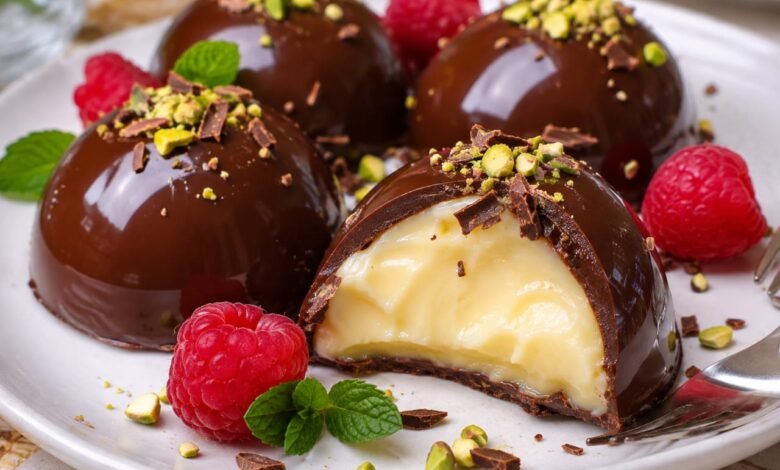
Imagine cracking through a smooth chocolate shell to discover a rich, creamy vanilla custard hidden inside. These Chocolate Covered Custard Desserts combine the elegance of a bakery-style treat with the comfort of homemade pudding.
Each individual dessert features a delicate chocolate coating filled with silky vanilla custard. The combination of rich chocolate and fragrant vanilla makes these little treats perfect for dinner parties, holidays, celebrations, or whenever you want something special.
Best of all, you can prepare them ahead of time. With a few simple ingredients, silicone molds, and a little patience, you can create beautiful chocolate custard desserts right in your own kitchen.
Why You’ll Love These Chocolate Covered Custard Desserts
- Two delicious textures: A crisp chocolate exterior surrounds a smooth, creamy custard filling.
- Homemade vanilla flavor: Milk, cream, egg yolks, and vanilla create a rich custard from scratch.
- Beautiful individual portions: Silicone molds make it easy to create elegant desserts.
- Make-ahead friendly: Prepare and freeze the desserts before your guests arrive.
- Easy to customize: Add berries, chopped nuts, caramel, or a little sea salt.
Ingredients You’ll Need
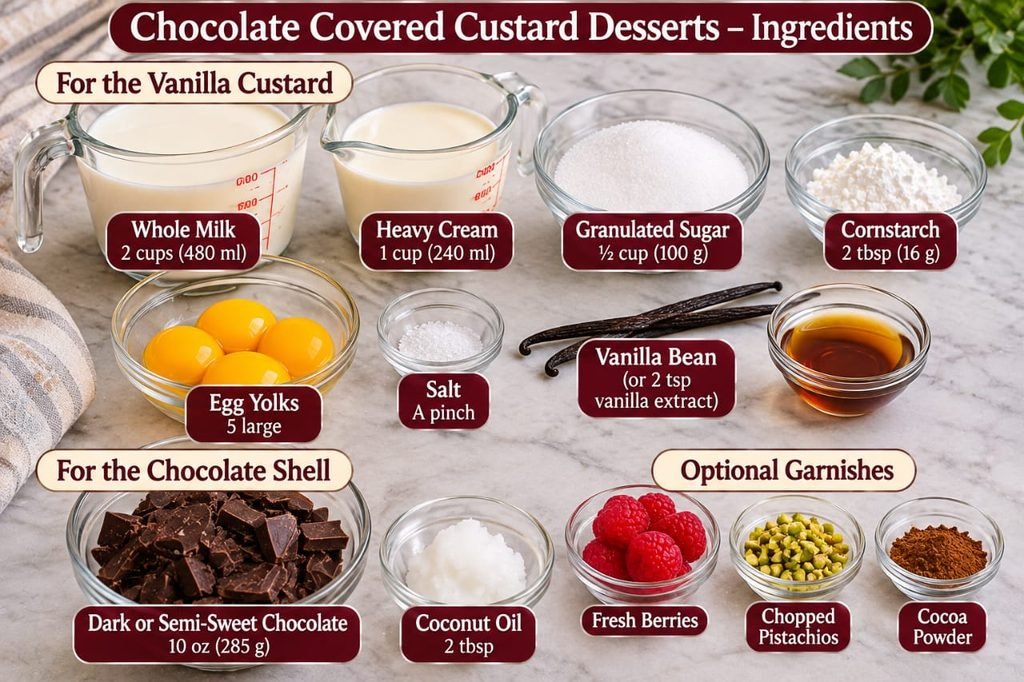
These ingredients make approximately 6 to 8 individual chocolate custard desserts, depending on the size of your molds.
For the Vanilla Custard Filling
- 2 cups (480ml) whole milk: Provides the creamy base.
- 1 cup (240ml) heavy cream: Adds richness and a smooth texture.
- 1 vanilla bean or 2 teaspoons pure vanilla extract: Gives the custard its warm vanilla aroma.
- 5 large egg yolks: Add richness and help create a smooth custard.
- 1/2 cup (100g) granulated sugar: Sweetens the filling.
- 2 tablespoons (about 16g) cornstarch: Helps the custard become thick enough to hold its shape inside the chocolate shell.
- A pinch of fine sea salt: Balances the sweetness.
For the Chocolate Shell
- 10 oz (285g) good-quality semi-sweet or dark chocolate: Chopped into small pieces for easier melting.
- 2 tablespoons refined coconut oil: Helps create a smooth chocolate coating that firms up when chilled.
Optional Garnishes
- Fresh raspberries or strawberries.
- Unsweetened cocoa powder.
- Chopped pistachios or toasted hazelnuts.
- A small pinch of flaky sea salt.
Equipment
- 6 to 8 small silicone hemisphere molds or suitable silicone dessert molds.
- Medium saucepan.
- Heatproof mixing bowls.
- Fine-mesh strainer.
- Whisk and silicone spatula.
- Pastry brush or small spoon.
- Flat tray that fits in your freezer.
How to Make Chocolate Covered Custard Desserts
Step 1: Prepare the Vanilla
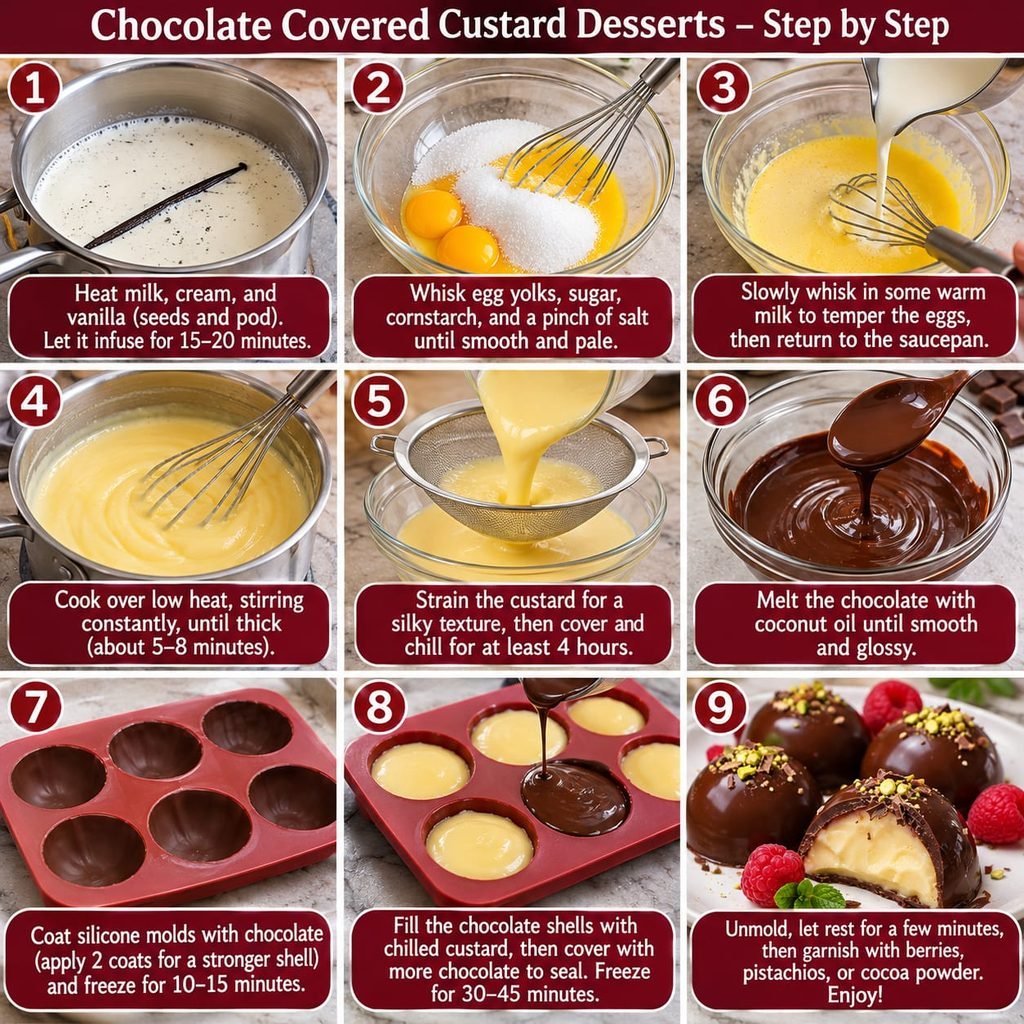
If using a vanilla bean, slice it lengthwise with a small knife. Scrape out the seeds using the back of the knife.
Add the milk, heavy cream, vanilla seeds, and empty vanilla pod to a medium saucepan. Heat over medium heat until small bubbles appear around the edges. Do not let the mixture boil vigorously.
Remove from the heat, cover, and let the vanilla infuse for 15 to 20 minutes. Remove the empty pod before continuing.
Step 2: Whisk the Egg Yolks and Sugar
In a medium heatproof bowl, whisk together the egg yolks, granulated sugar, cornstarch, and salt until smooth and slightly thickened.
Make sure the cornstarch is fully incorporated so the finished custard does not contain lumps.
Step 3: Temper the Egg Mixture
Slowly drizzle about 1/2 cup of the warm milk and cream mixture into the egg yolks while whisking constantly. This gradually warms the yolks and helps prevent them from scrambling.
Gradually pour the tempered egg mixture back into the saucepan with the remaining dairy, whisking continuously.
Step 4: Cook Until Thick and Creamy
Place the saucepan over medium-low heat. Whisk constantly, paying attention to the bottom and corners of the pan.
Continue cooking until the custard becomes noticeably thick and begins to bubble gently. Once it reaches a gentle bubble, cook for approximately 1 minute while whisking continuously to activate the cornstarch.
The finished custard should be thick, smooth, and able to hold its shape on a spoon. Remove from the heat.
Step 5: Strain and Chill the Custard
Pour the hot custard through a fine-mesh strainer into a clean bowl. Stir in the vanilla extract if you used it instead of a vanilla bean.
Cover the surface directly with plastic wrap to prevent a skin from forming. Cool briefly, then refrigerate for at least 4 hours or until completely cold and firm.
Do not assemble the chocolate desserts while the custard is warm. Warm filling can melt the chocolate shell.
Step 6: Melt the Chocolate
Place the chopped chocolate and refined coconut oil in a heatproof bowl. Set the bowl over a saucepan of barely simmering water, making sure the bottom of the bowl does not touch the water.
Stir gently until the chocolate is completely melted and smooth. Remove from the heat and allow it to cool slightly so it is still fluid but not hot.
Keep water away from the chocolate, as even a small amount can cause it to seize.
Step 7: Create the Chocolate Shells
Place the silicone molds on a flat tray. Using a pastry brush or small spoon, coat the inside of each mold with melted chocolate.
Make sure the chocolate covers the bottom and sides evenly, without leaving thin spots. Place the tray in the freezer for about 10 to 15 minutes, until the chocolate is firm.
For a stronger shell, apply a second coat of chocolate and freeze for another 10 minutes.
Step 8: Fill with Vanilla Custard
Remove the molds from the freezer. Spoon or pipe the chilled custard into each chocolate shell, leaving a small space at the top for the chocolate base.
Gently smooth the filling without pressing too hard against the sides of the shell.
Step 9: Seal the Desserts
If necessary, gently rewarm the remaining chocolate until it becomes fluid again.
Spoon a layer of chocolate over each filled mold, covering the custard completely. Use a small spatula to smooth the surface and remove excess chocolate around the edges.
Return the tray to the freezer for 30 to 45 minutes, or until the chocolate is completely firm and the desserts are solid enough to release from the molds.
Step 10: Unmold and Serve
Carefully peel the silicone molds away from the chocolate shells. Avoid squeezing the desserts, as the chocolate can crack if handled roughly.
Place the desserts in the refrigerator for a few minutes before serving, or allow them to stand briefly at room temperature until the custard reaches a creamy texture.
Finish with fresh berries, chopped pistachios, cocoa powder, or a tiny pinch of flaky sea salt.
Tips for Perfect Chocolate Covered Custard Desserts
- Use good-quality chocolate: Choose chocolate you enjoy eating on its own. It makes a noticeable difference in the final dessert.
- Keep the custard cold: Always use completely chilled, thick custard when filling the chocolate shells.
- Build an even shell: Pay special attention to the edges and sides of the molds. Thin spots can crack during unmolding.
- Apply a second chocolate coat: This helps create a sturdier shell that is less likely to break.
- Do not rush the freezing: Make sure the chocolate is fully set before removing the desserts from the molds.
- Use dry equipment: Water can make melted chocolate seize and become grainy.
Common Problems and How to Fix Them
Why Is My Custard Too Runny?
The custard may not have cooked long enough for the cornstarch to thicken properly. Return it to the saucepan and gently reheat while whisking until it reaches a thick consistency and briefly bubbles. Cool it completely before using.
Why Did My Custard Become Lumpy?
The heat may have been too high, or the mixture may not have been stirred continuously. Strain the custard through a fine-mesh sieve while it is still warm. Gentle heating and constant whisking help prevent lumps.
Why Does My Chocolate Shell Break?
The shell may be too thin or the dessert may have been handled before it was fully set. Apply a second coat of chocolate and allow enough time in the freezer before unmolding.
Why Is the Chocolate Shell Soft?
Chocolate mixed with coconut oil is not the same as professionally tempered chocolate. It firms up when cold but can soften at warmer room temperatures. Keep the desserts refrigerated or frozen until close to serving time.
Delicious Variations
- Dark Chocolate Custard Desserts: Use dark chocolate with a higher cocoa percentage for a richer, less sweet finish.
- White Chocolate Shell: Replace the semi-sweet chocolate with white chocolate and pair it with fresh raspberries.
- Chocolate Hazelnut Custard: Add a spoonful of chocolate hazelnut spread to the cooled custard and mix until smooth.
- Caramel Custard Cups: Add a thin layer of thick caramel sauce over the chilled custard before sealing with chocolate.
- Coffee Vanilla Custard: Infuse the warm milk and cream with a small amount of instant espresso powder.
How to Store Chocolate Covered Custard Desserts
Because these desserts contain milk, cream, and egg yolks, they must be kept refrigerated or frozen.
- Refrigerator: Store in an airtight container for up to 2 days. The chocolate shell may gradually soften, depending on the chocolate and room temperature.
- Freezer: Store in a freezer-safe airtight container for up to 1 week for the best texture and flavor.
- Before serving: Allow frozen desserts to soften in the refrigerator or briefly at room temperature until the custard is creamy but the chocolate shell remains firm.
Frequently Asked Questions
Can I Make Chocolate Covered Custard Desserts Ahead of Time?
Yes. You can prepare the custard a day ahead and assemble the chocolate desserts once it is completely chilled. Keep the finished desserts in an airtight container in the freezer until serving.
Can I Use Vanilla Extract Instead of a Vanilla Bean?
Absolutely. Use 2 teaspoons of pure vanilla extract. Stir it into the custard after removing the saucepan from the heat to preserve its aroma.
Do I Need Silicone Molds?
Silicone molds make it much easier to create individual chocolate shells and release the finished desserts. Small silicone dome molds work particularly well. Ramekins are useful for serving custard, but they do not provide the same easy chocolate-shell release.
Can I Use Chocolate Chips?
Yes, but choose good-quality chocolate chips designed for melting. Chopped chocolate bars or couverture chocolate generally melt more smoothly and produce a better coating.
Can I Make These Desserts Without Coconut Oil?
Yes. You can melt the chocolate without coconut oil, but the coating may be thicker and harder. For a more professional chocolate shell, use properly tempered chocolate instead.
How Long Should I Let Them Sit Before Serving?
Allow frozen desserts to soften briefly before serving. The exact time depends on their size and how cold they are. Check the center to make sure the custard is creamy rather than frozen solid.
A Beautiful Dessert Worth Sharing
These Chocolate Covered Custard Desserts bring together everything we love about a special homemade treat: a delicate chocolate shell, creamy vanilla filling, and a beautiful individual presentation.
Prepare them for a celebration, serve them after dinner, or keep a few in the freezer for a special occasion. With their rich chocolate coating and smooth custard center, these little desserts are sure to make an impression.
Enjoy every creamy, chocolate-filled bite!