Imagine biting into a golden, crisp pastry shell and discovering a smooth, rich vanilla custard inside. These Creamy Custard Cannoli bring together two irresistible textures: a delicate, blistered shell and a silky homemade pastry cream.
Unlike the familiar ricotta-filled version, this variation uses traditional Italian vanilla custard, also known as crema pasticcera. The shells are made from scratch, rolled thin, wrapped around cannoli tubes, and fried until beautifully golden.
Whether you’re preparing an Italian-inspired dessert for a family gathering or simply want to try something special, this step-by-step recipe will help you make delicious custard cannoli at home.
Why You’ll Love These Creamy Custard Cannoli
- Crispy homemade shells: Thin pastry fries into golden shells with delicate bubbles.
- Silky vanilla filling: Homemade custard made with milk, egg yolks, vanilla, and butter.
- Made from scratch: Both the pastry and filling are prepared in your kitchen.
- Easy to customize: Finish with pistachios, mini chocolate chips, or candied orange peel.
- Perfect for entertaining: Prepare the shells and custard ahead, then fill just before serving.
Ingredients for Creamy Custard Cannoli
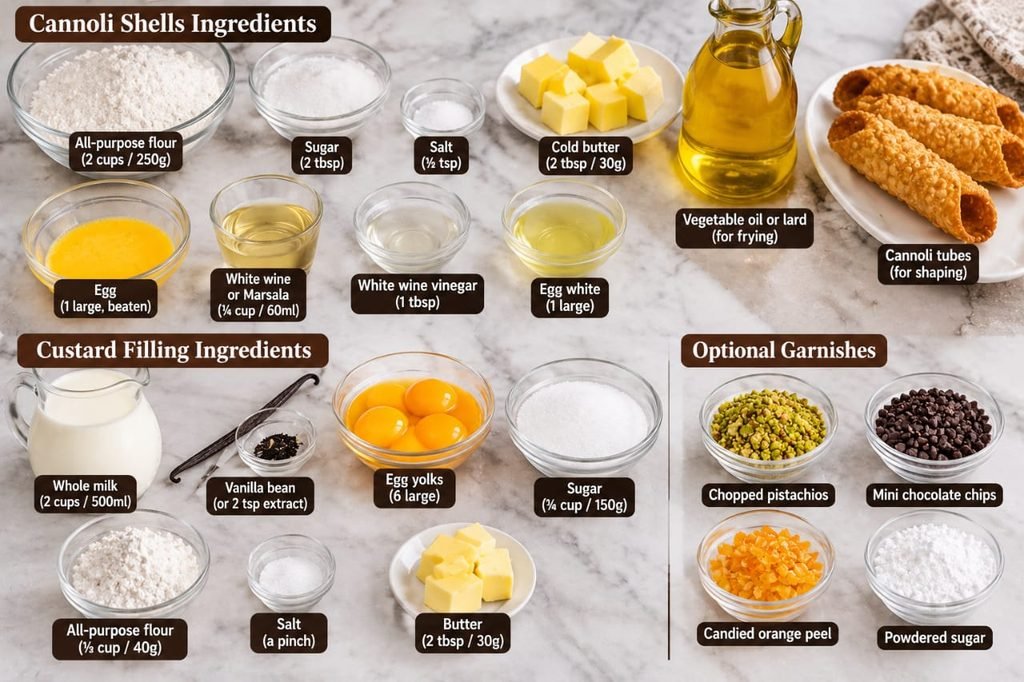
For the Cannoli Shells
- 2 cups (250g) all-purpose flour
- 2 tablespoons granulated sugar
- ½ teaspoon salt
- 2 tablespoons (30g) cold unsalted butter, cubed
- 1 large egg, lightly beaten
- ¼ cup (60ml) dry white wine or Marsala wine, at room temperature
- 1 tablespoon white wine vinegar
- 1 large egg white, for sealing
- Vegetable oil or lard, for deep-frying (about 1 quart, as needed)
For the Vanilla Custard Filling (Crema Pasticcera)
- 2 cups (500ml) whole milk
- 1 vanilla bean or 2 teaspoons pure vanilla extract
- 6 large egg yolks
- ¾ cup (150g) granulated sugar
- ⅓ cup (40g) all-purpose flour
- A pinch of salt
- 2 tablespoons (30g) unsalted butter, softened
Optional Garnishes
- Powdered sugar, for dusting
- Finely chopped pistachios
- Mini chocolate chips
- Finely chopped candied orange peel
Equipment You’ll Need
- Metal cannoli tubes
- Rolling pin or pasta machine
- 4- to 5-inch round cookie cutter
- Deep, heavy-bottomed saucepan or pot
- Kitchen thermometer
- Whisk and mixing bowls
- Slotted spoon or tongs
- Wire cooling rack
- Piping bag with a round or star-shaped tip
How to Make Creamy Custard Cannoli
Part 1: Make the Cannoli Dough
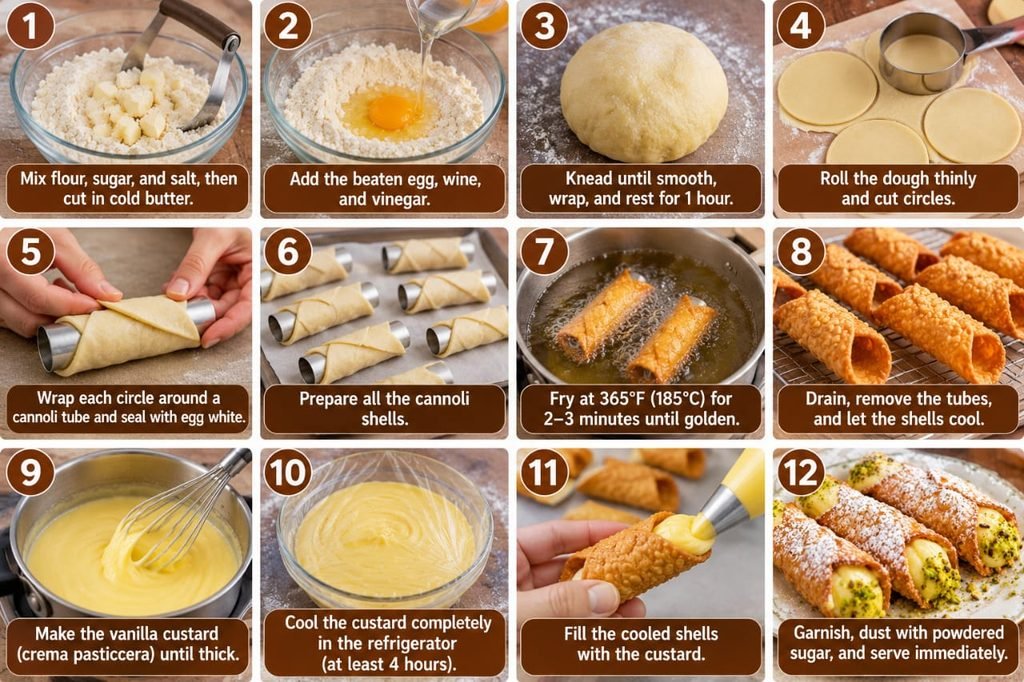
- Combine the dry ingredients. In a large mixing bowl, whisk together the flour, granulated sugar, and salt until evenly combined.
- Work in the butter. Add the cold, cubed butter. Rub it into the flour using your fingertips or a pastry cutter until the mixture resembles coarse breadcrumbs.
- Add the wet ingredients. Make a well in the center and add the beaten egg, wine, and white wine vinegar. Mix with a fork until a rough dough begins to form.
- Knead and rest. Transfer the dough to a lightly floured surface. Knead for about 5 minutes until smooth and elastic. Shape into a disc, wrap tightly, and rest at room temperature for at least 1 hour.
Part 2: Shape and Fry the Cannoli Shells
- Roll the dough thinly. Divide the rested dough in half. Roll each portion using a pasta machine or rolling pin until approximately 1–2mm thick. Thin dough helps create crisp, delicate shells.
- Cut the circles. Use a 4- to 5-inch round cutter to cut circles. Gather and reroll the scraps once if needed. The recipe should yield approximately 12–16 shells, depending on the cutter size and dough thickness.
- Wrap around the tubes. Lightly brush one edge of each dough circle with egg white. Wrap it around a metal cannoli tube, overlapping the edges and pressing firmly to seal. Keep the egg white away from the metal tube where possible.
- Heat the frying oil. Add enough vegetable oil or lard to a deep pot to reach a depth of about 2–3 inches. Heat to 365°F (185°C), checking with a kitchen thermometer.
- Fry until golden. Carefully lower 2–3 wrapped tubes into the hot oil at a time. Fry for approximately 2–3 minutes, turning as needed, until the pastry is golden and blistered. Avoid overcrowding the pot, which can lower the oil temperature.
- Remove and cool. Lift the tubes out with tongs and place them on a wire rack lined with paper towels underneath. After 1–2 minutes, when cool enough to handle safely, gently twist and slide the metal tubes out of the shells.
- Cool completely. Let the shells cool completely before filling. They should feel crisp and dry.
Part 3: Prepare the Vanilla Custard
- Infuse the milk. Pour the milk into a medium saucepan. If using a vanilla bean, split it lengthwise, scrape out the seeds, and add both the seeds and pod to the milk. Heat over medium heat until steaming and just beginning to simmer. Remove from the heat, cover, and let infuse for 15 minutes. Remove the pod.
- Whisk the egg yolks and sugar. In a separate bowl, whisk the egg yolks and sugar for 2–3 minutes until pale, thick, and creamy.
- Add the flour. Sift the flour and salt into the yolk mixture. Whisk until a smooth paste forms without visible lumps.
- Temper the egg mixture. Slowly drizzle about one-third of the warm milk into the yolk mixture while whisking constantly. This gradually raises the temperature of the eggs and helps prevent scrambling.
- Combine everything. Pour the tempered mixture back into the saucepan with the remaining milk, whisking continuously.
- Cook until thick. Return the saucepan to medium-low heat. Whisk constantly, paying attention to the bottom and corners, until the custard thickens and reaches a gentle boil. Continue cooking for 1–2 minutes while whisking to cook the flour properly.
- Finish with butter and vanilla. Remove from the heat and whisk in the softened butter until smooth and glossy. If using vanilla extract instead of a bean, stir it in now.
- Strain if necessary. If you notice any lumps, pass the warm custard through a fine-mesh sieve.
- Chill thoroughly. Transfer the custard to a clean bowl. Press plastic wrap directly against the surface to prevent a skin from forming. Refrigerate for at least 4 hours, or preferably overnight, until completely cold and firm.
Part 4: Fill and Decorate the Cannoli
- Prepare the custard. Once chilled, whisk the custard briefly until smooth and transfer it to a piping bag fitted with a large round or star tip.
- Fill the shells. Insert the piping tip into one end of a completely cooled shell. Pipe custard toward the center, then fill from the opposite end until the shell is evenly filled.
- Add the garnish. Dip the exposed custard at each end into chopped pistachios, mini chocolate chips, or candied orange peel.
- Dust and serve. Arrange the cannoli on a serving plate and dust with powdered sugar just before serving.
Expert Tips for Perfect Custard Cannoli
Roll the Dough Very Thin
Thick pastry can become heavy instead of crisp. Aim for approximately 1–2mm thickness so the shells fry evenly and develop their characteristic delicate texture.
Keep the Oil Temperature Steady
Use a kitchen thermometer to maintain approximately 365°F (185°C). Oil that is too cool can make the shells greasy, while excessively hot oil can brown them before they cook through.
Seal the Dough Properly
Press the overlapping dough edges firmly together with a little egg white. A loose seam may open during frying and cause the shell to lose its shape.
Cool the Custard Completely
Warm custard can soften the pastry almost immediately. Refrigerate it until thoroughly cold and firm before transferring it to a piping bag.
Fill Just Before Serving
This is one of the most important secrets to crisp cannoli. The moisture in the custard gradually softens the shells, so fill only the quantity you plan to serve.
Common Cannoli Problems and How to Fix Them
Why Are My Cannoli Shells Not Crispy?
The dough may be too thick, the frying oil may be too cool, or the shells may not have cooled and dried properly. Roll the dough thinner, monitor the oil temperature, and cool the shells completely on a wire rack.
Why Did My Cannoli Shells Open During Frying?
The overlapping edges may not have been sealed firmly enough. Brush a small amount of egg white along the edge and press the seam securely around the tube before frying.
Why Is My Custard Lumpy?
The eggs may have heated too quickly, or the custard may not have been whisked consistently. Temper the yolks slowly with warm milk and keep whisking while cooking. If lumps remain, strain the custard before chilling.
Why Is My Custard Too Thin?
The custard may not have cooked long enough to activate and thicken the flour. Return it to gentle heat and whisk continuously until thickened and bubbling gently. Cool completely before judging its final consistency.
Variations and Decoration Ideas
- Chocolate-dipped cannoli: Dip the cooled shell ends in melted chocolate and allow the coating to set before filling.
- Pistachio cannoli: Finish both ends with finely chopped pistachios for a nutty contrast.
- Chocolate chip cannoli: Add mini chocolate chips to the exposed custard ends for extra texture.
- Citrus custard cannoli: Add a little finely grated orange zest to the custard for a fresh aroma.
- Candied orange cannoli: Decorate the ends with finely chopped candied orange peel for a classic Italian-inspired finish.
Make-Ahead and Storage Instructions
Can You Make Cannoli Shells Ahead?
Yes. Prepare and cool the empty shells completely, then store them in an airtight container at room temperature for up to 3 days. Keep them away from humidity.
Can You Make the Custard Ahead?
Yes. Prepare the vanilla custard up to 2 days ahead and keep it covered in the refrigerator. Press plastic wrap directly against the surface to prevent a skin from forming.
How Should Filled Cannoli Be Stored?
Filled cannoli are best served immediately. The shells gradually absorb moisture from the custard and lose their crispness. For the best texture, assemble only shortly before serving.
Frequently Asked Questions
Are custard cannoli different from traditional ricotta cannoli?
Yes. Traditional Sicilian cannoli are commonly filled with sweetened ricotta, while this variation uses vanilla pastry custard, or crema pasticcera. Both have crisp pastry shells, but the fillings have different flavors and textures.
What is crema pasticcera?
Crema pasticcera is Italian pastry cream made with milk, egg yolks, sugar, flour or starch, and vanilla or other flavorings. It is cooked until thick and used in many Italian desserts.
Can I use store-bought cannoli shells?
Absolutely. Store-bought shells are a convenient shortcut. Let them reach room temperature if needed, prepare the custard as directed, and fill the shells shortly before serving.
Can I make cannoli without metal tubes?
Metal cannoli tubes are the safest and most reliable option for shaping and frying the pastry. Use purpose-made food-safe cannoli molds rather than improvised materials that may not be suitable for deep-frying.
Can I freeze custard cannoli?
Freezing fully assembled cannoli is not recommended because the pastry can lose its crisp texture and the custard may change consistency after thawing. It is better to prepare the components separately and assemble them fresh.
How do I keep cannoli crispy?
Store empty shells in an airtight container, refrigerate the custard separately, and fill the shells just before serving. Avoid leaving filled cannoli at room temperature for extended periods.
Final Thoughts
These Creamy Custard Cannoli are a beautiful homemade dessert that combines crisp golden pastry with smooth, rich vanilla cream. Making the shells from scratch takes a little patience, but the result is worth the effort.
Prepare the pastry and custard ahead, fill the shells at the last moment, and finish with your favorite toppings. One bite delivers a lovely contrast of crunch and creaminess that makes these Italian-inspired pastries especially memorable.
Serve them with coffee or espresso and enjoy a little taste of Italian pastry-making at home!
Recipe Notes
- Recipe: Creamy Custard Cannoli
- Filling: Homemade vanilla pastry custard (crema pasticcera)
- Shells: Homemade fried pastry
- Yield: Approximately 12–16 cannoli, depending on shell size
- Chilling: At least 4 hours for the custard
- Best serving advice: Fill immediately before serving