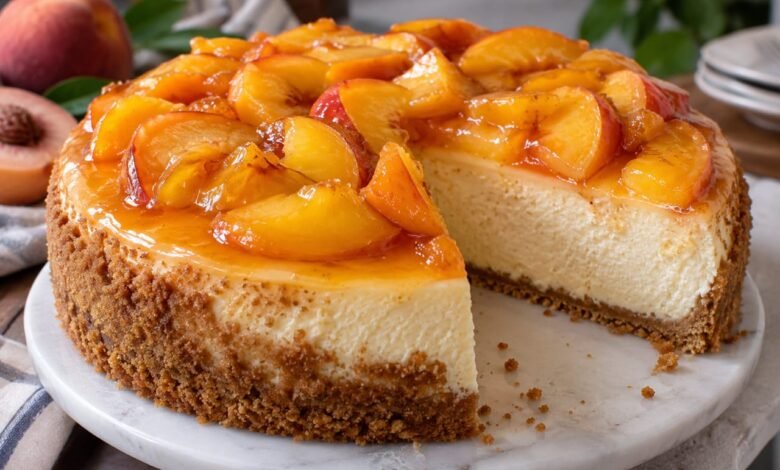
This juicy peach cheesecake combines a buttery graham cracker crust, a rich and silky cream cheese filling, and a fresh peach topping that brings a bright, fruity finish to every slice. It is an inviting dessert for summer gatherings, family celebrations, or any occasion when ripe peaches are at their best.
What makes this peach cheesecake special is the contrast between its three layers. The lightly crisp crust supports a smooth, tangy filling, while the peaches add natural sweetness and a refreshing flavor. A gentle water bath helps the cheesecake bake evenly, and a slow cooling process helps reduce the risk of deep cracks.
Although this dessert looks impressive, the preparation is straightforward when you follow each stage carefully. Prepare the crust first, mix the filling without incorporating too much air, and finish with a glossy homemade peach topping.
What Makes This Peach Cheesecake Different?
- A balanced fruit topping: Fresh peaches provide sweetness and acidity that complement the rich cream cheese filling.
- A firm, buttery base: Graham cracker crumbs create a crust that holds together when the cheesecake is sliced.
- A smooth center: Room-temperature ingredients help the filling blend evenly without unnecessary mixing.
- Gentle baking: A water bath helps maintain a moist baking environment and reduces sudden temperature changes.
- A fresh finish: The peach topping adds color and texture without requiring complicated decoration.
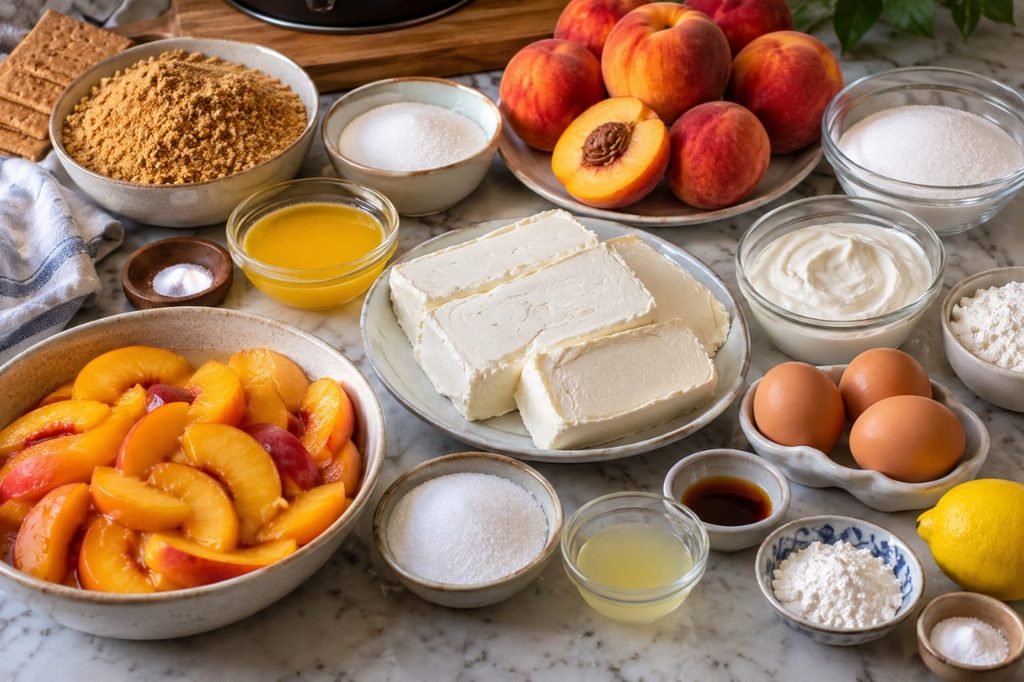
Ingredients for Peach Cheesecake
For the most consistent results, measure the ingredients before you begin. Choose ripe but firm peaches so they retain some texture when cooked.
For the Graham Cracker Crust
- 1 1/2 cups (150 g) graham cracker crumbs
- 1/3 cup (75 g) granulated sugar
- 6 tablespoons (85 g) unsalted butter, melted
- A pinch of salt
For the Creamy Cheesecake Filling
- 24 ounces (680 g) full-fat cream cheese, softened to room temperature
- 1 cup (200 g) granulated sugar
- 1 cup (240 ml) full-fat sour cream, at room temperature
- 3 large eggs, at room temperature
- 2 teaspoons pure vanilla extract
- 1/4 cup (30 g) all-purpose flour
- 1 tablespoon fresh lemon juice
- A pinch of salt
For the Juicy Peach Topping
- 4–5 large ripe peaches, peeled, pitted, and sliced
- 1/2 cup (100 g) granulated sugar, adjusted to the sweetness of the peaches
- 1 tablespoon fresh lemon juice
- 1 teaspoon cornstarch mixed with 1 tablespoon water
- 1/2 teaspoon vanilla extract
Essential Equipment for the Best Results
- One 9-inch springform pan
- A large roasting pan for the water bath
- Heavy-duty aluminum foil
- A hand mixer or stand mixer
- A mixing bowl and silicone spatula
- A small saucepan for the peach topping
- A wire cooling rack
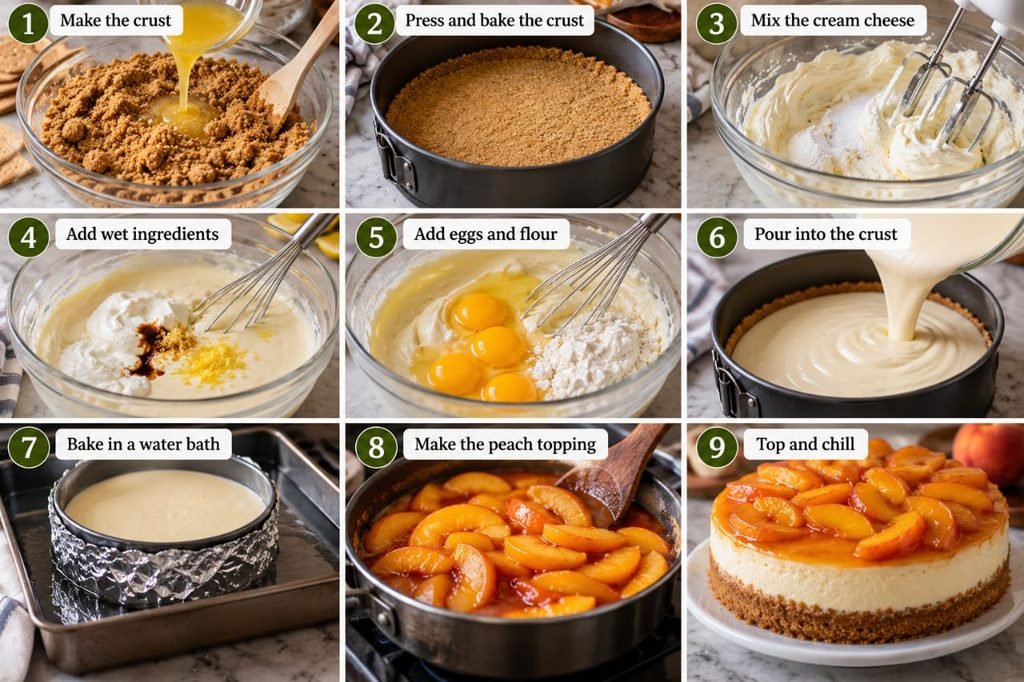
How to Make Peach Cheesecake Step by Step
Step 1: Prepare the Pan and Oven
Preheat the oven to 325°F (160°C). Lightly grease a 9-inch springform pan and line the bottom with parchment paper if desired.
Wrap the outside bottom and sides of the pan with two layers of heavy-duty aluminum foil. Make sure the foil reaches high enough to protect the pan from water entering during baking. This preparation is especially important when using a water bath.
Step 2: Make the Graham Cracker Crust
Combine the graham cracker crumbs, sugar, and salt in a medium bowl. Pour in the melted butter and stir until the mixture resembles damp sand. When pressed between your fingers, the crumbs should hold together.
Transfer the mixture to the prepared springform pan. Press it firmly across the bottom and slightly up the sides, creating an even layer. The flat bottom of a measuring cup works well for compacting the crumbs.
Bake the crust for about 10 minutes. Remove it from the oven and let it cool slightly while you prepare the filling. Reduce the oven temperature to 300°F (150°C).
Step 3: Beat the Cream Cheese Until Smooth
Place the softened cream cheese in a large mixing bowl. Beat on medium-low speed until smooth and free of visible lumps, scraping down the sides of the bowl as needed.
Use room-temperature cream cheese rather than cold cream cheese. Cold ingredients are harder to blend smoothly and may leave small lumps in the finished filling.
Step 4: Add the Sugar and Flavorings
Gradually add the granulated sugar and mix until incorporated. Add the sour cream, vanilla extract, lemon juice, and salt. Mix on low speed until the filling looks uniform and creamy.
The sour cream contributes a gentle tang that balances the sweetness, while lemon juice brightens the flavor without overpowering the peaches.
Step 5: Incorporate the Eggs Carefully
Add the eggs one at a time, mixing on low speed after each addition. Stop as soon as the egg disappears into the batter.
Avoid beating the mixture excessively at this stage. Too much incorporated air can cause the cheesecake to rise unevenly and then sink as it cools.
Sprinkle the flour over the filling and mix gently until no dry streaks remain. The batter should be smooth and thick rather than foamy.
Step 6: Fill the Crust and Prepare the Water Bath
Pour the cheesecake filling over the slightly cooled crust. Smooth the surface with a spatula, then tap the pan gently on the counter to release any large air bubbles.
Place the foil-wrapped springform pan inside a large roasting pan. Carefully pour hot water into the roasting pan until it reaches approximately halfway up the sides of the springform pan. Avoid splashing water onto the cheesecake.
Step 7: Bake Until the Center Is Just Set
Bake at 300°F (150°C) for approximately 60–75 minutes, checking the cheesecake toward the end of the baking period. The outer portion should look set, while the center should still have a slight, gentle wobble when the pan is moved.
Do not wait until the entire center becomes completely firm in the oven. The cheesecake will continue to set as it cools. Baking time can vary depending on the oven, pan, and starting temperature of the ingredients.
Step 8: Cool Slowly to Help Prevent Cracks
Turn off the oven and leave the cheesecake inside with the door slightly open for about 30–60 minutes. This gradual temperature change helps prevent the surface from contracting too quickly.
Carefully remove the springform pan from the water bath, remove the foil, and let the cheesecake cool to room temperature. Refrigerate it for at least 6 hours, preferably overnight, before adding the peach topping.
How to Make the Fresh Peach Topping
Step 9: Prepare the Peaches
Peel, pit, and slice the peaches into even pieces. If the fruit is exceptionally juicy, reserve some of the released juice for the saucepan rather than adding all the liquid immediately.
Place the sliced peaches in a saucepan with the sugar and lemon juice. Cook over medium-low heat, stirring gently, until the peaches begin to soften and release their juices.
Step 10: Thicken the Peach Sauce
Mix the cornstarch with one tablespoon of water in a small bowl to create a smooth slurry. Slowly stir it into the simmering peach mixture.
Cook for another 1–2 minutes, stirring gently, until the liquid becomes glossy and lightly thickened. Remove the saucepan from the heat and stir in the vanilla extract.
Allow the topping to cool completely before placing it on the chilled cheesecake. The sauce should coat the peaches without becoming stiff or sticky. If it seems too thick, stir in a small amount of water or reserved peach juice.
Step 11: Assemble and Chill Before Serving
Once the cheesecake is thoroughly chilled and the peach topping is cool, spoon the peaches over the surface. Spread them gently, keeping some of the slices visible for a natural, homemade appearance.
Refrigerate the finished cheesecake for another 20–30 minutes to help the topping settle. Run a thin knife around the inside edge of the springform pan before releasing the sides.
Use a sharp knife, wiping it clean between slices, to achieve neat portions with a clear view of the crust, creamy filling, and peach topping.
Tips for a Creamy Cheesecake With No Major Cracks
Bring the Ingredients to Room Temperature
Cream cheese, sour cream, and eggs blend more evenly when they are not refrigerator-cold. This helps create a smoother filling with fewer lumps.
Mix on Low Speed
Use a gentle mixing speed, particularly after adding the eggs. The goal is a uniform filling, not a whipped mixture full of air bubbles.
Protect the Springform Pan From Water
Use intact heavy-duty foil and wrap the pan carefully. Water entering the crust can make it soggy. If you are concerned about leaks, use an oven-safe roasting bag designed for this purpose around the outside of the pan, or another suitable water-bath method.
Do Not Overbake
A slight wobble in the center is a better sign than waiting for the entire cheesecake to become firm. Overbaking can produce a dry texture and increase the risk of cracking.
Cool Before Adding the Peaches
Warm peach sauce can soften the cheesecake surface and make the topping slide. Let the sauce cool fully, and make sure the cheesecake is well chilled before assembly.
Choosing the Best Peaches for Cheesecake
Fresh, fragrant peaches with a little give when gently pressed are ideal for this recipe. Very firm peaches may need additional cooking, while overly soft fruit can break down into a puree.
Yellow peaches usually provide a familiar sweet-tart flavor and attractive golden color. White peaches can also work, but their sweetness and acidity may differ. Adjust the sugar and lemon juice to suit the fruit.
If fresh peaches are unavailable, drained canned peach slices can be used. Since canned peaches are often packed in syrup, reduce the added sugar and cook them just long enough to create the desired topping consistency.
Common Peach Cheesecake Problems and Solutions
Why Did My Cheesecake Crack?
Cracks can develop when the filling is overmixed, the cheesecake is overbaked, or it cools too quickly. Use room-temperature ingredients, mix gently, check for a slight center wobble, and cool the cake gradually.
Why Is the Center Too Soft?
The cheesecake may need additional baking time or more chilling. If the center is still visibly liquid rather than gently wobbly, continue baking and check again. Allow at least 6 hours in the refrigerator before judging the final texture.
Why Is My Crust Crumbling?
The crumbs may not contain enough evenly distributed butter, or the crust may not have been pressed firmly enough. Mix until the crumbs resemble damp sand and compact them evenly before baking.
Why Is the Peach Topping Watery?
Peaches release different amounts of juice depending on ripeness. Simmer the fruit gently and add the cornstarch slurry gradually. Allow the topping to cool before spreading it over the cheesecake.
Storage and Make-Ahead Instructions
Because this cheesecake contains cream cheese, sour cream, and eggs, refrigerate it promptly. Store it covered in the refrigerator at 40°F (4°C) or below and consume it within 3–4 days for best quality.
For a make-ahead dessert, bake and chill the cheesecake the day before serving. Prepare the peach topping separately, refrigerate it in a covered container, and assemble the cake shortly before serving.
Individual portions can be frozen without the fresh peach topping for better texture. Wrap the slices securely and thaw them in the refrigerator. Fresh peach topping is best prepared and added separately after thawing.
Frequently Asked Questions
Can I make peach cheesecake the day before serving?
Yes. In fact, overnight refrigeration helps the filling become firm enough to slice cleanly. Add the cooled peach topping before serving or after the cheesecake has chilled completely.
Do I need a water bath for this recipe?
A water bath is recommended because it provides a gentler baking environment and helps the cheesecake cook more evenly. It cannot guarantee a crack-free surface, but careful mixing, baking, and cooling also make a difference.
Can I use frozen peaches?
Yes. Thaw frozen peaches and drain excess liquid before cooking them with the sugar and lemon juice. The cooking time may vary depending on how much moisture the fruit releases.
How can I make the peach topping less sweet?
Start with less sugar if your peaches are naturally sweet, then taste the mixture as it cooks. A little extra lemon juice can brighten the flavor, but add it gradually.
How do I get clean cheesecake slices?
Chill the cheesecake thoroughly, use a sharp knife dipped in warm water, and wipe the blade clean between cuts. This helps keep the peach topping and creamy filling from smearing across each slice.
Serving Ideas for Peach Cheesecake
Serve each slice chilled with a spoonful of the peach sauce. For a simple presentation, add a few fresh peach slices or a small mint leaf just before serving.
This cheesecake also pairs beautifully with unsweetened tea or freshly brewed coffee. Since the filling is rich and creamy, modest portions allow the fruit flavor to stand out without making the dessert feel too heavy.
Final Thoughts
This juicy peach cheesecake brings together a crisp graham cracker crust, a smooth cream cheese filling, and a bright homemade peach topping. Its appeal lies in the contrast between creamy and fruity textures rather than complicated decoration.
For the best result, take your time with each stage: bake the crust, mix the filling gently, use a water bath, cool the cheesecake gradually, and add the peach topping only after everything has cooled. These details help create a dessert that looks beautiful and slices cleanly.
When peaches are ripe and flavorful, this cheesecake is a wonderful way to turn seasonal fruit into a memorable homemade dessert.