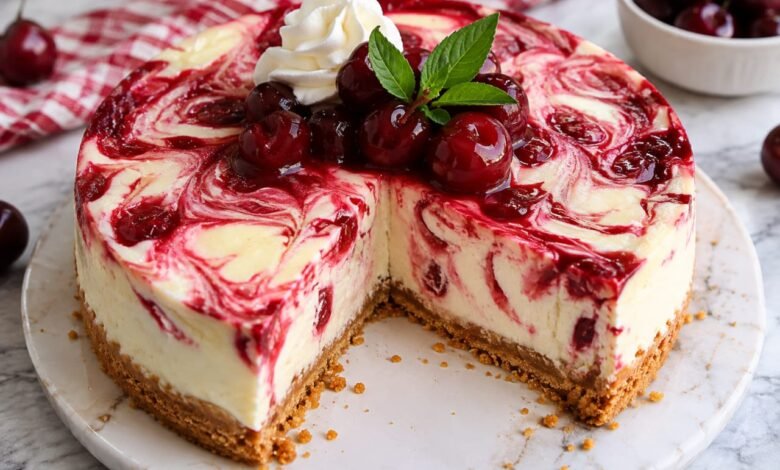
Imagine a buttery graham cracker crust topped with a fluffy, creamy cheesecake filling and beautiful ribbons of homemade cherry sauce. This No-Bake Cherry Swirl Cheesecake is an easy, elegant dessert that delivers all the delicious flavor of classic cheesecake without turning on the oven.
Made with softened cream cheese, freshly whipped cream, and a sweet-tart cherry sauce, this dessert is perfect for holidays, family gatherings, summer parties, or whenever you’re craving something special. The gorgeous cherry swirls make every slice look impressive, even though the recipe is surprisingly simple.
Prepare it ahead of time, let it chill until firm, and enjoy a refreshing cheesecake dessert that everyone will love.
Why You’ll Love This No-Bake Cherry Swirl Cheesecake
- No oven required: The crust and filling come together without baking.
- Rich and creamy filling: Cream cheese and freshly whipped cream create a light, fluffy texture.
- Homemade cherry swirl: A simple cherry sauce adds a beautiful color and a sweet-tangy fruit flavor.
- Perfect for special occasions: Its elegant appearance makes it ideal for holidays, potlucks, and celebrations.
- Make-ahead friendly: Prepare it the day before and let the refrigerator do the work.
Ingredients You’ll Need
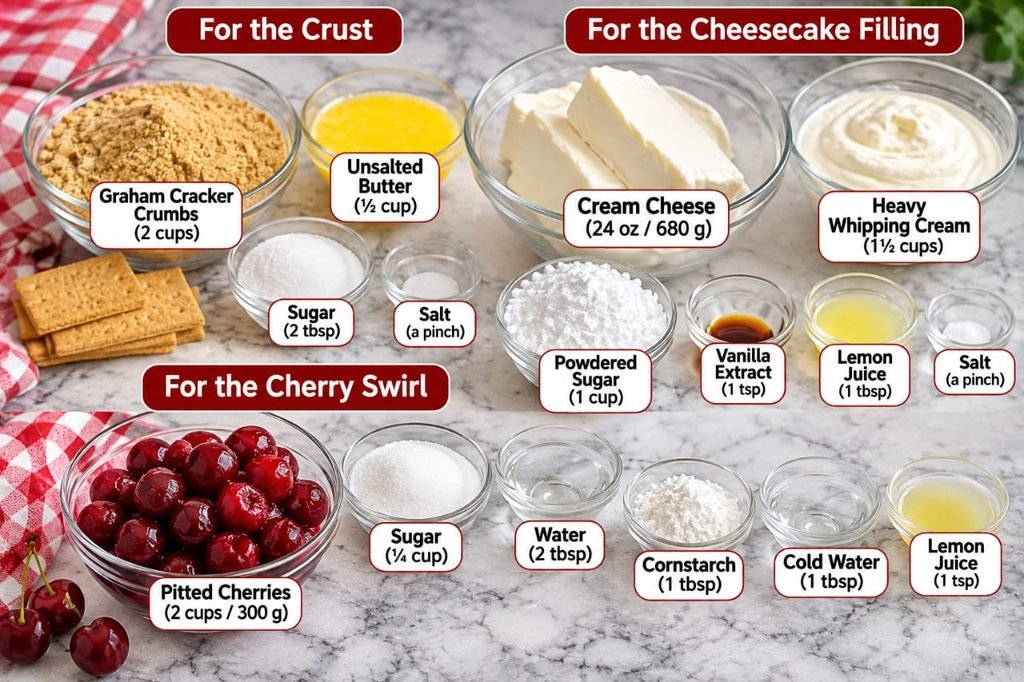
For the Graham Cracker Crust
- 2 cups (about 200g) graham cracker crumbs: Use finely crushed crumbs for a firm, even crust.
- ½ cup (115g) unsalted butter, melted: Binds the crumbs together.
- 2 tablespoons granulated sugar: Adds a little sweetness.
- A pinch of salt: Balances the buttery flavor.
For the No-Bake Cheesecake Filling
- 24 ounces (680g) full-fat cream cheese: Softened completely to room temperature.
- 1 cup (120g) powdered sugar: Sifted for a smooth filling.
- 1½ cups (360ml) cold heavy whipping cream: Whipped separately until stiff peaks form.
- 1 teaspoon pure vanilla extract: Adds classic cheesecake flavor.
- 1 tablespoon fresh lemon juice: Brightens the rich cream cheese filling.
- A pinch of salt: Enhances the overall flavor.
For the Homemade Cherry Swirl
- 2 cups (about 300g) fresh or frozen pitted cherries: Thaw frozen cherries before cooking.
- ¼ cup (50g) granulated sugar: Sweetens the fruit.
- 2 tablespoons water: Helps the cherries release their juices.
- 1 tablespoon cornstarch: Thickens the cherry sauce.
- 1 tablespoon cold water: Mix with the cornstarch to make a slurry.
- 1 teaspoon fresh lemon juice: Balances the sweetness.
How to Make No-Bake Cherry Swirl Cheesecake
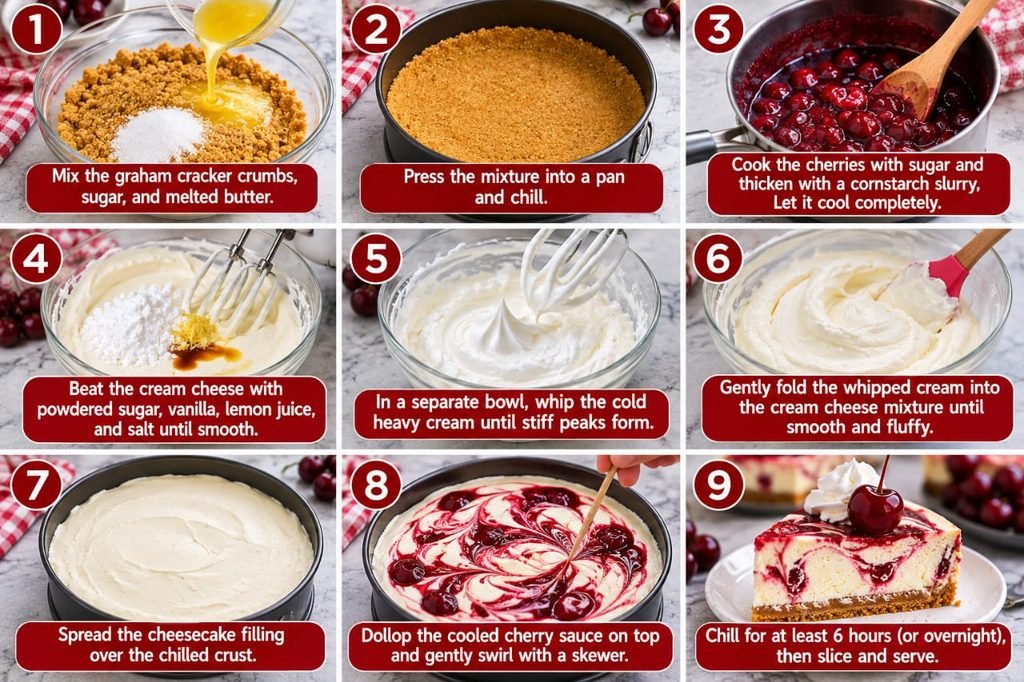
Step 1: Prepare the Graham Cracker Crust
If using whole graham crackers, crush them in a food processor until they become fine crumbs. You can also place them in a sealed plastic bag and crush them with a rolling pin.
Combine the graham cracker crumbs, melted butter, sugar, and salt in a medium bowl. Stir until the crumbs are evenly moistened and resemble wet sand.
Transfer the mixture to a 9-inch springform pan. Press it firmly and evenly into the bottom using the flat bottom of a measuring cup.
Refrigerate the crust while preparing the filling. Chilling helps the butter firm up and holds the crust together.
Step 2: Make the Homemade Cherry Sauce
Combine the pitted cherries, granulated sugar, and water in a medium saucepan over medium heat.
Cook for about 8–10 minutes, stirring occasionally, until the cherries soften and release their juices.
In a small bowl, mix the cornstarch with 1 tablespoon of cold water until smooth. Slowly stir this slurry into the simmering cherry mixture.
Continue cooking for another 2–3 minutes, stirring constantly, until the sauce thickens and becomes glossy.
Remove the saucepan from the heat and stir in the lemon juice. Allow the cherry sauce to cool completely before using it on the cheesecake. You can leave it slightly chunky or blend it for a smoother texture.
Step 3: Prepare the Creamy Cheesecake Filling
Place the softened cream cheese in a large mixing bowl. Beat with an electric mixer on medium speed for about 2 minutes, scraping down the sides as needed, until completely smooth and creamy.
Add the sifted powdered sugar, vanilla extract, lemon juice, and salt. Mix on low speed until combined, then beat briefly until smooth.
In a separate chilled bowl, whip the cold heavy cream using a clean mixer attachment. Beat until stiff peaks form. Be careful not to overwhip, or the cream may become grainy.
Using a rubber spatula, gently fold the whipped cream into the cream cheese mixture in two or three additions. Use slow, sweeping movements to keep the filling light and airy.
Continue folding just until no white streaks remain. The finished filling should be thick, fluffy, and spreadable.
Step 4: Assemble the Cheesecake
Remove the chilled crust from the refrigerator. Spoon the cheesecake filling over the crust and spread it into an even layer.
Add small spoonfuls of the completely cooled cherry sauce across the surface of the filling.
Use a toothpick, skewer, or thin knife to gently create swirls through the cherry sauce. Make a few figure-eight movements to create a beautiful marbled pattern.
Avoid over-swirling because too much mixing can turn the filling pink instead of creating distinct cherry ribbons.
Step 5: Chill Until Firm
Cover the cheesecake carefully with plastic wrap without pressing it against the surface.
Refrigerate for at least 6 hours, preferably overnight. This resting time allows the filling to firm up and makes the cheesecake easier to slice.
Step 6: Slice and Serve
Once fully chilled, run a thin knife around the inside edge of the springform pan before releasing the sides.
For clean slices, dip a sharp knife in hot water, wipe it dry, and cut the cheesecake. Repeat between slices.
Serve each slice with extra cherry sauce, fresh cherries, or a little whipped cream if desired.
Tips for the Best No-Bake Cherry Swirl Cheesecake
- Soften the cream cheese: Room-temperature cream cheese blends smoothly and prevents lumps in the filling.
- Use cold whipping cream: Cold cream whips more easily and helps create a stable, fluffy filling.
- Don’t overmix the whipped cream: Fold it gently into the cream cheese mixture to preserve its airy texture.
- Cool the cherry sauce completely: Warm sauce can soften the filling and ruin the decorative swirl.
- Press the crust firmly: A tightly packed crust is less likely to crumble when slicing.
- Allow enough chilling time: Overnight chilling gives the cheesecake its best texture and cleanest slices.
- Don’t over-swirl: A few gentle movements create more attractive cherry ribbons.
Easy Variations
Blueberry Swirl Cheesecake
Replace the cherries with fresh or frozen blueberries. Cook them with sugar, water, and cornstarch using the same method.
Raspberry Swirl Cheesecake
Use raspberries for a brighter, tangier fruit swirl. Strain the cooked sauce if you prefer to remove the seeds.
Strawberry Swirl Cheesecake
Chop fresh or frozen strawberries and prepare the sauce just as you would the cherry topping.
Chocolate Cherry Cheesecake
Add a light drizzle of melted chocolate over the finished cheesecake or sprinkle mini chocolate chips over the filling before chilling.
Vanilla Wafer Crust
Replace the graham cracker crumbs with finely crushed vanilla wafers for a sweeter, buttery crust.
Serving Suggestions
This cherry swirl cheesecake is delicious on its own, but you can make each serving extra special with:
- Extra homemade cherry sauce
- Fresh pitted cherries
- A dollop of whipped cream
- Chocolate shavings
- A light dusting of powdered sugar
Serve it chilled after a family dinner, at a holiday celebration, or as a refreshing dessert for a summer gathering.
How to Store No-Bake Cherry Swirl Cheesecake
Refrigerator
Store the cheesecake covered in the refrigerator for up to 5 days. Keep it chilled until ready to serve because the cream cheese and whipped cream filling should not sit at room temperature for extended periods.
Freezer
For longer storage, freeze the cheesecake until firm, then wrap it tightly or place individual slices in airtight freezer-safe containers. Freeze for up to 2 months for best quality.
Thaw frozen cheesecake overnight in the refrigerator before serving. The texture of the cherry swirl may soften slightly after thawing.
Frequently Asked Questions
Does no-bake cherry cheesecake need gelatin?
This recipe does not use gelatin. Its structure comes from the cream cheese, whipped cream, and extended chilling time. For the best results, use full-fat cream cheese, whip the cream to stiff peaks, and chill the cheesecake overnight.
Why is my no-bake cheesecake too soft?
A soft filling can result from underwhipped cream, cream cheese that was too warm, or insufficient chilling. Make sure the heavy cream reaches stiff peaks and allow the cheesecake at least 6 hours in the refrigerator, preferably overnight.
Can I use frozen cherries?
Yes. Frozen pitted cherries work very well. Thaw them first and drain any excess liquid if necessary before cooking the sauce.
Can I make this cheesecake a day ahead?
Absolutely. In fact, making it the day before serving is recommended. Overnight chilling helps the filling become firmer and allows the flavors to develop.
Can I use store-bought cherry pie filling?
Yes. You can use cherry pie filling if you are short on time. However, homemade cherry sauce gives you more control over sweetness and texture and creates a fresher fruit flavor.
How do I get clean cheesecake slices?
Make sure the cheesecake is thoroughly chilled. Use a sharp knife dipped in hot water and wiped dry before each cut. This helps create neat slices without dragging the cherry swirl through the filling.
Can I make this recipe in a square baking dish?
Yes. A 9-inch square dish works well for cheesecake bars. Press the crust evenly into the bottom and spread the filling over it. You can still create the cherry swirl on top. For easier removal and slicing, line the dish with parchment paper.
Final Thoughts
This No-Bake Cherry Swirl Cheesecake is proof that an impressive dessert doesn’t need complicated baking techniques. With its buttery graham cracker crust, fluffy cream cheese filling, and homemade cherry sauce, every slice delivers the perfect balance of rich and fruity flavors.
Whether you’re preparing it for a celebration or simply treating yourself, this easy cheesecake is a beautiful dessert worth making ahead. Chill it overnight, slice it neatly, and enjoy every creamy, cherry-filled bite!