

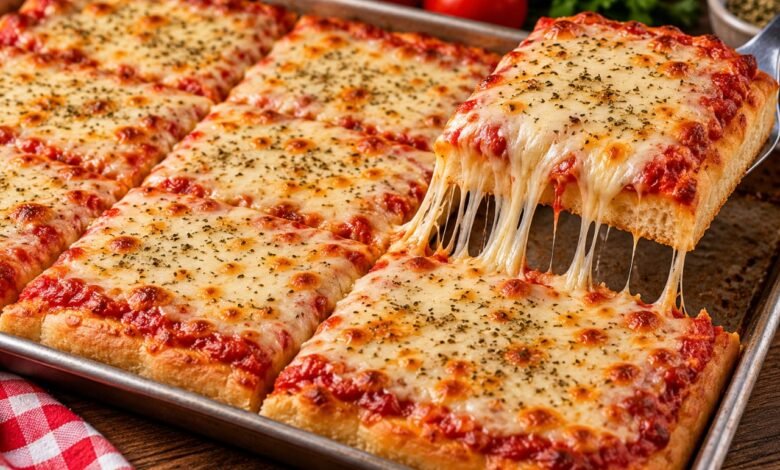
Remember the soft, cheesy square pizza served in the school cafeteria? With its thick, tender crust, slightly sweet tomato sauce, and perfectly melted mozzarella, classic school lunch pizza brings back delicious childhood memories.
Now you can recreate that nostalgic favorite at home! This homemade School Lunch Pizza features a fluffy sheet-pan crust, a simple herb-seasoned tomato sauce, and a generous layer of mozzarella cheese. Cut it into rectangles, serve it warm, and enjoy a comforting meal the whole family will love.
Why You’ll Love This School Lunch Pizza
- Nostalgic flavor: A soft crust, familiar tomato sauce, and melted cheese recreate the classic cafeteria experience.
- Easy sheet-pan recipe: Bake one large rectangular pizza and cut it into individual portions.
- Simple ingredients: Pantry staples make this recipe easy to prepare at home.
- Family-friendly: Kids and adults can enjoy it for lunch, dinner, or an after-school meal.
- Make-ahead friendly: Prepare the dough and sauce in advance to save time.
Ingredients You’ll Need
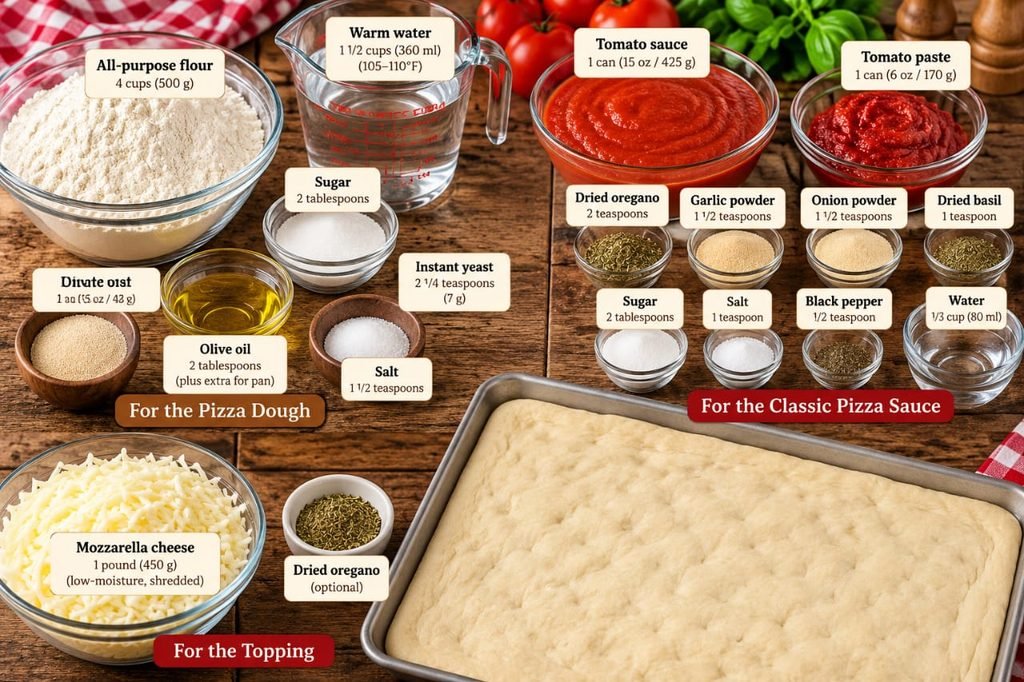
For the Pizza Dough
- 4 cups (500 g) all-purpose flour
- 1 1/2 cups (360 ml) warm water, about 105–110°F (40–43°C)
- 2 1/4 teaspoons instant yeast (one 7 g packet)
- 2 tablespoons (25 g) granulated sugar
- 2 tablespoons (30 ml) olive oil, plus extra for the pan
- 1 1/2 teaspoons salt
For the Classic Pizza Sauce
- 1 can (15 oz / 425 g) plain tomato sauce
- 1 can (6 oz / 170 g) tomato paste
- 2 teaspoons dried oregano
- 1 1/2 teaspoons garlic powder
- 1 1/2 teaspoons onion powder
- 1 teaspoon dried basil
- 2 tablespoons granulated sugar, adjusted to taste
- 1 teaspoon salt
- 1/2 teaspoon black pepper
- 1/3 cup (80 ml) water
For the Topping
- 1 pound (450 g) low-moisture, full-fat mozzarella, freshly grated
- A light sprinkle of dried oregano or parsley, optional
How to Make School Lunch Pizza
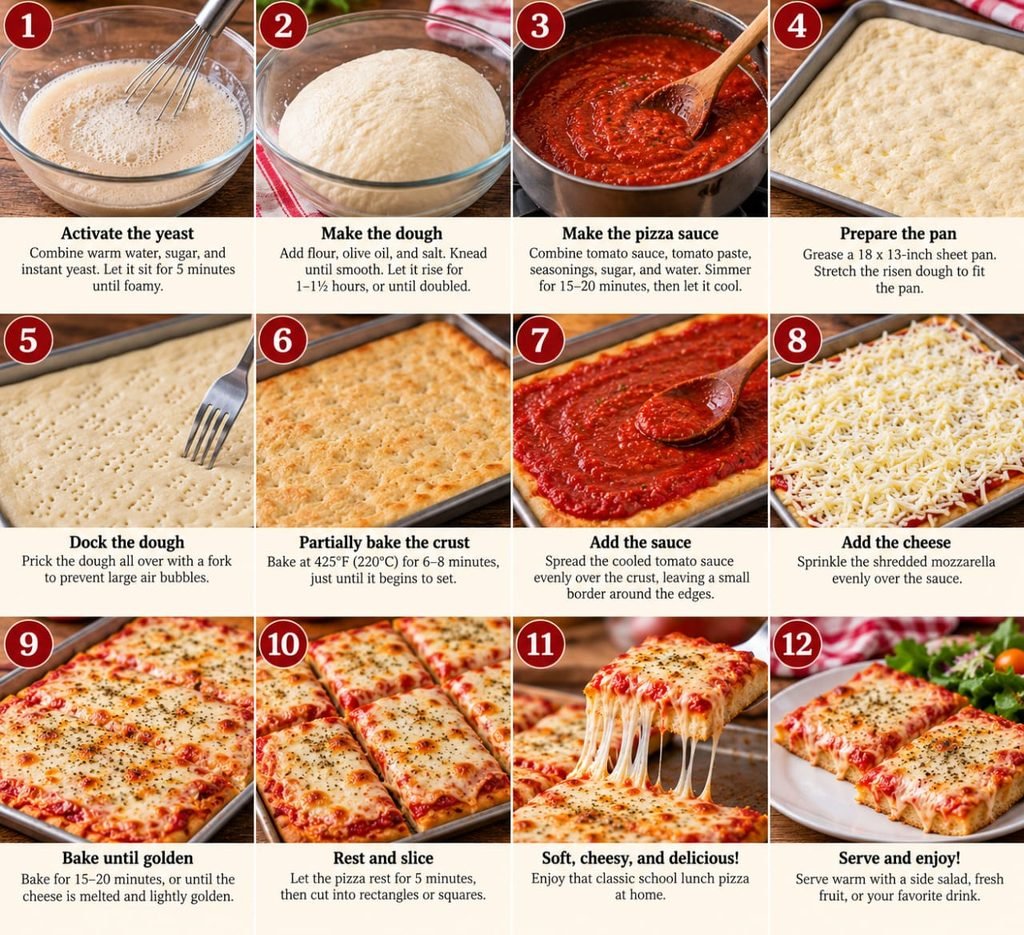
Step 1: Prepare the Dough
In a large mixing bowl, combine the warm water, sugar, and instant yeast. Let the mixture stand for about 5 minutes. Add the olive oil, flour, and salt. Mix until a dough forms, then knead for 5–7 minutes in a stand mixer or about 10 minutes by hand, until smooth and slightly tacky.
Place the dough in a lightly oiled bowl and turn it to coat. Cover and let it rise in a warm place for 1–1 1/2 hours, or until doubled in size.
Step 2: Make the Signature Tomato Sauce
While the dough rises, combine the tomato sauce, tomato paste, oregano, garlic powder, onion powder, basil, sugar, salt, black pepper, and water in a saucepan. Whisk until smooth.
Bring the mixture to a gentle simmer over low heat. Cook for 15–20 minutes, stirring occasionally, until the sauce thickens slightly. Remove it from the heat and allow it to cool before assembling the pizza.
Step 3: Prepare the Baking Pan
Preheat the oven to 425°F (220°C). Generously grease an 18 x 13-inch half-sheet pan with olive oil.
Gently press down the risen dough and transfer it to the pan. Stretch it with your fingertips until it reaches the edges. If it springs back, let it rest for 5 minutes before stretching again.
Step 4: Partially Bake the Crust
Prick the dough all over with a fork to help prevent large air bubbles. Bake the plain crust for 6–8 minutes, just until it begins to set and the surface looks dry. This helps the crust hold the sauce without becoming soggy.
Step 5: Add the Sauce and Cheese
Remove the partially baked crust from the oven. Spread the cooled tomato sauce evenly over the surface, leaving a small border around the edges.
Sprinkle the grated mozzarella evenly over the sauce. Grating a block of low-moisture mozzarella yourself can help create a smoother melt.
Step 6: Bake Until Golden and Bubbly
Return the pizza to the oven and bake for another 15–20 minutes, or until the cheese is fully melted with light golden spots and the crust is cooked through.
Ovens vary, so begin checking near the end of the baking time. If the edges brown too quickly, keep an eye on the pizza to prevent overbaking.
Step 7: Rest and Slice
Remove the pizza from the oven and let it rest in the pan for about 5 minutes. Sprinkle with a little dried oregano or parsley if desired, then cut into rectangles or squares with a pizza cutter or sharp knife.
Serve warm for that classic school-cafeteria feel.
Tips for the Best Cafeteria-Style Pizza
- Check the water temperature: Use warm, not hot, water so the yeast can work properly.
- Allow enough rising time: The dough should roughly double in size before you stretch it into the pan.
- Keep the sauce thick: Simmering the sauce helps prevent excess moisture from softening the crust.
- Don’t skip the partial bake: Setting the crust before adding toppings helps the pizza bake more evenly.
- Use low-moisture mozzarella: It generally releases less water than fresh mozzarella and gives the pizza a classic cheese topping.
- Let it rest before cutting: A short rest helps the cheese settle and makes cleaner slices.
Easy Variations
- Cheese-only classic: Keep the topping simple with mozzarella and the traditional tomato sauce.
- Pepperoni pizza: Add small pepperoni pieces before baking for a different cafeteria-inspired version.
- Extra herbs: Add a little extra oregano or basil to the sauce for a more pronounced herb flavor.
- Vegetable topping: Add finely diced bell peppers or mushrooms, but avoid adding too many watery ingredients.
- Whole-wheat option: Replace part of the all-purpose flour with whole-wheat flour. The crust may be denser and may need a little extra water.
What to Serve with School Lunch Pizza
Serve this rectangular pizza with a crisp green salad, carrot sticks, cucumber slices, roasted vegetables, or fresh fruit. For a nostalgic lunch, pair it with a simple side salad and a cold glass of milk or your favorite drink.
How to Store and Reheat Leftovers
Allow leftover pizza to cool, then refrigerate it in an airtight container within 2 hours of cooking. Store it in the refrigerator for 3–4 days.
Reheat slices in an oven at 350°F (175°C) until hot throughout. An air fryer also works well for reheating individual pieces. The microwave is quicker, although it may make the crust softer.
To freeze, wrap individual slices securely and store them in a freezer-safe container for up to 2 months for best quality. Thaw in the refrigerator and reheat until hot.
Frequently Asked Questions
What makes school lunch pizza different from regular pizza?
Classic school lunch pizza is usually baked in a rectangular sheet pan and has a soft, bread-like crust, a smooth tomato sauce, and a generous layer of melted cheese.
Can I make the dough ahead of time?
Yes. Prepare the dough, cover it, and refrigerate it for up to 24 hours. Let it come closer to room temperature before stretching it into the pan.
Can I make the sauce in advance?
Yes. Prepare the sauce ahead, cool it, and store it in a covered container in the refrigerator. Use it within 3–4 days.
Why should I partially bake the crust?
Partial baking helps the dough set before the sauce and cheese are added. This can reduce sogginess and help the crust cook more evenly.
Can I use store-bought pizza dough?
Yes, but the texture may differ from the homemade version. Follow the package directions and adjust the baking time as needed.
Final Thoughts
This School Lunch Pizza recipe brings the familiar comfort of cafeteria pizza into your own kitchen. With its soft sheet-pan crust, savory-sweet tomato sauce, and golden mozzarella topping, it’s a simple meal worth sharing.
Make a batch for family lunch, a casual dinner, or a nostalgic weekend treat. Cut it into classic squares, serve it warm, and enjoy every cheesy bite.


2 Comments