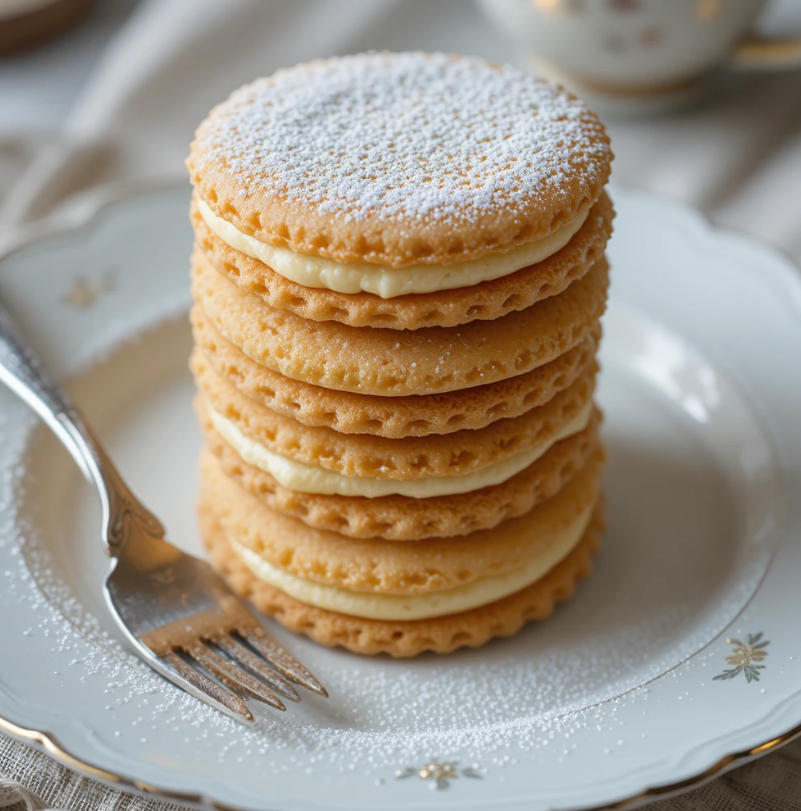
Parisian Cream Wafers: The Elegant, Buttery Cookie That Melts in Your Mouth
Have you ever bitten into a cookie so delicate, so ethereally light, that it seemed to dissolve into a whisper of butter and sugar on your tongue? That is the magic of the Parisian Cream Wafer. This elegant, old-world confection is the pinnacle of tea-time sophistication, offering a textural experience unlike any other cookie. Forget everything you know about dense, chewy treats. These wafers are a study in subtlety: impossibly thin, crisp layers that shatter at the slightest pressure, giving way to a creamy, often citrus-kissed filling. They are not just cookies; they are edible proof that simplicity, when executed with care, can be utterly sublime. In this detailed, beginner-friendly guide, we will demystify this classic recipe. You’ll learn that with a little patience and a few key techniques, you can recreate these melt-in-your-mouth Parisian cookies right in your own kitchen, bringing a touch of Parisian patisserie elegance to your table.
The Secret to Delicate Wafers: Your Ingredients
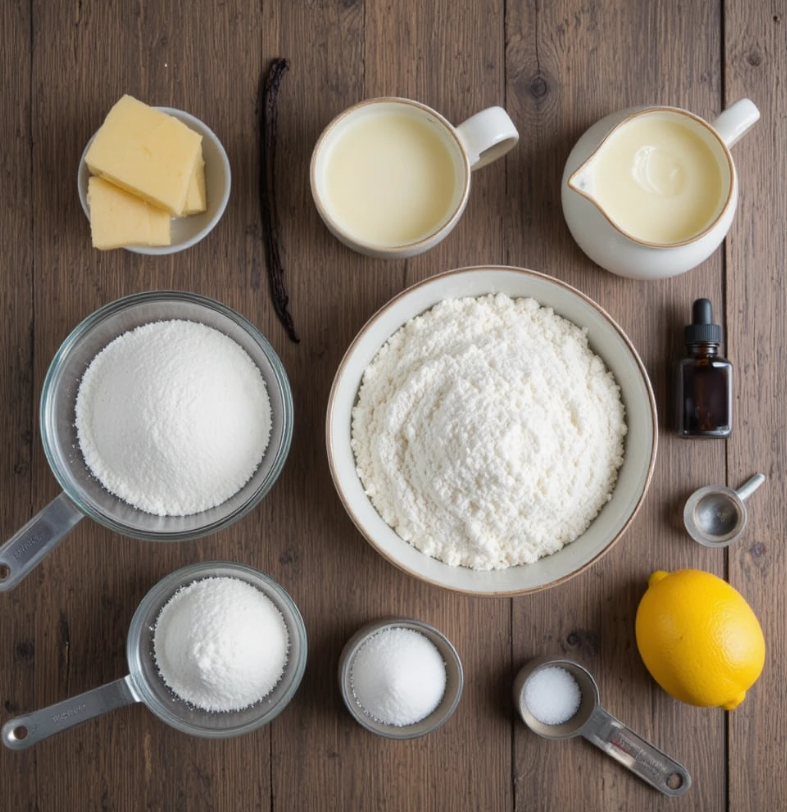
The beauty of Parisian Cream Wafers lies in their short ingredient list. Each component plays a critical role in achieving that signature tender-crisp texture. For the best results, use high-quality, fresh ingredients, especially the butter.
For the Parisian Wafer Dough:
- 1 cup (226g) unsalted butter, room temperature: This is the star. Use the best butter you can find for unparalleled flavor. It must be softened to room temperature for proper creaming.
- 1/3 cup (80ml) heavy whipping cream: The cream enriches the dough, tenderizes it, and helps bind the ingredients without developing gluten.
- 2 cups (250g) all-purpose flour: Measured correctly using the spoon-and-level method. This provides structure without making the cookies tough.
- A pinch of fine sea salt: Enhances all the other flavors and balances the sweetness.
For the Luxurious Cream Filling:
- 3/4 cup (170g) unsalted butter, softened: Again, quality is key for a silky, flavorful filling.
- 2 3/4 cups (330g) powdered sugar: Sifted to avoid lumps in the filling.
- 1 teaspoon pure vanilla extract: For classic, warm flavor notes.
- 1-2 tablespoons heavy cream or milk: To adjust the filling’s consistency.
- Optional Flavorings:
- 1 teaspoon finely grated lemon or orange zest
- 1-2 tablespoons fruit jam (raspberry, strawberry)
- 1 tablespoon cocoa powder (for a chocolate variation)
Step-by-Step Guide to Perfect Parisian Cream Wafers
Follow these numbered steps carefully. The process is simple but requires attention to details like chilling the dough, which is non-negotiable for success.
Part 1: Making & Chilling the Dough
- Cream the Butter: In a large mixing bowl, use an electric hand mixer or stand mixer fitted with a paddle attachment to beat the softened butter on medium speed until it is completely smooth, pale, and creamy. This should take about 2-3 minutes.
- Incorporate the Cream: With the mixer on low, gradually pour in the heavy cream. Mix just until the cream is fully absorbed and the mixture looks uniform. It may look slightly curdled, which is normal.
- Add Dry Ingredients: In a separate bowl, whisk together the flour and salt. Add this flour mixture to the butter-cream mixture in two additions, mixing on low speed after each until just combined. The moment the flour disappears, stop mixing. Overworking the dough will make the wafers tough.
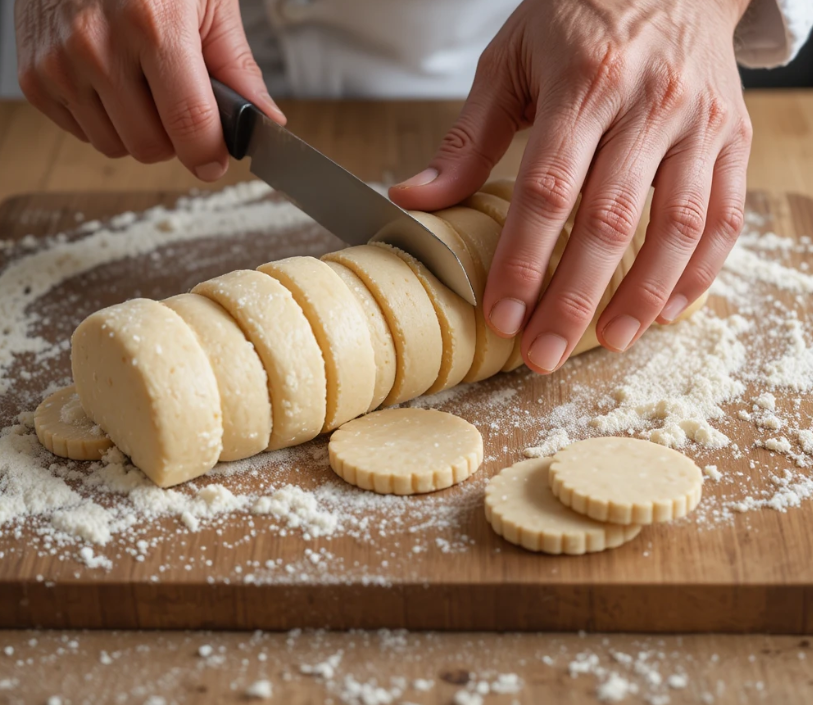
- Form the Dough Logs: Divide the soft dough in half. Place each half on a separate piece of plastic wrap. Use the wrap to help you shape each portion into a smooth, even log about 1.5 to 2 inches (4-5 cm) in diameter. Roll tightly.
- The Essential Chill: Wrap the logs securely in the plastic wrap and refrigerate for at least 4 hours, or preferably overnight. The dough must be very firm to slice cleanly.
Part 2: Slicing & Baking
- Preheat and Prepare: Preheat your oven to 375°F (190°C). Line two baking sheets with parchment paper.
- Slice the Dough: Remove one dough log from the fridge. Using a sharp, thin-bladed knife, slice the log into rounds just under 1/4-inch (about 5mm) thick. Aim for uniform thickness so they bake evenly. If the dough cracks, let it warm up for 5-10 minutes.
- Arrange and Bake: Place the slices about 1 inch apart on the prepared baking sheets. They spread only slightly. Bake for 7-9 minutes, or until the edges are just barely beginning to turn a very light golden brown. The centers should remain pale.
- Cool Completely: Remove the baking sheets from the oven. Let the wafers cool on the sheet for 5 minutes before transferring them to a wire rack to cool completely. They will crisp up as they cool.
Part 3: Preparing the Cream Filling & Assembly
- Make the Filling: While the wafers cool, make the filling. In a clean bowl, beat the softened butter until smooth and fluffy. Gradually add the sifted powdered sugar, about 1/2 cup at a time, beating well after each addition. Add the vanilla extract and any optional flavorings. Beat for 2-3 minutes until very light and fluffy. If the filling is too thick, add cream or milk, one teaspoon at a time, until it reaches a spreadable consistency.
- Pair and Fill: Match the cooled wafer discs into pairs of similar size. Turn one wafer from each pair flat-side up. Spoon or pipe about 1-2 teaspoons of filling onto the center.
- Create the Sandwich: Gently press the matching wafer on top, flat-side down, and press lightly until the filling spreads to the edges. Don’t squeeze too hard, as the wafers are fragile.
Pro Tips for Parisian Wafer Perfection
Even simple recipes benefit from expert advice. These tips will elevate your wafers from good to exceptional.
- Chilling is Non-Negotiable: Do not skip or shorten the chilling time. Firm dough is the only way to get clean, round slices that hold their shape in the oven.
- The Butter Temperature Paradox: For the dough, butter must be softened (pliable but not oily). For the filling, it must be softened to whip properly. However, for slicing, the dough log must be cold. Plan your timing accordingly.
- Sharp is Key: A dull knife will crush your delicate dough log. Use the sharpest knife you have for clean cuts.
- Watch Like a Hawk: Ovens vary. Start checking at 7 minutes. You want the barest hint of color on the bottom edges. Overbaking will make them brown and lose their delicate flavor.
- Flavor Playground: The basic vanilla filling is divine, but feel free to experiment. Add lemon zest for brightness, a thin layer of seedless raspberry jam for tartness, or even a tablespoon of matcha powder for a unique twist.
- Storage for Freshness: Store assembled cream wafers in an airtight container at room temperature for up to 3 days. For longer storage, keep the unfilled wafers and the filling separately in the fridge for up to a week, and assemble just before serving.
Conclusion: Your Journey to a Parisian Patisserie Starts Now
Creating Parisian Cream Wafers is more than baking; it’s a rewarding practice in precision and patience that yields a truly exquisite result. The process of chilling, slicing, and carefully sandwiching these delicate cookies is a mindful, almost meditative kitchen ritual. When you finally take that first bite and experience the sublime contrast of the crisp, buttery wafer and the lush, sweet cream, you’ll understand why these cookies have charmed generations.
Don’t be intimidated by their elegant appearance. This recipe is meticulously crafted for bakers of all levels. So, gather your simple ingredients, embrace the crucial chilling time, and prepare to impress. Your homemade Parisian Cream Wafers are ready to melt hearts and minds, one elegant, melt-in-your-mouth bite at a time. Bon appétit