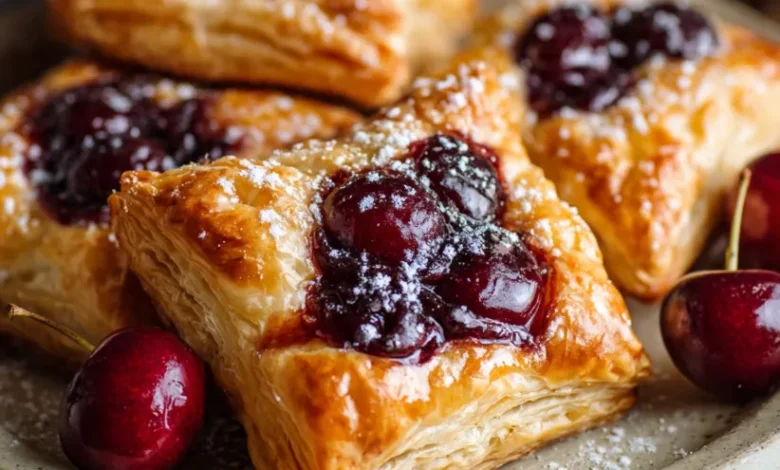
Imagine pulling a tray of golden, flaky pastries from the oven, their sweet cherry filling bubbling enticingly at the seams. The aroma of baked butter and fruit fills your kitchen, promising a dessert that looks like it came from a fancy bakery but required minimal effort. This is the magic of Simple Cherry Pastry Pies.
These delightful hand pies are the perfect easy dessert for any occasion. Whether you need a last-minute treat for guests, a fun baking project with kids, or a comforting sweet bite with your afternoon coffee, this recipe is your answer. With just a handful of ingredients and store-bought puff pastry, you can create impressive, delicious pastries that everyone will adore. Let’s embark on this simple baking journey that proves you don’t need to be a professional pastry chef to create something truly special.
What You’ll Need for Your Cherry Pastry Pies
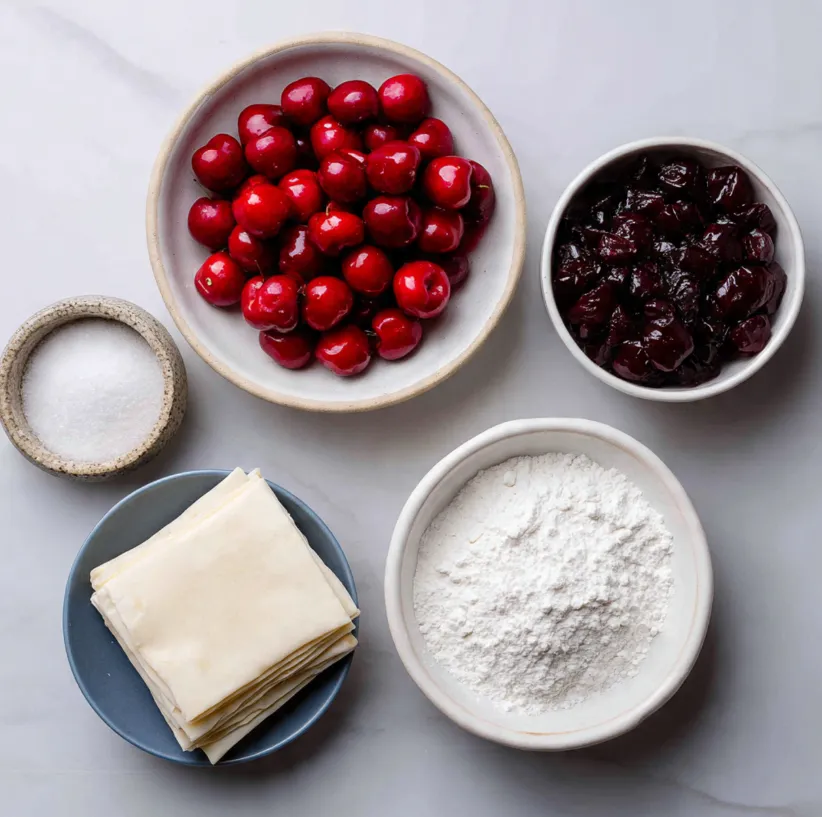
The beauty of this recipe lies in its simplicity and short ingredient list. You likely have most of these items in your pantry already!
For the Cherry Filling:
- 2 cups pitted cherries (fresh, frozen and thawed, or canned see tips below)
- 1/4 cup granulated sugar (adjust based on cherry sweetness)
- 1 tablespoon cornstarch
- 1 tablespoon lemon juice
- 1/2 teaspoon pure vanilla extract
- A pinch of salt
For the Pastry & Assembly:
- 1 sheet (approx. 250g) store-bought puff pastry, thawed according to package instructions
- 1 large egg (for egg wash)
- 1 tablespoon milk or water
- Coarse or granulated sugar, for sprinkling
- Powdered sugar, for dusting (optional)
Essential Tools:
- Rolling pin
- Baking sheet
- Parchment paper
- Small bowl (for egg wash)
- Pastry brush or your finger
- Fork (for crimping)
- Sharp knife or pizza cutter
Step-by-Step Instructions for Perfect Pastries
Follow these straightforward steps to create your own bakery-worthy cherry pies at home.
Step 1: Prepare the Cherry Filling
If using frozen cherries, ensure they are completely thawed and drained of excess liquid. In a medium saucepan, combine the pitted cherries, granulated sugar, cornstarch, lemon juice, and a pinch of salt. Stir well to coat the cherries.
Cook over medium heat, stirring frequently, until the mixture thickens and becomes glossy this should take about 5-7 minutes. The cherries will release their juices, which will then thicken thanks to the cornstarch. Remove from heat and stir in the vanilla extract. Let the filling cool completely to room temperature. (Pro Tip: You can speed this up by spreading it on a plate and placing it in the refrigerator.)
Step 2: Prepare the Puff Pastry
While the filling cools, prepare your puff pastry. Lightly flour your work surface. Unfold the thawed pastry sheet and roll it out gently with a rolling pin to smooth any folds and create a slightly larger, even rectangle (about 10×12 inches). This ensures a uniform thickness for baking.
Using a sharp knife, pizza cutter, or a pastry wheel, cut the large rectangle into 8 smaller, equal-sized rectangles.
Step 3: Assemble the Pastry Pies
Line a baking sheet with parchment paper. Place half of the pastry rectangles (4 pieces) on the sheet, spacing them about 2 inches apart.
Spoon about 1.5 to 2 tablespoons of the cooled cherry filling onto the center of each rectangle on the baking sheet, leaving a 1/2-inch border clear around the edges.
In a small bowl, make an egg wash by beating the egg with a tablespoon of milk or water. Use your pastry brush or finger to lightly brush the egg wash onto the clean border surrounding the filling on each pastry. This acts as the “glue” to seal the pies.
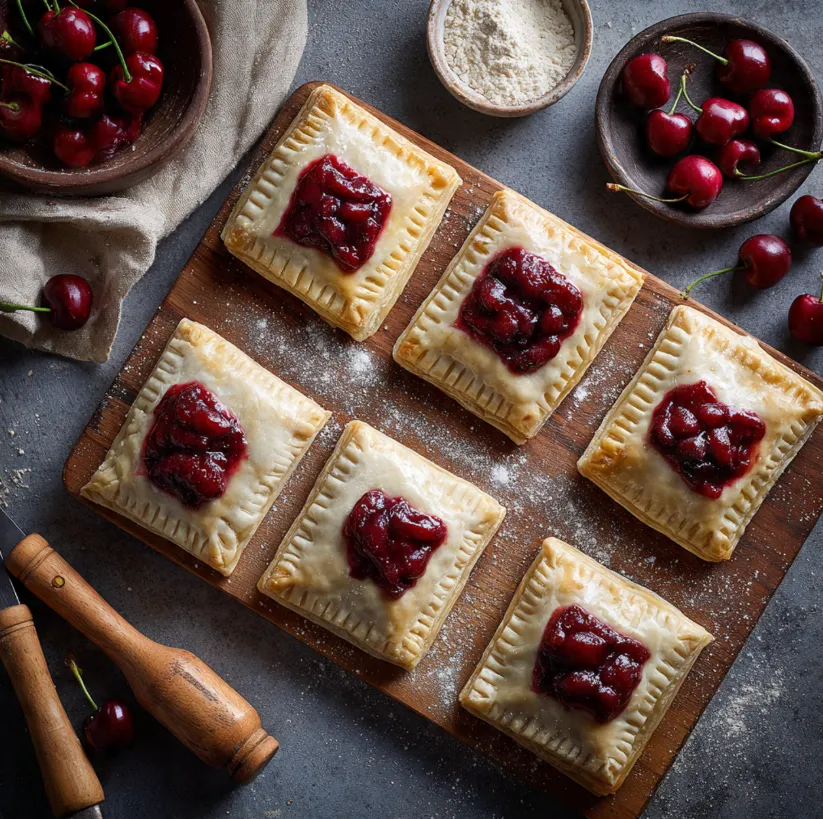
Carefully place the remaining 4 pastry rectangles on top of the filled ones. Gently press down around the edges with your fingers to seal. For a secure seal, use the tines of a fork to press and crimp all four edges of each pastry pie. This also creates a classic, decorative look.
Step 4: Bake to Golden Perfection
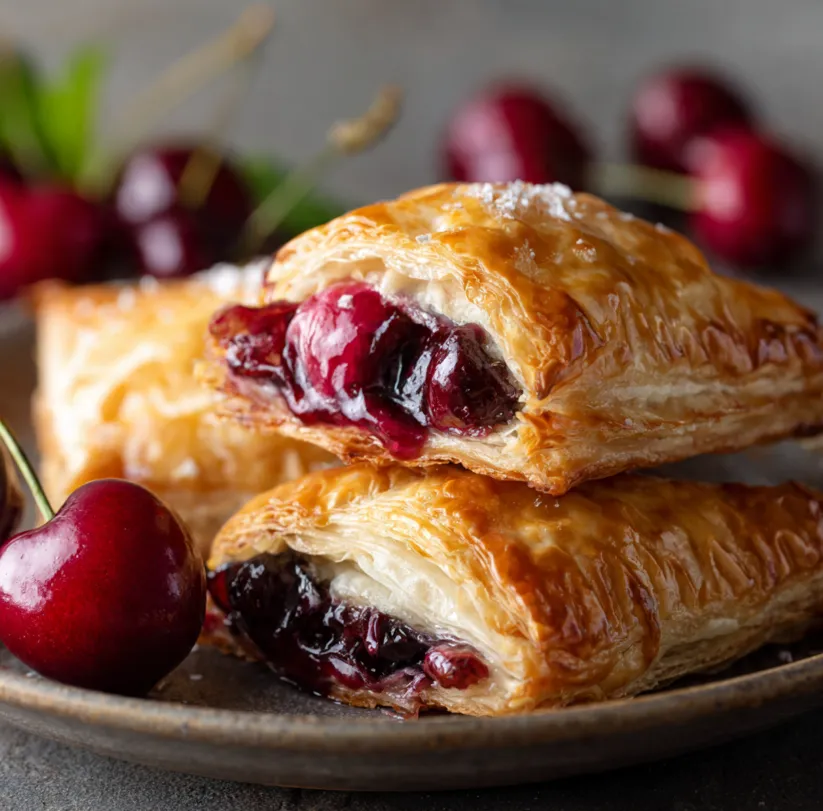
Use a sharp knife to make 2-3 small slits on the top of each pastry pie. This allows steam to escape during baking and prevents the pies from bursting. Brush the tops of each pie lightly with the remaining egg wash, then sprinkle generously with coarse or granulated sugar.
Preheat your oven to 400°F (200°C). Bake the pastries for 18-22 minutes, or until they are puffed and a deep, golden brown. The filling may bubble out slightly this is a good sign!
Step 5: Cool and Serve
Remove the baking sheet from the oven and let the cherry pastry pies cool on the sheet for at least 10 minutes. They will be extremely hot inside! Transfer them to a wire rack to cool further if desired. Just before serving, you can dust them lightly with powdered sugar for an elegant finish.
Useful Tips for Cherry Pastry Pie Success
Even the easiest desserts benefit from a few expert tips. Here’s how to ensure your pies are perfect every time.
Choosing Your Cherries
- Fresh Cherries: Perfect when in season. Use a cherry pitter for easy prep.
- Frozen Cherries: An excellent year-round option. Thaw completely and drain any excess liquid to prevent a soggy filling.
- Canned Cherry Pie Filling: For ultimate convenience, you can skip the filling steps and use a quality canned filling. However, a homemade filling tastes fresher and is less sweet.
Mastering the Puff Pastry
- Keep it Cold: Puff pastry works best when cold. If it becomes too soft and sticky while you’re working, place it in the refrigerator for 10 minutes.
- Thaw Safely: Always thaw puff pastry in the refrigerator overnight or on the counter for the time specified on the package. Never use a microwave.
Flavor Variations
This recipe is wonderfully adaptable. Don’t hesitate to make it your own!
- Fruit Swaps: Try blueberry, apple, apricot, or peach filling.
- Flavor Boosts: Add a sprinkle of cinnamon or almond extract to the cherry filling.
- Cheese Please: Add a small cube of cream cheese or a sprinkle of ricotta under the cherry filling for a creamy surprise.
Storage and Reheating
- Make-Ahead: You can assemble the pies, place them on the baking sheet, and freeze them solid before baking. Transfer to a freezer bag and bake from frozen, adding a few extra minutes to the baking time.
- Leftovers: Store baked and cooled pies in an airtight container at room temperature for 1 day or in the refrigerator for up to 3 days.
- Reheating: Re-crisp them in a 350°F (175°C) oven for 5-8 minutes. The microwave will make the pastry soft.
Your New Go-To Dessert Awaits
There you have it the simplest path to an impressive, delicious dessert. These Simple Cherry Pastry Pies are more than just a recipe; they’re a confidence-builder in the kitchen. They prove that with a few quality ingredients and simple techniques, you can create moments of pure joy around the table.
So, what are you waiting for? Preheat your oven, grab that sheet of puff pastry, and get ready to bake your new favorite easy dessert. The combination of buttery, flaky layers and sweet-tart cherry is truly irresistible. Don’t forget to share your creations once you taste them, you’ll want to pass the recipe along to everyone you know. Happy baking