There’s something truly magical about a dessert that comes together without any baking. No preheating, no worrying about over-browning, and best of all no heat warming up your kitchen! Whether you’re a kitchen newbie, short on time, or simply dreaming of a sweet, satisfying treat, this Easy No-Bake Dessert with Coconut and Pecans is about to become your go-to recipe. It combines the rich, buttery crunch of pecans with the sweet, tropical flair of coconut, all held together in a lusciously creamy base that sets perfectly in your fridge. It’s effortless, impressively delicious, and proves that sometimes, the best desserts don’t need an oven at all. Let’s get started!
What You’ll Need: Simple Ingredients for a Fantastic Dessert
Gathering your ingredients is the first simple step. You’ll be delighted to find that most of these are pantry staples or easily found at your local grocery store. The beauty of this recipe lies in its simplicity and the wonderful textures each component brings.
For the Crunchy Base Layer:
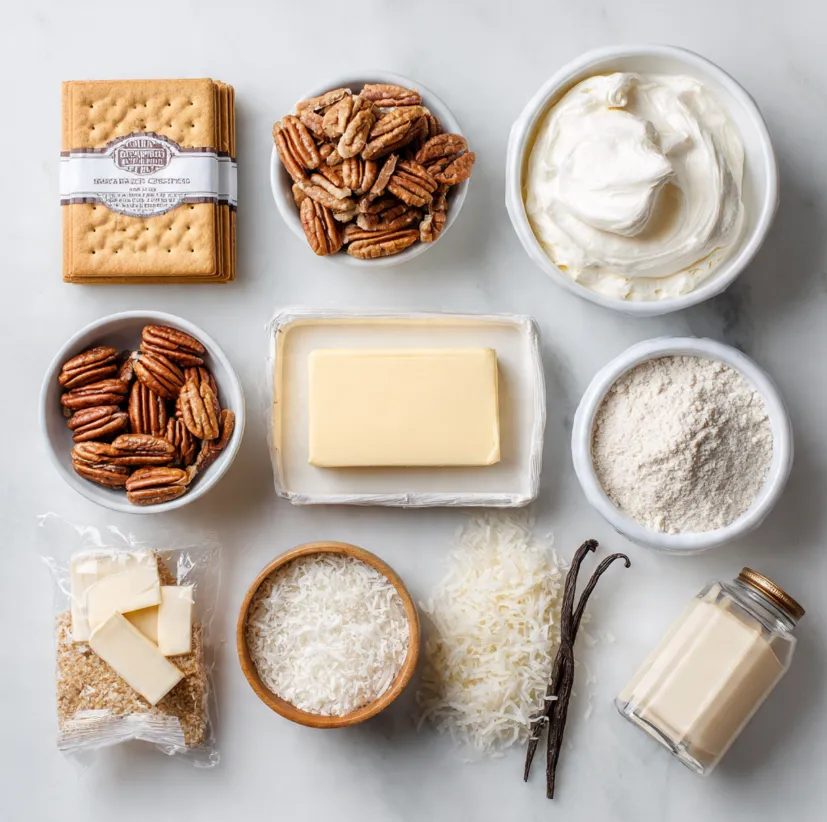
- 2 cups graham cracker crumbs (about 15 full sheets)
- 1 cup pecans, finely chopped
- ½ cup unsalted butter, melted
- 3 tablespoons granulated sugar
- A pinch of salt
For the Luscious Creamy Filling:
- 1 package (8 oz) full-fat cream cheese, softened to room temperature
- 1 cup powdered sugar (also called confectioners’ sugar), sifted
- 1 teaspoon pure vanilla extract
- 1 tub (8 oz) frozen whipped topping (like Cool Whip), thawed – or use 1.5 cups of homemade whipped cream
For the Irresistible Topping:
- 1 ½ cups sweetened shredded coconut
- 1 cup pecan halves or pieces
- Caramel sauce or chocolate syrup for drizzling (optional, but highly recommended!)
Step-by-Step Instructions: Your Foolproof Guide to Dessert Success
Follow these numbered steps for a seamless, no-stress preparation. This process is designed to be clear and beginner-friendly.
Step 1: Prepare Your Pan
Start by lightly greasing an 8×8 inch square baking dish or a 9-inch pie plate. You can also use a springform pan for cleaner slices. For a beautiful presentation, a clear glass dish is perfect. Set it aside.
Step 2: Make the Nutty Crumb Base
- If you have whole graham crackers, place them in a zip-top bag and crush them finely using a rolling pin until you have fine crumbs. You can also use a food processor.
- In a medium mixing bowl, combine the graham cracker crumbs, finely chopped pecans, melted butter, sugar, and pinch of salt.
- Stir vigorously with a fork until the mixture resembles wet sand and all the crumbs are evenly coated with butter.
- Pour this mixture into your prepared dish. Using the bottom of a glass or a measuring cup, press the crumbs down firmly and evenly to create a compact base layer. This crust will hold your dessert together.
- Place the dish in the refrigerator to chill while you make the filling.
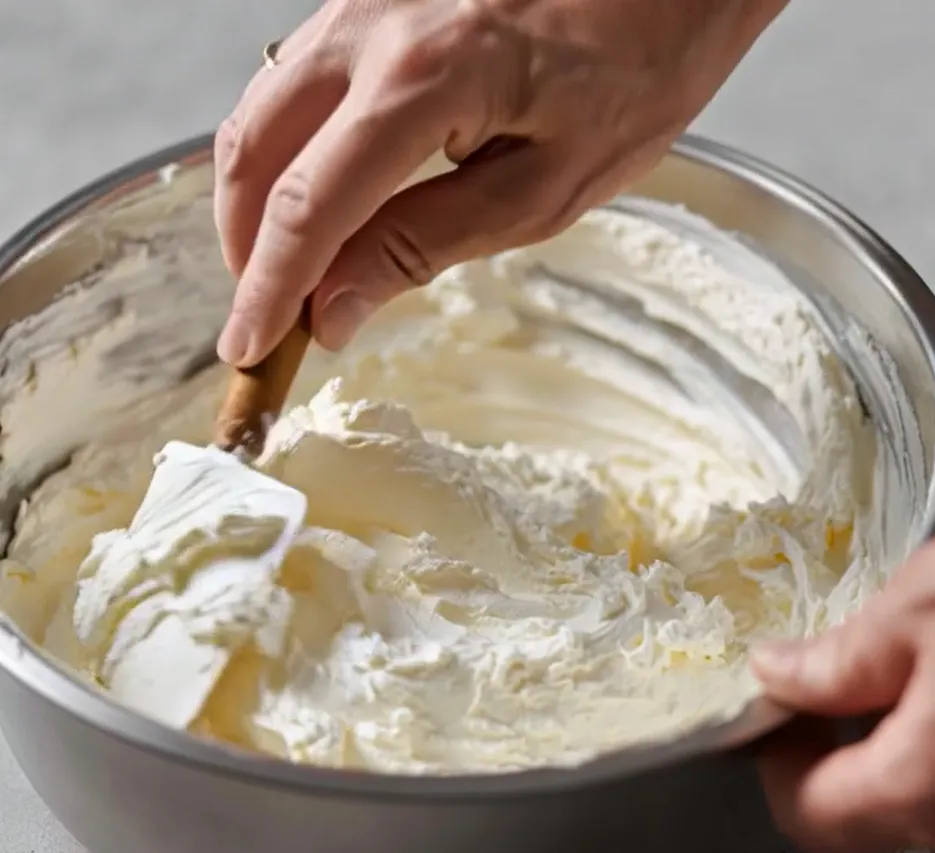
Step 3: Create the Dreamy Cream Cheese Filling
- In a large mixing bowl, beat the softened cream cheese with an electric hand mixer (or a stand mixer) on medium speed until it is completely smooth and lump-free. This should take about 1-2 minutes. Tip: Soft cream cheese is non-negotiable for a smooth filling!
- Add the sifted powdered sugar and vanilla extract. Beat on low speed initially to avoid a sugar cloud, then increase to medium-high until the mixture is well combined and creamy.
- Now, gently fold in the thawed whipped topping. Use a rubber spatula and a folding motion (scoop from the bottom and turn over) until no white streaks remain. Be gentle to keep the filling light and airy.
Step 4: Assemble and Set
- Take the chilled base out of the refrigerator.
- Spoon the creamy filling over the crust. Spread it evenly with a spatula, making sure to reach all the edges.
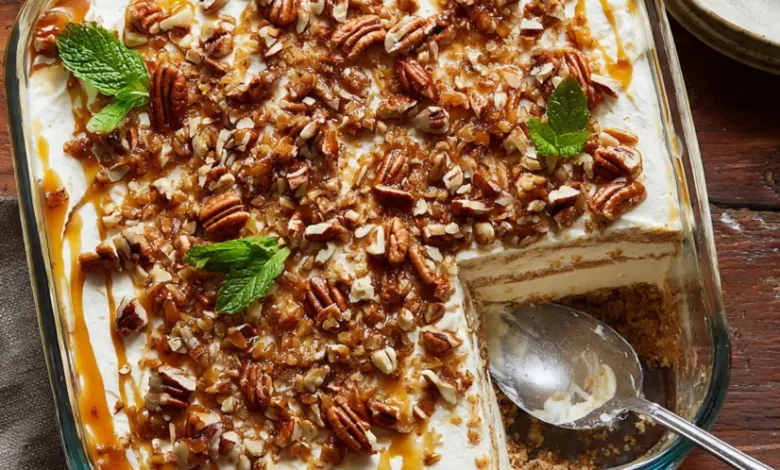
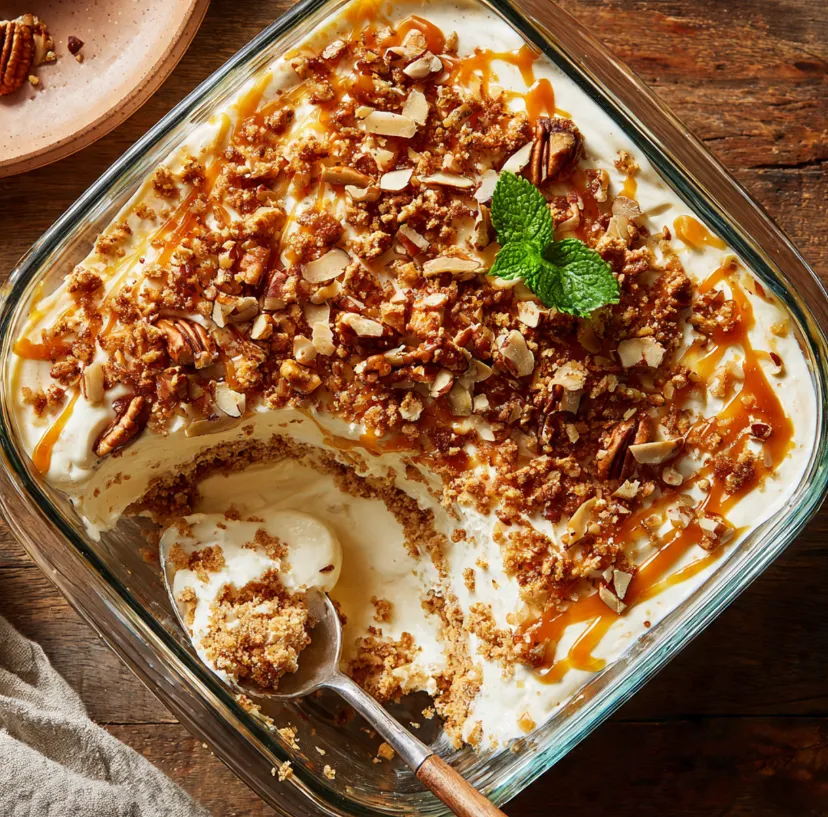
- Smooth the top. Now, evenly sprinkle the shredded coconut over the entire surface.
- Arrange the pecan halves or pieces on top of the coconut, pressing them down slightly.
- For an extra touch of decadence, drizzle caramel sauce or chocolate syrup generously over everything.
- Cover the dish loosely with plastic wrap and refrigerate for at least 4 hours, or ideally overnight. This chilling time is crucial as it allows the dessert to set firmly, making it easy to slice and serve.
Pro Tips for the Perfect No-Bake Dessert Every Time
- Toast for Extra Flavor: For a deeper, nuttier flavor, toast your pecans and shredded coconut in a dry skillet over medium heat for 3-5 minutes until fragrant and lightly golden. Let them cool completely before using.
- Gluten-Free Option: Easily make this gluten-free by using gluten-free graham crackers or crushed gluten-free cookies for the base.
- Whipped Cream Alternative: Prefer real whipped cream? Whip 1.5 cups of heavy cream with 2 tablespoons of powdered sugar and 1 tsp vanilla until stiff peaks form, and use it in place of the frozen whipped topping.
- Storage: This dessert keeps beautifully covered in the refrigerator for up to 4 days. The crust may soften slightly over time but will still be delicious.
- Customize It: Add a layer of sliced bananas or strawberries under the cream filling, or mix mini chocolate chips into the filling for a different twist!
Ready to Impress Without the Stress
And there you have it a show-stopping, incredibly delicious Easy No-Bake Dessert with Coconut and Pecans that requires absolutely zero oven time. It’s the perfect solution for potlucks, weeknight cravings, last-minute guests, or when you just need a sweet escape without the fuss. The contrast of the buttery, crunchy base with the cloud-like creamy filling and the sweet, textured topping is nothing short of heavenly.
So, what are you waiting for? Gather those simple ingredients and give yourself the gift of this effortless, crowd-pleasing treat. Don’t forget to share your creation and tag #NoBakeDreamDessert! Happy no-baking