Vegan Poppy Seed Coffee Cake: Your Guide to the Perfect Dairy-Free Treat
A Delightful Twist on a Classic
Imagine the comforting aroma of a freshly baked cake, rich with the nutty fragrance of poppy seeds and a hint of citrus, wafting through your kitchen. Now, imagine achieving that bliss without a single dairy product or egg. Welcome to the world of vegan baking, where indulgence meets compassion.
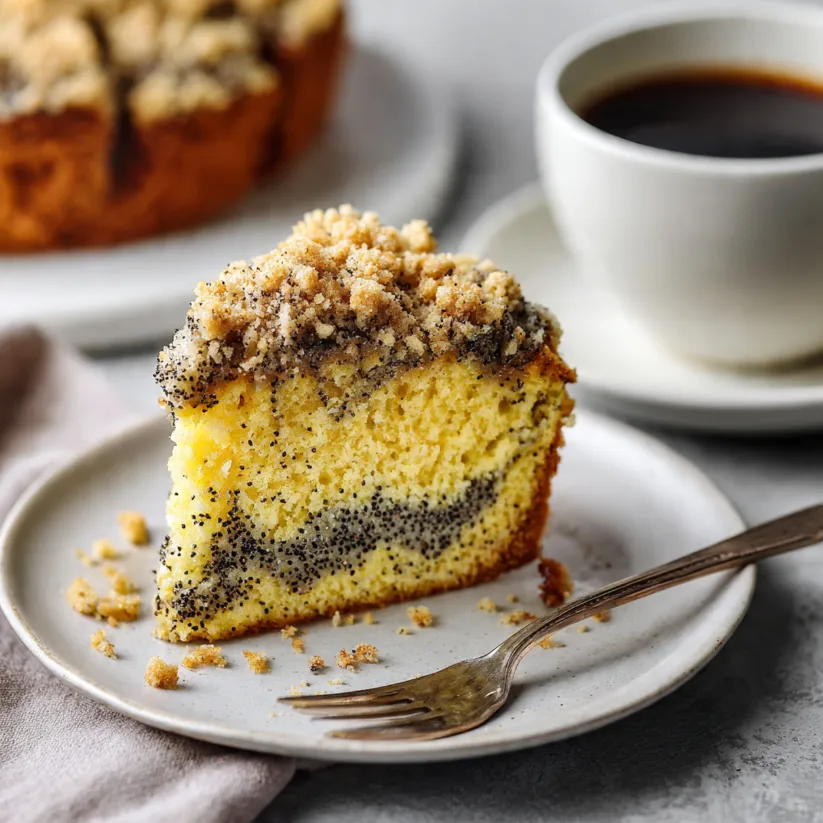
This Vegan Poppy Seed Coffee Cake is a revelation. It’s tender, moist, and bursting with flavor, featuring a signature swirl of cinnamon-sugar and a delicate crumb topping that will have everyone asking for seconds. Traditionally, coffee cake is the perfect companion to your afternoon cup of coffee or tea, designed to be enjoyed alongside your favorite brew. Our vegan version loses none of that cozy charm but gains the wonderful benefit of being entirely plant-based.
Whether you’re a seasoned vegan baker or just starting to explore dairy-free desserts, this guide will walk you through every step to ensure success. Get ready to create a show-stopping treat that proves vegan baking is anything but boring.
Everything You’ll Need
This recipe uses simple, accessible ingredients that work together magically to create a rich, tender cake. The key is in the plant-based substitutions: apple sauce and vegan yogurt add moisture and bind the cake, while a mix of oil and vegan butter ensure a perfect texture.
For the Poppy Seed Cake Batter:
- 2 ½ cups (315g) all-purpose flour
- 1 cup (200g) granulated sugar
- 2 ½ teaspoons baking powder
- ½ teaspoon baking soda
- ½ teaspoon salt
- 1 ⅓ cup (320ml) unsweetened plant-based milk (soy, oat, or almond work best)
- ⅓ cup (80ml) neutral oil (like canola or vegetable)
- ⅓ cup (80g) unsweetened applesauce
- ¼ cup (60g) plain vegan yogurt
- 2 tablespoons fresh lemon juice
- 1 ½ teaspoons pure vanilla extract
- ¼ cup (25g) poppy seeds
- Zest of 1 lemon
For the Cinnamon Swirl & Crumb Topping:
- ⅓ cup (65g) packed brown sugar
- 2 teaspoons ground cinnamon
- ¼ cup (30g) all-purpose flour
- 2 tablespoons cold vegan butter, cut into small pieces
- 2 tablespoons chopped walnuts or pecans (optional, for crunch)

Step-by-Step Baking Instructions
Follow these numbered steps carefully for a foolproof baking experience. Remember, precision in baking leads to perfection!
Preparing Your Kitchen
- Preheat and Prepare: Start by preheating your oven to 350°F (175°C). Grease a 9-inch square or round baking pan with a little vegan butter or oil, and line it with parchment paper for easy removal.
- Make the Cinnamon Mix: In a small bowl, combine the brown sugar and 1 teaspoon of the cinnamon. This will be your swirl layer. Set it aside.
- Make the Crumb Topping: In another small bowl, mix the ¼ cup (30g) of flour with the remaining 1 teaspoon of cinnamon. Add the cold, diced vegan butter. Using your fingers, a fork, or a pastry cutter, work the butter into the flour until the mixture resembles coarse, wet sand. Stir in the chopped nuts if using. Set this bowl aside as well.
Creating the Vegan Cake Batter
- Combine Dry Ingredients: In a large mixing bowl, whisk together the 2 ½ cups of flour, granulated sugar, baking powder, baking soda, and salt. Ensure they are evenly distributed.
- Combine Wet Ingredients: In a separate medium bowl, whisk the plant-based milk, oil, applesauce, vegan yogurt, lemon juice, and vanilla extract. The lemon juice will react with the baking soda, helping the cake rise.
- Mix and Fold: Pour the wet ingredient mixture into the dry ingredients. Using a spatula, gently fold everything together until just combined. A few small lumps are perfectly fine; overmixing will lead to a tough cake.
- Add Poppy Seeds & Zest: Gently fold in the poppy seeds and fresh lemon zest until evenly distributed throughout the batter.
Assembling the Cake
- First Layer: Pour half of the cake batter into your prepared pan. Use the spatula to spread it into an even layer.
- Add the Swirl: Sprinkle the entire cinnamon-brown sugar mixture evenly over this first layer of batter.
- Top it Off: Carefully spoon and spread the remaining cake batter over the cinnamon sugar layer. Try to cover it as completely as possible to prevent the sugar from burning.
- Final Touch: Evenly sprinkle the prepared crumb topping over the entire surface of the batter.

Baking to Perfection
- Bake: Place the pan in the center of your preheated oven. Bake for 45-55 minutes. The cake is done when the top is golden brown, the crumb topping is crisp, and a toothpick inserted into the center of the cake (avoiding the gooey swirl) comes out clean or with a few moist crumbs.
- Cool: This is a crucial step! Allow the cake to cool in the pan on a wire rack for at least 30 minutes. This lets the structure set, making it much easier to slice. For the cleanest cuts, let it cool completely.
- Serve: Once cooled, lift the cake out using the parchment paper, transfer to a serving plate, and slice into squares or wedges.
Useful Tips for a Flawless Vegan Coffee Cake
Baking is a science, especially vegan baking. These tips will elevate your cake from good to extraordinary.
- Ingredient Temperatures: For best results, ensure your plant-based milk, yogurt, and applesauce are at room temperature. This helps them emulsify better with the oil, creating a smoother, more uniform batter.
- Measuring Flour Correctly: The most common baking mistake is using too much flour. To avoid a dense cake, spoon the flour into your measuring cup and level it off with a knife. Don’t scoop directly from the bag.
- Poppy Seed Power: For maximum flavor, you can briefly toast the poppy seeds in a dry skillet over medium heat for 1-2 minutes until fragrant. Let them cool completely before adding to the batter.
- Don’t Overmix: Stir the batter until you no longer see dry streaks of flour. Overworking the gluten in the flour is the enemy of a tender crumb.
- Test for Doneness: Ovens vary. Start checking your cake at the 45-minute mark. If the top is browning too quickly while the center is still wet, loosely tent it with a piece of aluminum foil.
- Storage: Keep any leftover cake in an airtight container at room temperature for up to 2 days, or in the refrigerator for up to 5 days. It can also be frozen for up to 3 months. Thaw overnight in the fridge.
Ready to Bake Your Masterpiece?
There you have it your comprehensive guide to creating an utterly delicious, 100% plant-based Vegan Poppy Seed Coffee Cake. This recipe demonstrates that with the right techniques, vegan desserts can stand proudly alongside any traditional treat, offering incredible flavor and a wonderfully satisfying texture.
So, preheat that oven, gather your ingredients, and embrace the joy of baking. The process is therapeutic, the aroma is heavenly, and the result a slice of warm, spiced cake with your favorite hot beverage is pure comfort. We promise, this dairy-free treat will become a cherished recipe in your collection.
Happy baking! Don’t forget to share your beautiful creations online with #VeganPoppySeedJoy.