Your Dreamy, Creamy Homemade Treat Awaits!
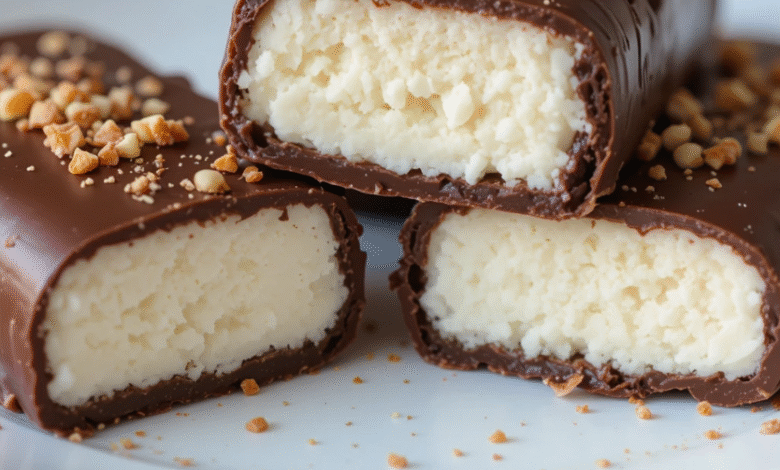
Imagine biting into a perfectly frozen ice cream bar: a thick, creamy center encased in a satisfyingly crisp shell of rich chocolate. That magical combination of textures and flavors isn’t just for the grocery store freezer aisle. Making homemade chocolate-covered ice cream bars is surprisingly simple, incredibly fun, and allows you to control every ingredient. This ultimate guide will walk you through the foolproof process, ensuring you create stunning, professional-looking treats that will impress family and friends. Get ready to unlock the secrets to the most delicious DIY frozen dessert you’ve ever made!
Ingredients for Homemade Chocolate-Cushioned Ice Cream Bars
Gathering quality ingredients is the first step to success. This recipe is highly customizable, but here’s the classic foundation.
For the Ice Cream Base:
- 1 pint (about 500ml) of your favorite ice cream, slightly softened (Vanilla, chocolate, strawberry, or cookies and cream work wonderfully)
For the Chocolate Shell:
- 2 cups (about 350g) high-quality chocolate chips or chopped chocolate (dark, milk, or semi-sweet)
- 2 tablespoons coconut oil (this is the secret for a crisp, fast-hardening shell)
Optional Toppings & Mix-Ins (Choose Your Favorites!):
- Chopped nuts (almonds, peanuts, pecans)
- Sprinkles or jimmies
- Crushed cookies, pretzels, or waffle cones
- Sea salt flakes
- Shredded coconut
- Freeze-dried fruit powder

Step-by-Step Instructions for Perfect Ice Cream Bars
Follow these numbered steps for guaranteed delicious results. Remember, working quickly is key!
Step 1: Prepare Your Mold and Ice Cream
- Line a square baking pan (8×8 inch) with parchment paper, leaving overhang on two sides for easy lifting. Alternatively, you can use popsicle molds.
- Scoop the slightly softened ice cream into the prepared pan. Use a spatula to spread it into an even layer, about 1-inch thick.
- Place the pan in the freezer for at least 2-3 hours, or until the ice cream is completely solid.
Step 2: Cut the Ice Cream into Bars
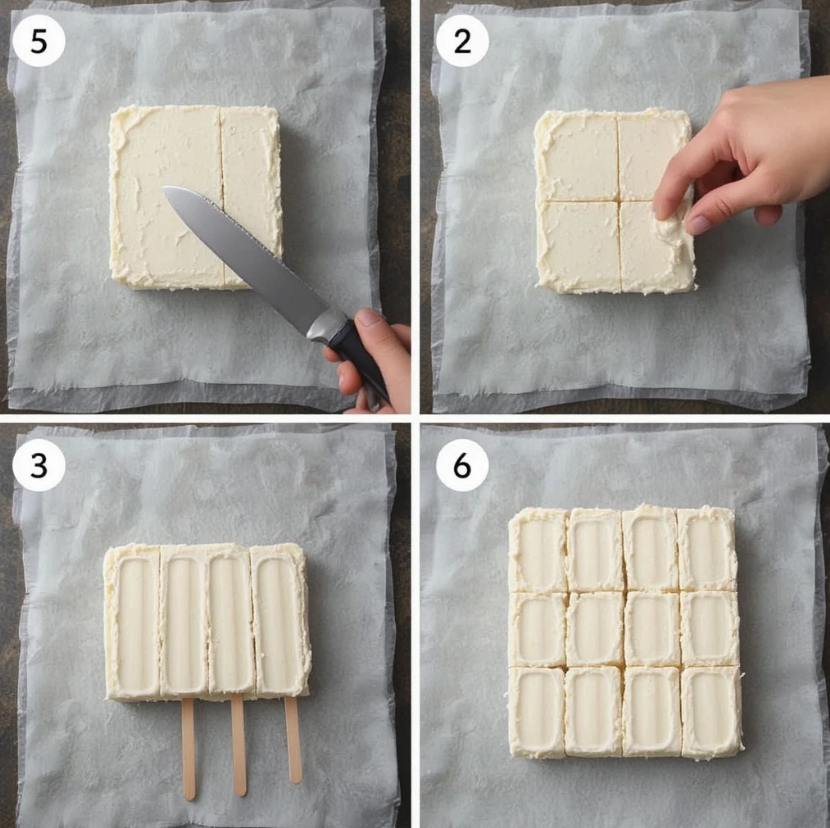
4. Once solid, use the parchment paper to lift the entire ice cream slab out of the pan.
5. Using a sharp knife warmed under hot water and dried, cut the slab into 8-10 even rectangular bars.
6. Insert a popsicle stick into each bar, if desired. Place the bars on a parchment-lined tray and return to the freezer for at least 30 minutes to re-harden completely.
Step 3: Create the Magic Shell & Dip
7. In a microwave-safe bowl or a double boiler, combine the chocolate chips and coconut oil.
8. If microwaving: Heat in 30-second bursts, stirring well after each, until completely smooth and melted.
9. Using a double boiler: Heat over simmering water, stirring constantly, until melted and smooth. Let the chocolate mixture cool slightly for 2-3 minutes.
10. Pour the melted chocolate into a tall, narrow glass for easy dipping.
11. Take 2-3 ice cream bars out of the freezer at a time. Quickly dip each bar into the chocolate, swirling to coat completely. Let the excess drip off.
Step 4: Add Toppings and Freeze
12. Immediately after dipping, sprinkle your chosen toppings over the wet chocolate before it sets.
13. Place the finished chocolate-covered bar back onto the parchment-lined tray.
14. Repeat with the remaining bars, working in small batches to prevent melting.
15. Once all bars are dipped and decorated, freeze the entire tray for at least 20-30 minutes to allow the chocolate shell to fully set.
Useful Tips for Ice Cream Bar Success
- Work Cold & Fast: Keep the ice cream bars as cold as possible. Only take a few out of the freezer at a time for dipping.
- The Coconut Oil Key: Do not skip the coconut oil. It thins the chocolate to the perfect dipping consistency and ensures it hardens into a crisp shell upon contact with the frozen ice cream.
- Customize Everything! Use dairy-free ice cream and vegan chocolate for a plant-based version. Mix crumbled cookies or brownie bits right into the ice cream base before freezing.
- Storage: Once fully set, store your homemade chocolate-covered ice cream bars in a single layer in an airtight container separated by parchment paper. They will keep for 1-2 weeks in the freezer.
- Troubleshooting: If your chocolate is too thick, add a touch more coconut oil. If it’s too thin, let it cool a bit longer before dipping.
Conclusion: Enjoy Your Custom Creations!
Congratulations! You’ve just mastered the art of making homemade chocolate-covered ice cream bars. Not only are they far more satisfying than anything store-bought, but they also offer endless possibilities for creativity. Whether you keep it classic with vanilla and nuts or go wild with unique mix-ins, these treats are sure to become a staple in your home. So, what combination will you try first? Gather your ingredients, follow this simple guide, and get ready to enjoy the ultimate frozen delight made entirely by you. Don’t forget to share your delicious creations!


