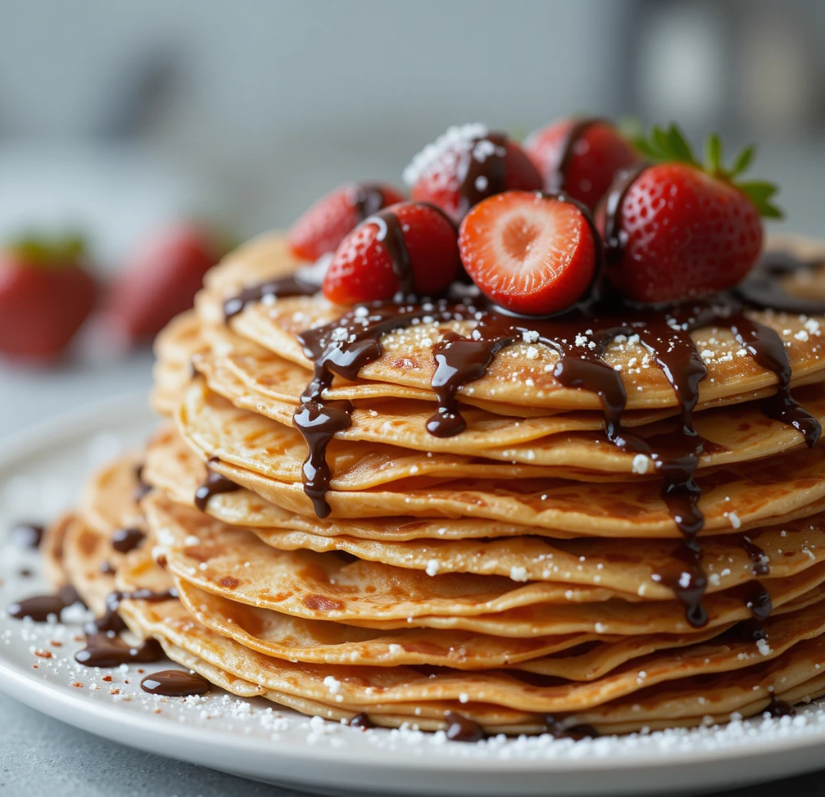
The Art of Traditional French Crêpes: A Recipe Using 4-6 Eggs for Perfect Results
A Taste of Paris in Your Kitchen
Imagine the scent of lightly browned butter, the delicate sizzle of a thin batter hitting a hot pan, and the anticipation of rolling a warm, golden crêpe around a dollop of sweet jam or savory filling. This isn’t just breakfast; it’s the art of French crêpe-making, a culinary tradition beloved worldwide. Far from complicated, the magic of a perfect crêpe lies in its simplicity and technique. Whether you envision a stack for a leisurely weekend brunch or an elegant dessert, mastering this recipe is a rewarding kitchen skill. Using 4 to 6 eggs a range that allows you to tailor the richness and structure this guide will demystify the process. We’ll walk through every step, ensuring that even a beginner can achieve the lacy edges, tender center, and that quintessential French je ne sais quoi. Let’s bring a piece of a Parisian crêperie into your home.
Your Essential Ingredients for Authentic French Crêpes
The beauty of a classic crêpe batter is its short, pantry-friendly list. Using 4 to 6 eggs gives you flexibility: 4 eggs yield a slightly lighter crêpe, while 5 or 6 create a richer, more custardy, and sturdy texture—ideal for hearty fillings. Here’s what you’ll need for about 12-15 crêpes:
Wet Ingredients:
- 4-6 large eggs (This is your key variable. Start with 5 for a perfect balance.)
- 2 cups (500ml) whole milk (For best flavor and texture)
- 4 tablespoons (60g) unsalted butter, melted and cooled, plus extra for the pan
Dry Ingredients:
- 1 cup (125g) all-purpose flour
- A generous pinch of fine sea salt
- 2 tablespoons (25g) granulated sugar (Omit for savory crêpes)
For Cooking & Serving:
- Unsalted butter or neutral oil for the pan
- Classic Fillings: Nutella, lemon juice & powdered sugar, whipped cream & berries, ham & cheese, sautéed mushrooms.

Step-by-Step Guide to Perfect Crêpes Every Time
H2: Preparing the Perfect Crêpe Batter
The first secret to sublime crêpes is a smooth, lump-free batter that has time to rest.
H3: Step 1: Combine the Wet Ingredients
In a large mixing bowl, gently whisk the 4-6 eggs until the yolks and whites are just combined. Be careful not to whisk too vigorously and create too much foam. Gradually whisk in the milk, followed by the 4 tablespoons of cooled, melted butter. The mixture should be uniform.
H3: Step 2: Incorporate the Dry Ingredients
In a separate bowl, sift together the flour and salt (and sugar, if making sweet crêpes). This aerates the flour and prevents lumps. Create a well in the center of the dry ingredients. Gradually pour the wet mixture into the well, whisking constantly from the center outward. This technique helps form a smooth paste first, which then thins out seamlessly with the remaining liquid.
H3: Step 3: The Crucial Resting Period
Once your batter is smooth it should have the consistency of thin cream cover the bowl with plastic wrap and let it rest at room temperature for at least 30 minutes, or up to 2 hours in the refrigerator. This allows the gluten in the flour to relax (resulting in tender crêpes) and any tiny flour lumps to dissolve.
H2: Cooking Your Crêpes Like a Pro
This is where the magic happens. A non-stick skillet or a well-seasoned crêpe pan (20-25 cm) is your best friend.

H3: Step 4: Heat and Grease the Pan
Place your skillet over medium heat. Let it get properly hot a drop of water should sizzle and dance. Using a folded paper towel, lightly coat the pan with a tiny amount of butter or oil. You should see a slight sizzle but no smoke.
H3: Step 5: Pour and Swirl
Lift the hot pan off the heat. Using a ladle or measuring cup (about 1/4 cup per crêpe), pour the batter into the center of the pan. Immediately, tilt and rotate the pan in a circular motion so the batter spreads outwards into a very thin, even circle. Return the pan to the heat.
H3: Step 6: Watch for the Signs
The crêpe will cook quickly, in about 60-90 seconds. You’ll see the edges begin to lift and turn a light golden brown, and the surface will lose its wet, shiny look and may form tiny bubbles. This is your cue to flip.
H3: Step 7: The Confident Flip
Loosen the edges with a thin spatula. For the brave, you can try the classic wrist-flick flip! Otherwise, use your spatula to gently but swiftly flip the crêpe. Cook the second side for just 20-30 seconds until lightly spotted with gold. Slide it onto a plate.
H3: Step 8: Stack and Keep Warm
Repeat the process, re-greasing the pan lightly every 2-3 crêpes. Stack the cooked crêpes on a plate, optionally with parchment paper between them. You can keep them warm in a low oven (about 200°F/95°C) covered with foil.
Pro Tips for Flawless French Crêpes
- Batter Consistency is Key: If your first crêpe is too thick, your batter needs thinning. Add a tablespoon of milk at a time. It should coat the back of a spoon but run off quickly.
- Pan Temperature Matters: If the batter sets too fast before you can swirl it, the pan is too hot. If it doesn’t set quickly and sticks, it’s not hot enough. Adjust as you go.
- Don’t Over-flip: One flip is enough. Flipping multiple times can make the crêpe tough.
- Embrace Imperfection: The first crêpe is often a “test” for the pan’s heat and batter consistency. Don’t be discouraged if it’s not perfect it’s the cook’s treat!
- Make-Ahead Magic: Crêpe batter actually improves overnight. Rest it in the fridge for up to 48 hours. Cooked crêpes can be stored in the fridge for 3 days or frozen for a month, separated by parchment paper.
Conclusion: Your Crêpe Adventure Awaits
Mastering the art of traditional French crêpes is a delightful journey that rewards patience with delicious, versatile results. By using 4 to 6 eggs, you have direct control over the texture, making this recipe adaptable to your taste whether you prefer a delicate wrap or a heartier base. Now that you have the knowledge, from the resting batter to the confident swirl, it’s time to create. Gather your ingredients, heat your pan, and embrace the process. Fill them with your favorites, sweet or savory, and share the joy. Allez cuisine! (Let’s cook!). Don’t forget to share your beautiful crêpe creations online and tag them with #PerfectFrenchCrepes.