Imagine a dessert that combines the nostalgic joy of an ice cream sundae with the satisfying structure of a pie. A creation so versatile, it’s perfect for a casual family dinner, a festive birthday party, or a warm summer evening. That’s the magic of Sundae Pie. This no-bake wonder layers creamy ice cream, rich fudge sauce, crunchy nuts, and fluffy whipped topping into a buttery cookie crust. It’s a make-ahead masterpiece that looks stunning and tastes like pure celebration. In this easy-to-follow guide, we’ll walk you through creating your own show-stopping Sundae Pie, guaranteed to become your go-to dessert for any and every occasion.
Gather Your Ingredients: What You’ll Need for Sundae Pie
The beauty of this recipe lies in its simplicity and customizability. You can use store-bought ingredients for ultimate ease or homemade components for a personal touch. Here’s what you need to create a classic, crowd-pleasing version.
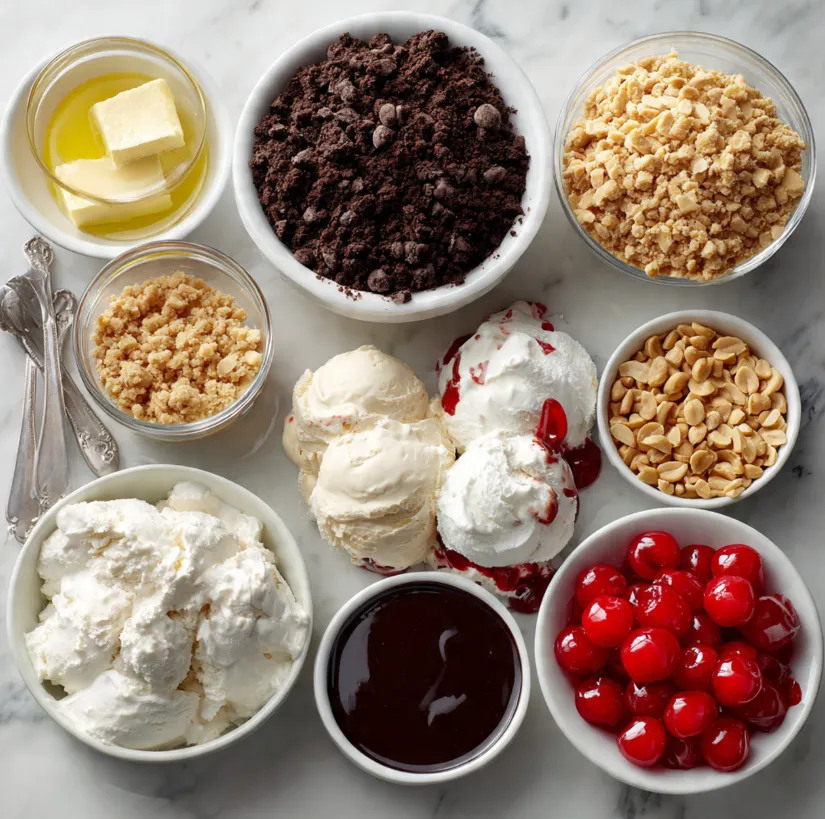
For the Crust:
- 1 ½ cups (about 150g) chocolate cookie crumbs (like Oreo baking crumbs, with filling removed, or graham cracker crumbs)
- ¼ cup (55g) granulated sugar
- 6 tablespoons (85g) unsalted butter, melted
For the Filling & Layers:
- ½ cup (120ml) hot fudge sauce, plus extra for drizzling (store-bought or homemade)
- 1 quart (about 950ml) high-quality vanilla ice cream, slightly softened
- 1 cup (125g) roasted, salted peanuts, roughly chopped (walnuts or pecans work great too)
- 1 (8 oz / 225g) container of frozen whipped topping (like Cool Whip), thawed in the fridge
For the Topping:
- ½ cup (120ml) hot fudge sauce, cooled slightly
- Remaining whipped topping
- Maraschino cherries
- Sprinkles (optional)
- Extra chopped nuts
Equipment:
- 9-inch pie dish (metal or glass)
- Mixing bowls
- Spatula
- Electric mixer or whisk
- Measuring cups and spoons
Step-by-Step Guide: How to Make Sundae Pie
This recipe is incredibly straightforward and requires no oven time, making it ideal for beginner bakers and hot days. The key is working quickly with the softened ice cream to maintain distinct, beautiful layers.
Step 1: Prepare the Chocolate Cookie Crust
- In a medium bowl, combine the chocolate cookie crumbs and sugar.
- Pour the melted butter over the crumbs and mix thoroughly with a fork until the mixture resembles wet sand and holds together when pinched.
- Press the mixture firmly and evenly into the bottom and up the sides of your 9-inch pie dish. Use the bottom of a flat glass or measuring cup to press for a compact, even crust.
- Place the crust in the freezer for at least 15-20 minutes to set firmly while you prepare the other components.
Step 2: Create the First Ice Cream Layer
- Remove the ice cream from the freezer and let it sit on the counter for 10-15 minutes to soften slightly. It should be spreadable but not soupy.
- Take the chilled crust from the freezer. Spread about ½ cup of hot fudge sauce evenly over the bottom of the crust. This creates a barrier and a delicious first layer of flavor.
- Scoop half of the softened vanilla ice cream into the crust. Using a spatula dipped in warm water, spread it evenly over the fudge layer, working quickly to prevent melting. Smooth the top.
Step 3: Add the Nutty Crunch
- Sprinkle a generous layer of chopped peanuts (about ¾ cup) evenly over the first ice cream layer, pressing them in gently. This adds a wonderful salty crunch that contrasts the sweet creaminess.
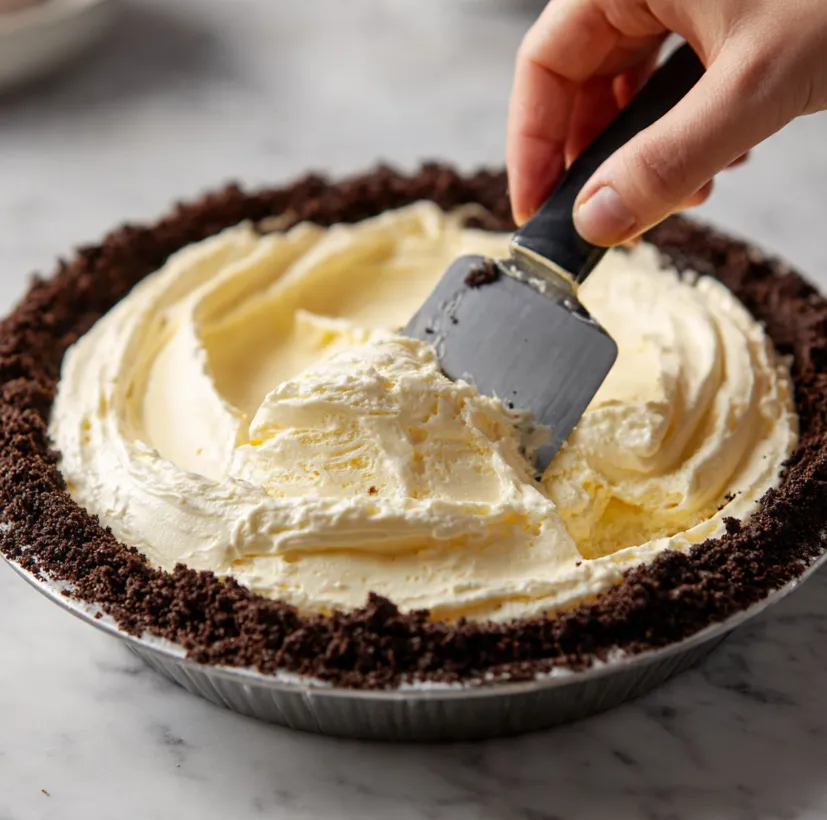
Step 4: Add the Second Ice Cream & Whipped Cream Layer
- Scoop and spread the remaining vanilla ice cream over the nut layer, smoothing the top again.
- Now, gently spread the entire container of thawed whipped topping over the second ice cream layer. Create a nice, even dome shape.
Step 5: The Final Touches and Freezing
- Drizzle the remaining ½ cup of hot fudge sauce over the whipped topping layer in a zigzag pattern.
- Sprinkle the remaining chopped nuts and sprinkles (if using) around the edge of the pie.
- Carefully cover the pie dish with plastic wrap, ensuring it doesn’t touch the toppings. Freeze for at least 6 hours, but preferably overnight, until the pie is completely firm and sliceable.
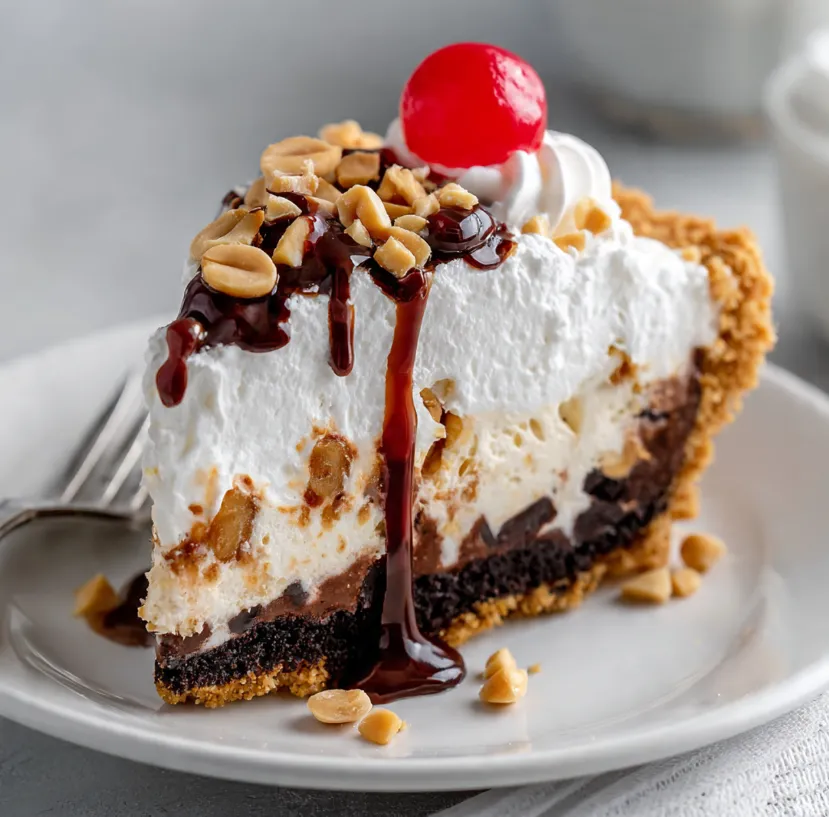
Step 6: Serving Your Masterpiece
- About 5-10 minutes before serving, transfer the pie from the freezer to the refrigerator. This makes slicing cleaner.
- Use a sharp knife dipped in hot water and wiped dry for each slice to get clean cuts through the layers.
- Place each slice on a plate, add a final dollop of whipped cream if desired, and crown it with a maraschino cherry. Serve immediately and enjoy the applause!
Pro Tips for the Perfect Sundae Pie Every Time
- Ice Cream Consistency is Key: Don’t let the ice cream melt. Softened just enough to spread is perfect. If it gets too runny, refreeze it for a few minutes.
- Hot Fudge Hack: Warm your fudge sauce slightly for drizzling so it flows easily. For the bottom layer, it can be at room temperature.
- Crust Variations: Use graham crackers, vanilla wafers, or even pretzels for a salty-sweet twist. Pre-made crusts work in a pinch, but homemade tastes better.
- Flavor Twists: Get creative! Use chocolate ice cream with raspberry sauce, mint chocolate chip with brownie chunks, or caramel ice cream with sea salt and pecans.
- Make-Ahead Marvel: This pie can be made up to 2-3 days in advance, tightly wrapped. It’s the ultimate party stress-reliever.
- For Clean Slices: The hot water knife trick is non-negotiable. Run the knife under very hot water, wipe it dry, and cut swiftly.
Conclusion: Your New Favorite Dessert Awaits
Sundae Pie is more than just a recipe; it’s a celebration in a pie dish. It captures the fun and flavor of building your own sundae but in a stunning, shareable format. With its no-bake simplicity, endless customizability, and guaranteed delicious results, it truly is a dessert for every season and every reason.
Don’t just dream about those layers of creamy ice cream, gooey fudge, and crunchy nuts. Gather your ingredients, follow these simple steps, and create a dessert that will have everyone asking for the recipe. Whether it’s a potluck, holiday, or just a well-deserved Tuesday treat, this Sundae Pie is ready to make the occasion special. So, what are you waiting for? Grab a spoon and start building your masterpiece today!