No-Bake Peanut Butter Chocolate Oatmeal Cookies: Your 20-Minute Path to Bliss
The Magic of No-Bake Treats
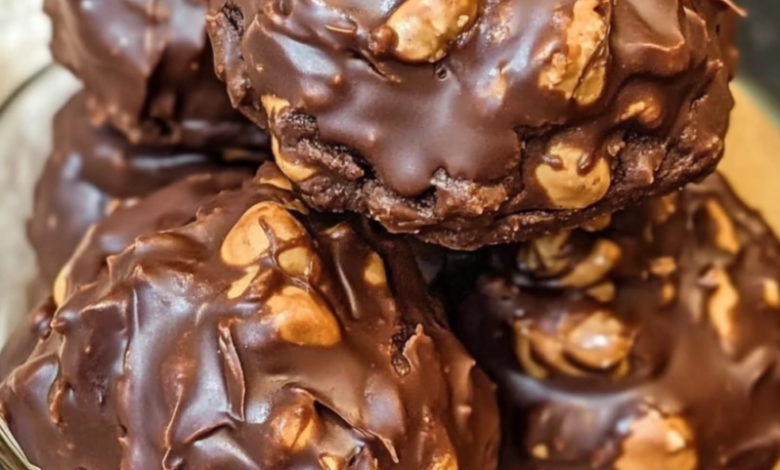
In a world where time is precious and cravings are urgent, the no-bake cookie is a culinary superhero. It requires no preheating, no precise baking times, and no fear of over-browning. Among these quick-fix delights, one recipe stands out as a timeless classic: the No-Bake Peanut Butter Chocolate Oatmeal Drop Cookie.
This recipe is more than just a convenience; it’s a perfect alchemy of rich chocolate, creamy peanut butter, and hearty oats. It’s the answer to a busy parent’s need for a quick snack, a student’s late-night study fuel, and a chocolate lover’s immediate gratification. Whether you’re a seasoned baker or a complete novice in the kitchen, this guide will walk you through every step to create perfectly fudgy, irresistibly chewy cookies that will become a staple in your home.
Why This Recipe is a Kitchen Essential
Before we dive into the ingredients and method, let’s explore why this particular recipe deserves a permanent spot in your repertoire:
- Speed and Simplicity: From stovetop to plate in under 30 minutes.
- No Special Equipment Required: All you need is a saucepan, a spoon, and a baking sheet.
- Incredibly Versatile: Easily adaptable for dietary needs (see variations below).
- Energy-Boosting: With complex carbs from oats and protein from peanut butter, these cookies are a satisfying snack that provides lasting energy, unlike many traditional baked goods.
- Crowd-Pleasing Flavor: The combination of chocolate and peanut butter is a universally adored duo that appeals to all ages.
The Ultimate Ingredient List: A Symphony of Flavor and Texture
Gathering your ingredients beforehand (a practice known as mise en place) is the first secret to success. Each component plays a crucial role in the final texture and taste of your cookies.
Core Ingredients:
- 2 cups (400g) Granulated Sugar: Provides sweetness and is essential for the structure of the cookie as it dissolves and then re-crystallizes.
- 1/2 cup (115g) Unsalted Butter: Adds richness, flavor, and a soft, melt-in-your-mouth texture. Using unsalted allows you to control the salt level.
- 1/2 cup (120ml) Milk: Whole milk is preferred for the creamiest result, but any milk will work. The liquid is necessary for dissolving the sugar.
- 1/4 cup (25g) Unsweetened Cocoa Powder: Use a high-quality cocoa powder for a deep, robust chocolate flavor.
- A Pinch of Salt: Enhances all the other flavors and balances the sweetness.
The Binding & Body Ingredients:
- 1/2 cup (130g) Creamy Peanut Butter: The star of the show! Use a standard, commercially available peanut butter (not the natural, oily kind) for the best consistency and binding. It adds creaminess, protein, and that iconic nutty flavor.
- 1 teaspoon Pure Vanilla Extract: A flavor enhancer that rounds out the sharp edges of the sugar and cocoa, adding a warm, aromatic depth.
- 3 cups (270g) Old-Fashioned Rolled Oats: This is the “heart” of the cookie. Old-fashioned oats provide the perfect chewy texture and nutty flavor. Do not use instant or quick oats, as they will become too mushy.
Step-by-Step Cooking Instructions: Your Path to Cookie Perfection
Follow these steps carefully, paying close attention to the boiling time, as this is the most critical part of the process.
Step 1: Prepare Your Workspace
Line two large baking sheets with parchment paper or wax paper. This prevents the cookies from sticking and makes cleanup a breeze. Have all your ingredients measured and ready to go next to the stove.
Step 2: The Boiling Phase – The Most Critical Step
In a medium-sized saucepan, combine the sugar, butter, milk, cocoa powder, and salt. Place the saucepan over medium heat.
Stir the mixture constantly with a wooden spoon or silicone spatula until the butter melts and the ingredients are fully combined. Once the mixture begins to boil, let it boil for exactly 1 minute (60 seconds), stirring continuously.
Why is this so important? This full minute of boiling is necessary to dissolve the sugar crystals completely. If you don’t boil it long enough, the cookies will be grainy and won’t set properly. If you boil it too long, they can become dry and crumbly. Use a timer!
Step 3: Combine and Create the “Dough”
After the minute is up, immediately remove the saucepan from the heat. Quickly add the peanut butter and vanilla extract. Stir vigorously until the peanut butter is completely melted and the mixture is smooth and uniform.
Now, add the rolled oats. Stir until every oat is thoroughly coated in the chocolate-peanut butter mixture. The “dough” will be thick and glossy.
Step 4: Dropping and Setting
Working relatively quickly (as the mixture will begin to set), drop spoonfuls of the mixture onto your prepared baking sheets. You can use a tablespoon, a small cookie scoop, or two spoons. The “drop” method gives them a charming, rustic appearance.
Allow the cookies to cool at room temperature until they are firm and set. This usually takes about 20-30 minutes. For faster setting, you can place the baking sheets in the refrigerator for 10-15 minutes.
Pro Tips and Common Variations
- The Perfect Consistency: If your cookies don’t set, it’s likely the sugar mixture wasn’t boiled for long enough. If they are too hard, it was boiled for too long. The 1-minute mark is the sweet spot.
- Add-In Ideas:
- For Crunch: Stir in 1/2 cup of chopped peanuts, pecans, or walnuts.
- For Sweetness: Add 1/2 cup of shredded coconut or mini chocolate chips after adding the oats.
- For a Flavor Kick: A 1/4 teaspoon of cinnamon can add a wonderful warmth.
- Dietary Variations:
- Dairy-Free: Use vegan butter and your favorite plant-based milk (oat or almond milk work well).
- Gluten-Free: Ensure you use certified gluten-free rolled oats.
- Reduced Sugar: You can try reducing the sugar by up to 1/4 cup, but be aware it may slightly alter the texture and setting ability.
Storing Your Masterpiece
Once completely set, store your no-bake cookies in an airtight container at room temperature. They will keep well for up to one week. For a firmer texture, you can store them in the refrigerator. They can also be frozen for up to 3 months; simply thaw at room temperature for 15 minutes before enjoying.
Conclusion: Your New Go-To Recipe
There you have it—the complete guide to creating flawless, delicious no-bake peanut butter chocolate oatmeal cookies. This recipe is more than just a list of instructions; it’s a gateway to effortless, homemade joy. It proves that you don’t need an oven or hours of free time to create something truly special and satisfying.
So, the next time a sweet craving strikes or you need a guaranteed hit for a bake sale or potluck, remember this recipe. Grab your saucepan, and in less time than it takes to watch a sitcom, you’ll have a batch of rich, chewy, and utterly irresistible cookies ready to delight everyone lucky enough to try one. Happy (no-bake) cooking
