Welcome to your new favorite comfort food recipe! If you’ve ever craved the rich, cheesy, and deeply satisfying flavors of Italian cuisine, this Eggplant Rollatini is about to become a star in your kitchen. This dish, a beloved classic in Southern Italian cooking, features tender slices of eggplant rolled around a creamy, herby ricotta filling, smothered in marinara sauce and melted mozzarella, then baked to golden perfection. Unlike the heavier, fried version often found in restaurants, this recipe offers a lighter, baked approach that celebrates the eggplant’s natural flavor without sacrificing an ounce of comfort. It’s impressive enough for a dinner party, yet straightforward enough for a cozy weeknight meal. Whether you’re a vegetarian looking for a hearty centerpiece or simply a lover of delicious food, follow this step-by-step guide to create a restaurant-quality Eggplant Rollatini at home.
Ingredients for Eggplant Rollatini
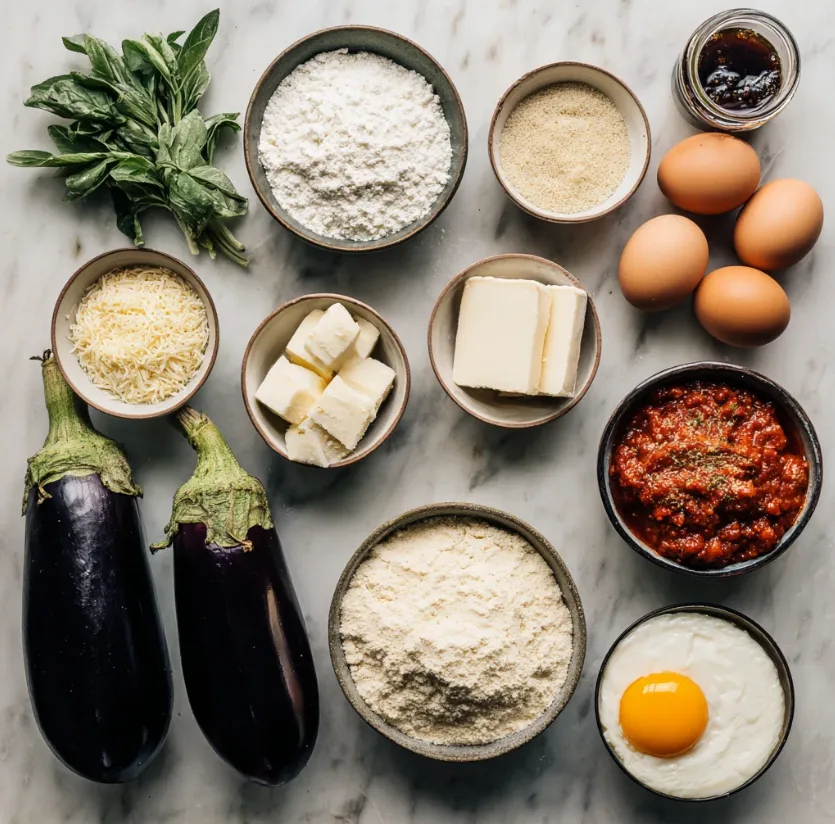
Gathering fresh, high-quality ingredients is the first step to an unforgettable dish. This recipe is designed to serve 4-6 people generously.
For the Eggplant:
- 2 large, firm eggplants (about 2 lbs total)
- 2 teaspoons kosher salt
- 2 large eggs
- 1/2 cup all-purpose flour
- 1 cup Italian-seasoned breadcrumbs
- 1/2 cup grated Parmesan cheese
- Olive oil cooking spray or 1/4 cup olive oil for brushing
For the Ricotta Filling:
- 15 oz (about 425g) whole milk ricotta cheese
- 1 large egg
- 1 cup shredded mozzarella cheese (divided)
- 1/2 cup grated Parmesan cheese
- 1/4 cup fresh parsley, finely chopped
- 2 tablespoons fresh basil, finely chopped
- 1 teaspoon dried oregano
- 1/2 teaspoon garlic powder
- 1/4 teaspoon black pepper
- 1/4 teaspoon salt
For Assembly:
- 24 oz (about 3 cups) of your favorite marinara sauce
- 1 cup shredded mozzarella cheese (for topping)
- Fresh basil leaves for garnish
Step-by-Step Preparation Instructions
Step 1: Preparing and Salting the Eggplant
This crucial step removes excess moisture and bitterness, ensuring your eggplant slices are tender, not soggy or tough.
- Wash the eggplants and trim off the stem ends. Using a sharp knife or a mandoline slicer for evenness, slice the eggplants lengthwise into approximately 1/4-inch thick slices. You should get about 12-16 slices total.
- Lay the slices in a single layer on a wire rack set over a baking sheet or on paper towels. Sprinkle both sides generously with kosher salt. Let them sit for 30-45 minutes. You’ll see beads of moisture (the bitter juices) form on the surface.
- Rinse the slices thoroughly under cold water to remove the salt. Pat them completely dry with clean kitchen towels or paper towels. This drying step is essential for the breading to adhere properly.
Step 2: Breading the Eggplant Slices
This creates a flavorful, golden coating that helps the rolls hold their shape.
- Set up a standard breading station with three shallow dishes. In the first dish, place the flour. In the second, beat the two eggs with a tablespoon of water. In the third, combine the Italian breadcrumbs with 1/2 cup of grated Parmesan cheese.
- Preheat your oven to 400°F (200°C). Line two large baking sheets with parchment paper and lightly grease them or spray with cooking spray.
- Working with one slice at a time, dredge a dry eggplant slice in the flour, shaking off any excess. Next, dip it into the beaten egg, allowing the excess to drip off. Finally, press it firmly into the breadcrumb-Parmesan mixture, coating both sides evenly. Place the breaded slice on the prepared baking sheet. Repeat with all slices.
- Lightly spray or brush the tops of the breaded eggplant with olive oil. This helps them crisp up. Bake for 15-20 minutes, flipping halfway through, until they are golden brown and pliable. Remove from the oven and let them cool slightly. Reduce oven temperature to 375°F (190°C).

Step 3: Making the Ricotta Cheese Filling
While the eggplant bakes, prepare the simple, flavorful filling.
- In a large mixing bowl, combine the ricotta cheese, one egg, 1 cup of shredded mozzarella, 1/2 cup of grated Parmesan, chopped parsley, chopped basil, dried oregano, garlic powder, black pepper, and salt.
- Mix gently but thoroughly with a fork until all ingredients are well incorporated. Taste and adjust seasoning if needed.
Step 4: Assembling the Eggplant Rolls
- Spread about 1 cup of marinara sauce evenly on the bottom of a 9×13 inch baking dish.
- Take a baked eggplant slice. Place about 2 tablespoons of the ricotta filling onto the wider end of the slice. Gently roll the eggplant up around the filling, starting from the wider end. Place the roll, seam-side down, into the prepared baking dish. Repeat with all slices, arranging them snugly in the dish.
Step 5: Baking to Perfection
- Spoon the remaining marinara sauce over the tops of the eggplant rolls, covering them evenly.
- Sprinkle the remaining 1 cup of shredded mozzarella cheese over the sauce.
- Cover the baking dish loosely with aluminum foil. Bake at 375°F (190°C) for 20 minutes.
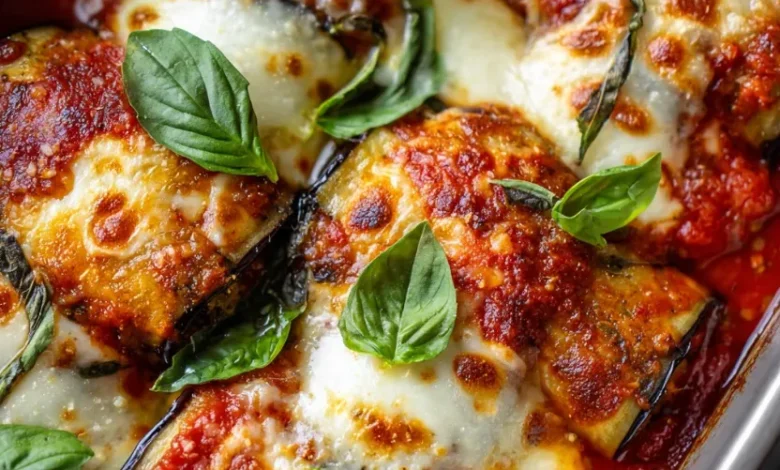
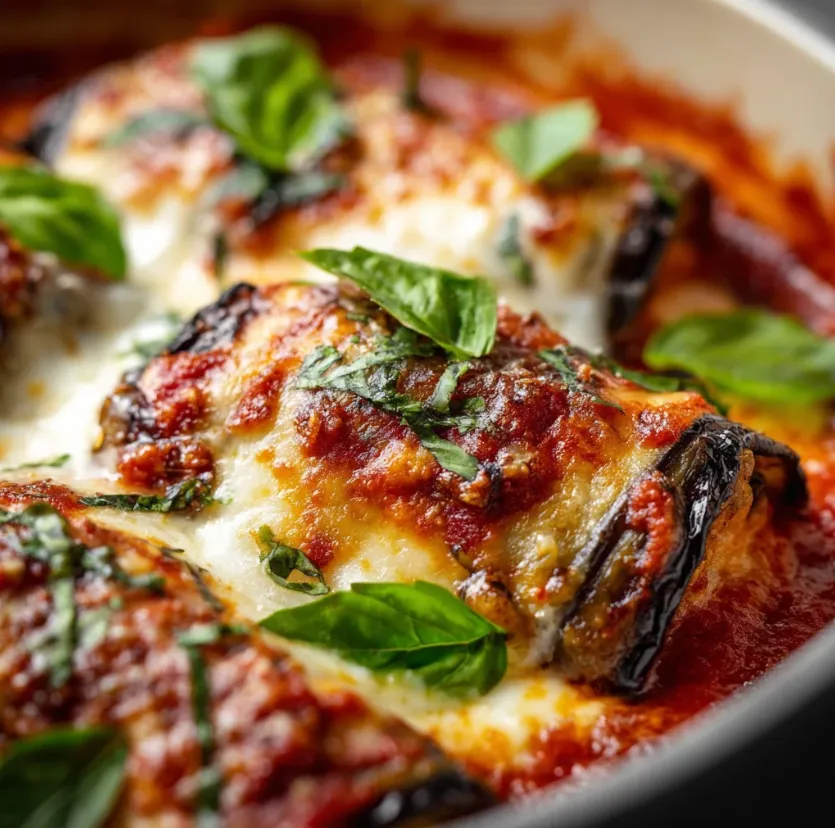
- Remove the foil and bake for an additional 10-15 minutes, or until the cheese is completely melted, bubbly, and lightly golden.
- Remove from the oven and let the dish rest for about 10 minutes before serving. This allows the filling to set slightly, making the rolls easier to serve.
Useful Tips for the Best Eggplant Rollatini
- Choosing Eggplants: Look for firm, glossy eggplants that feel heavy for their size, with smooth, taut skin. Smaller eggplants often have fewer seeds and less bitterness.
- Salting is Key: Don’t skip the salting step! It significantly improves the final texture.
- Ricotta Consistency: For an extra smooth and firm filling, consider draining your ricotta in a fine-mesh strainer for 30 minutes before mixing to remove excess whey.
- Make-Ahead Magic: You can assemble the entire dish a day in advance. Cover tightly and refrigerate. Add 10-15 minutes to the baking time if starting from cold. You can also freeze the unbaked, assembled dish for up to 3 months. Thaw overnight in the fridge before baking as directed.
- Sauce Matters: Use a high-quality, flavorful marinara sauce from a jar for convenience, or take the extra time to make your own simple sauce with canned San Marzano tomatoes.
- Variations: Add about 1/2 cup of finely chopped spinach (thawed and squeezed dry) to the ricotta mixture. For a protein boost, mix in 1/2 cup of finely chopped, cooked Italian sausage or ground beef.
Conclusion: Your Homemade Italian Feast Awaits
Congratulations! You’ve just mastered the art of making a truly spectacular and comforting Italian dish. This Eggplant Rollatini recipe proves that with a few simple techniques salting, breading, and a flavorful filling you can transform humble ingredients into a meal that feels both luxurious and homey. The combination of tender eggplant, creamy herbed ricotta, tangy marinara, and gooey melted cheese is simply irresistible.
Serve these beautiful rolls with a crisp green salad, a side of garlic bread to soak up the sauce, and perhaps a glass of red wine for the full trattoria experience at your dining table. It’s a dish that’s sure to garner compliments and requests for seconds. Don’t be intimidated by the steps; each one is straightforward and builds towards the incredible final result. So, preheat your oven, roll up your sleeves, and get ready to enjoy the deeply satisfying process and the delicious reward. Buon appetito!