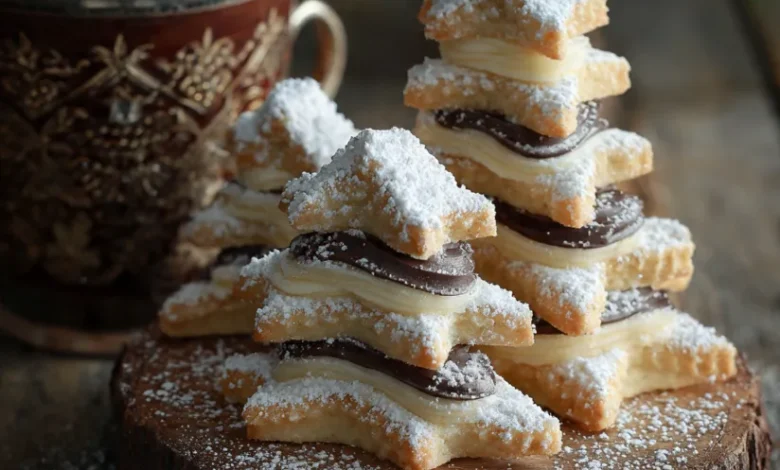
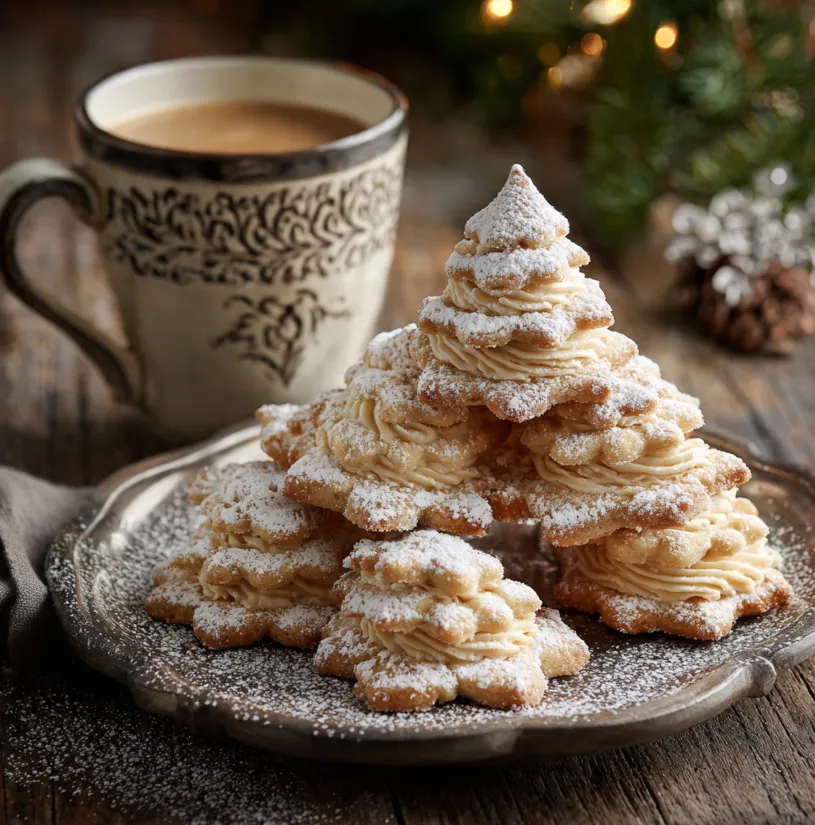
The holiday season whispers of cinnamon and ginger, but what if you could answer its call with something uniquely elegant and deeply flavorful? Imagine a cookie that captures the warmth of a festive gathering and the sophisticated kick of your favorite coffeehouse indulgence. Enter Espresso Cream Holiday Tree Cookies. These are not your average sugar cookies. They are a beautiful fusion of rich, buttery shortbread, infused with the deep, aromatic notes of espresso, and elegantly shaped into charming holiday trees. Each bite offers a delightful contrast: a slight crunch giving way to a melt-in-your-mouth texture, followed by the robust, comforting flavor of coffee. Perfect for cookie exchanges, sophisticated gift-giving, or as the stunning centerpiece of your dessert table, these cookies promise to elevate your holiday baking from traditional to extraordinary. They are a simple yet impressive project that rewards you with both beauty and incredible taste.
Gathering Your Ingredients
The magic of these cookies lies in the quality and balance of their simple components. Using real espresso powder is non-negotiable for that authentic, deep coffee flavor.
For the Espresso Shortbread Dough:
- 2 cups (250g) all-purpose flour, plus extra for dusting
- 1/4 cup (25g) high-quality unsweetened cocoa powder (for depth of color and flavor)
- 2 tablespoons (10g) finely ground, instant espresso powder (or more for a stronger kick)
- 1/4 teaspoon fine sea salt
- 1 cup (226g) unsalted butter, softened at room temperature
- 2/3 cup (80g) confectioners’ sugar (powdered sugar)
- 1 teaspoon pure vanilla extract
For the Espresso Cream Filling & Decoration:
- 3/4 cup (85g) confectioners’ sugar, sifted
- 1 tablespoon (5g) instant espresso powder
- 1-2 tablespoons milk or heavy cream
- 1/2 teaspoon pure vanilla extract
- Additional confectioners’ sugar or green sanding sugar for dusting/decorating

Step-by-Step Baking Instructions
Follow these detailed steps to ensure your espresso holiday cookies are perfect in both shape and flavor.
Preparing the Espresso Shortbread Dough
Combining the Dry Ingredients
- In a medium bowl, whisk together the 2 cups of all-purpose flour, cocoa powder, 2 tablespoons of espresso powder, and salt. Whisk thoroughly until no streaks of cocoa or espresso remain. This ensures the flavors are evenly distributed throughout your dough.
Creaming the Butter and Sugar
2. In a large mixing bowl (or the bowl of a stand mixer fitted with the paddle attachment), beat the softened butter and 2/3 cup of confectioners’ sugar together on medium speed for 2-3 minutes. The mixture should become light, fluffy, and pale in color.
3. Beat in the vanilla extract until just combined.
Bringing the Dough Together
4. With the mixer on low speed, gradually add the dry flour mixture to the wet ingredients. Mix only until the flour is fully incorporated and a soft, cohesive dough forms. Be careful not to overmix.
5. Turn the dough out onto a piece of plastic wrap. Shape it into a flat disc, wrap it tightly, and refrigerate for at least 1 hour (and up to 2 days). This chilling step is crucial as it firms up the butter, making the dough easy to roll and preventing the cookies from spreading too much in the oven.
Shaping and Baking the Trees
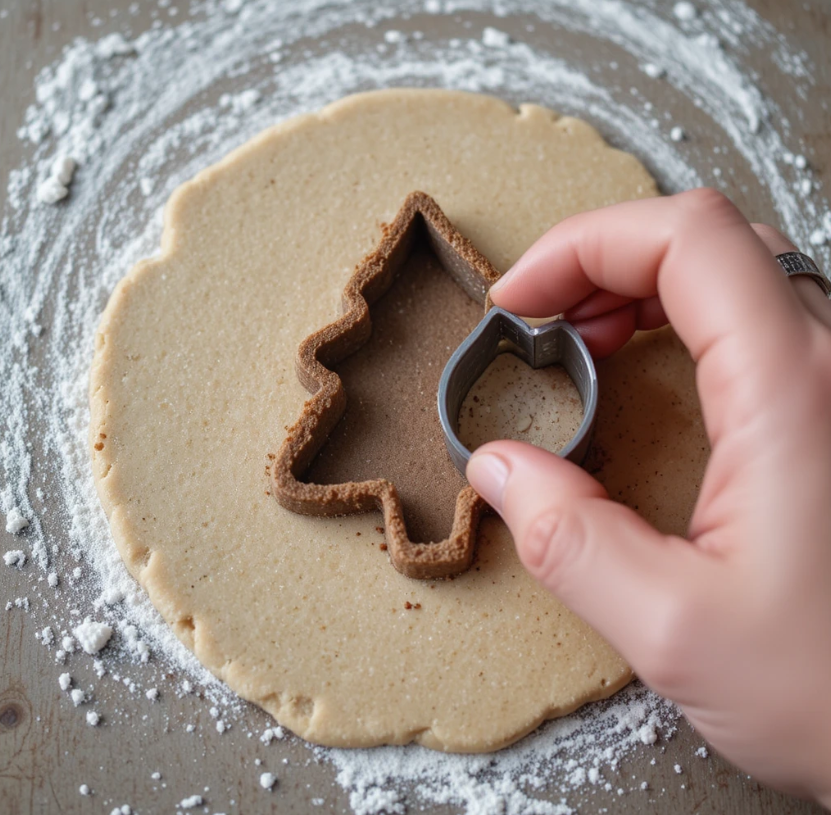
Rolling and Cutting the Dough
6. Preheat your oven to 325°F (165°C). Line two large baking sheets with parchment paper.
7. On a lightly floured surface, roll out the chilled dough to about 1/4-inch thickness. Use a tree-shaped cookie cutter (about 3 inches tall works well) to cut out your shapes. Dip the cutter in flour between cuts to prevent sticking.
8. Carefully transfer the trees to the prepared baking sheets, spacing them about 1 inch apart. Re-roll the scraps once to cut more cookies.
The Bake
9. Bake for 12-15 minutes, or until the cookies are set and the bottoms are just lightly golden. The cookies will remain fairly pale due to the cocoa.
10. Allow the cookies to cool on the baking sheet for 5 minutes before transferring them to a wire rack to cool completely. They must be completely cool before filling.
Making the Espresso Cream and Assembly
Whipping Up the Filling
11. In a small bowl, combine the sifted 3/4 cup confectioners’ sugar and 1 tablespoon of espresso powder.
12. Add 1 tablespoon of milk or cream and the vanilla extract. Whisk vigorously until a smooth, thick paste forms. If the filling is too thick to spread, add more milk or cream, a few drops at a time, until you reach a pipeable or spreadable consistency.
Decorating Your Holiday Trees
13. Method 1 (Simple): Spread a thin layer of the espresso cream onto the back of one cookie and sandwich it with another. Lightly dust the tops with confectioners’ sugar for a snowy effect.
14. Method 2 (Elegant): Transfer the filling to a piping bag fitted with a small round or star tip. Pipe delicate ornaments, garlands, or a simple outline onto each tree cookie. You can also sprinkle with green sanding sugar before the filling sets for a sparkling touch.
Pro Baker Tips for Perfect Espresso Cookies
- Espresso is Key: For the boldest flavor, use a finely ground, high-quality instant espresso powder. Avoid granules meant for brewing, as they won’t dissolve properly.
- Butter Temperature: Your butter should be softened but still cool it should leave a slight indent when pressed, not be greasy or melted. This is essential for creating the right texture.
- Chill for Success: Don’t skip chilling the dough. If it becomes too soft while rolling, pop it back in the fridge for 15 minutes.
- Uniform Thickness: Use rolling pin guides or two evenly sized dowels on either side of your dough to roll it to a perfectly consistent thickness for even baking.
- Storage: Store unfilled cookies in an airtight container at room temperature for up to 5 days. Fill them just before serving for the best texture. Filled cookies are best eaten within 1-2 days.
Conclusion: Share the Sophistication
These Espresso Cream Holiday Tree Cookies are more than just a dessert; they are a statement. They tell your guests that you appreciate the nuanced pairing of rich coffee and sweet, buttery pastry, and that you took the time to create something truly special. The process is meditative and rewarding, and the result is a treat that stands out in a sea of classic holiday sweets. So this season, preheat your oven, brew a little espresso for yourself, and embrace the joy of creating these sophisticated, delicious edible ornaments. We promise, one bite and these will become a cherished holiday tradition. Don’t forget to share your beautiful creations online with #EspressoTreeCookies!


