Crispy Potato Cheese Balls: The Ultimate Guide to Golden, Gooey Perfection

Introduction: Why These Crispy Potato Cheese Balls Will Become Your New Favorite Snack
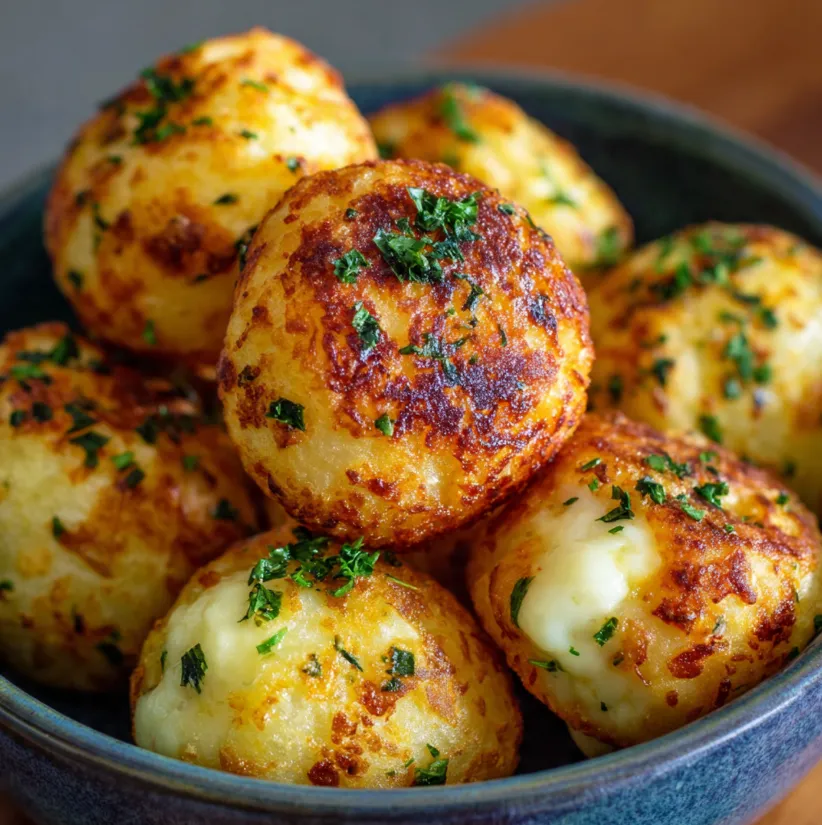
Imagine biting into a perfectly golden, crispy shell only to discover a cloud of fluffy, seasoned mashed potato and an oozing, molten heart of stretchy, savory cheese. That’s the magic of Crispy Potato Cheese Balls. This irresistible appetizer or snack combines comforting, familiar ingredients into a bite-sized piece of pure joy. Whether you’re hosting a party, looking for a fun family cooking project, or simply craving something deliciously indulgent, this guide will walk you through every step to achieve crispy, cheesy perfection. Far better than any frozen version, homemade potato cheese balls allow you to control the quality of ingredients and adjust flavors to your liking. Get ready to create a crowd-pleaser that’s surprisingly simple to make, even for kitchen beginners. Let’s turn humble potatoes and cheese into a spectacular treat!
Everything You Need: Your Crispy Potato Cheese Balls Shopping List
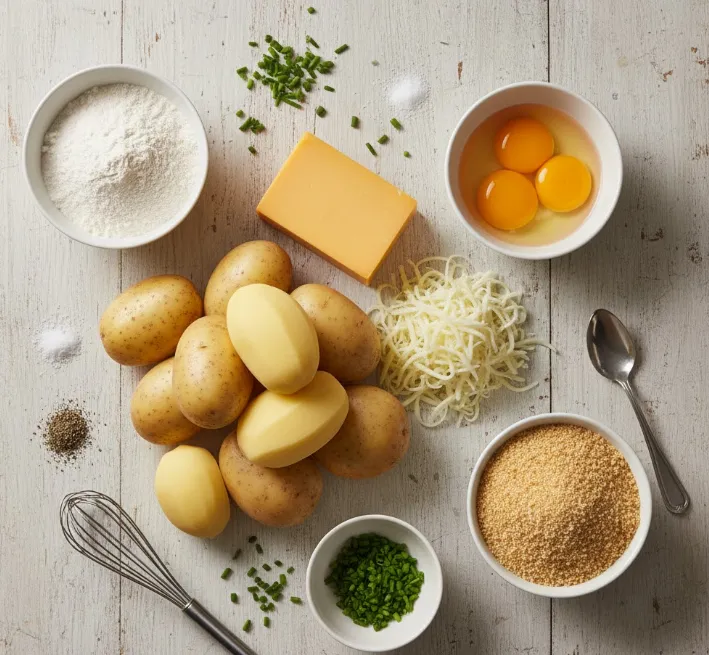
Gathering your ingredients is the first step to success. This recipe uses simple, pantry-friendly items to create something extraordinary.
Main Ingredients:
- For the Potato Mixture:
- 500g (about 4 medium) Russet or Yukon Gold Potatoes: Starchy potatoes like Russets create the fluffiest, best-textured mash.
- 40g (⅓ cup) Grated Parmesan Cheese: Adds a salty, umami depth to the potato.
- 2 tablespoons Unsalted Butter: For richness and flavor.
- 2 tablespoons Fresh Chives or Parsley, finely chopped (optional, for freshness).
- Salt and Black Pepper to taste.
- For the Cheesy Center & Coating:
- 150g Low-Moisture Mozzarella Cheese (or a blend of Mozzarella and Cheddar), cut into ½-inch cubes. Low-moisture cheese melts beautifully without making the mixture soggy.
- 100g (1 cup) All-Purpose Flour: For the initial coating to help the egg stick.
- 2 large Eggs, lightly beaten: The glue that binds the breadcrumbs.
- 150g (1 ½ cups) Fine Breadcrumbs or Panko breadcrumbs for extra crunch.
- Neutral Oil for Frying (like vegetable, canola, or sunflower oil). You’ll need enough for about 2-3 inches deep in your pot.
Step-by-Step Instructions for Perfect Potato Cheese Balls
Follow these numbered steps carefully for a foolproof process. We’ll break it down into clear stages: preparing the potato, forming the balls, and the crucial coating process.
Step 1: Prepare the Perfect Mashed Potato Base
- Peel and Cube: Peel the potatoes and cut them into evenly sized chunks (about 1-inch pieces). This ensures they cook uniformly.
- Boil: Place the potato chunks in a large pot of cold, salted water. Bring to a boil over high heat, then reduce to a simmer. Cook for 15-20 minutes, or until the potatoes are fork-tender.
- Drain and Dry: Drain the potatoes thoroughly in a colander. Let them sit for a minute in the hot pot over the turned-off burner to allow any excess moisture to evaporate. This step is key for a non-soggy mixture.
- Mash and Season: Transfer the potatoes to a large mixing bowl. Add the butter, grated Parmesan, chopped herbs (if using), and a generous pinch of salt and pepper. Mash until completely smooth and free of lumps. Let the mixture cool to room temperature. (Pro Tip: For an extra-smooth mash, pass the potatoes through a ricer.)
Step 2: Form the Balls with a Cheesy Surprise
- Portion: Once the potato mixture is cool enough to handle, take a heaped tablespoon (about 20-25g) and roll it into a smooth ball in your lightly oiled or damp hands.
- Create the Pocket: Flatten the ball in your palm to form a small disc. Place one cube of mozzarella (or a mix of cheeses) in the center.
- Seal Tightly: Carefully fold the potato around the cheese, pinching to seal completely. Roll it gently between your palms to form a perfect, smooth sphere. Ensure the cheese is fully enclosed to prevent leaks during frying. Repeat with the remaining mixture.
Step 3: The Triple-Coating Station for Maximum Crispiness
This is the secret to that iconic, crunchy exterior. Set up three shallow bowls in an assembly line:
- Bowl 1: All-purpose flour.
- Bowl 2: Lightly beaten eggs.
- Bowl 3: Fine breadcrumbs.

- Coat: Roll each formed potato ball first in the flour, shaking off the excess. Next, dip it fully into the beaten egg, letting any drip off. Finally, roll it in the breadcrumbs until evenly and thoroughly coated. Place the coated balls on a plate or baking sheet.
- Chill (Important!): Place the tray of coated balls in the refrigerator for at least 30 minutes. This chills the butter and cheese, helping the balls hold their shape and preventing them from bursting open in the hot oil.
Step 4: Frying to Golden Perfection
- Heat the Oil: In a deep, heavy-bottomed pot or Dutch oven, heat about 3 inches of oil to 350°F (175°C). Use a cooking thermometer for accuracy this temperature ensures a crispy exterior and a fully melted center without absorbing too much oil.
- Fry in Batches: Carefully lower 4-5 chilled balls into the hot oil using a slotted spoon. Do not overcrowd the pot, as this will lower the oil temperature.
- Fry Until Golden: Fry for 2-3 minutes, turning occasionally, until they are uniformly deep golden brown and crispy.
- Drain: Remove the crispy potato cheese balls with the slotted spoon and transfer them to a plate lined with paper towels to drain excess oil. Let them cool for a minute before serving the cheese inside will be extremely hot!
Pro Tips & Useful Information for Flawless Results
Troubleshooting Common Issues
- My balls are falling apart in the oil: This usually means they weren’t sealed properly or the coating wasn’t even. Ensure the potato completely encloses the cheese and that the crumb coating is intact. The chilling step is also crucial for structural integrity.
- The cheese is leaking out: Make sure you’re using low-moisture, block cheese (not pre-shredded, which contains anti-caking agents). Also, ensure the oil is hot enough before frying; if it’s too cool, the balls will sit and potentially burst before forming a crust.
- They are not crispy enough: Your oil may not have been hot enough. Use a thermometer. Also, ensure you are using fine, dry breadcrumbs. Panko will give an even crispier, airier texture.
Baking Option for a Lighter Version
Prefer to bake? You can make baked potato cheese balls!
- Preheat your oven to 425°F (220°C).
- Place the coated and chilled balls on a parchment-lined baking sheet.
- Lightly spray or brush them with oil.
- Bake for 20-25 minutes, turning halfway, until golden and crispy. Note: The exterior will be slightly different from deep-frying, but still delicious.
Make-Ahead and Storage Instructions
- Make Ahead: You can prepare the balls up to the coating and chilling stage. Store them covered on a tray in the refrigerator for up to 24 hours before frying. You can also freeze them on the tray until solid, then transfer to a freezer bag for up to 2 months. Fry directly from frozen, adding an extra 1-2 minutes to the cooking time.
- Storing Leftovers: Store any leftovers in an airtight container in the fridge for up to 2 days. Reheat in an air fryer or oven (375°F / 190°C for 10-12 minutes) to restore crispiness. The microwave will make them soft.
Conclusion: Time to Create Your Own Cheesy Masterpiece!
There you have it your comprehensive guide to creating unforgettable Crispy Potato Cheese Balls. This recipe proves that with a bit of care and these simple steps, you can easily recreate a restaurant-quality appetizer at home. The process of shaping, coating, and frying is not just cooking; it’s a fun, rewarding experience that ends with the ultimate payoff: that first glorious, cheesy bite.
So, roll up your sleeves, gather your potatoes and cheese, and get ready to impress your family, friends, or just yourself. Don’t forget to pair them with your favorite dipping sauces like marinara, ranch, or garlic aioli. We’d love to see your results! Share your golden, gooey creations online and tag your photos with #MyCheesyPotatoBalls. Happy cooking