Creamy Coconut Milk Pudding: Your Ultimate Guide to a Dreamy, Dairy-Free Dessert
Imagine a dessert so luxuriously smooth, so delicately fragrant, and so effortlessly elegant that it feels like a tropical vacation in a bowl. That’s the magic of homemade Creamy Coconut Milk Pudding. This isn’t just any pudding; it’s a velvety, dairy-free delight that captivates with its rich coconut flavor and a texture that’s pure silk. Far superior to any store-bought version, this pudding is surprisingly simple to make, requiring just a handful of pantry staples. Whether you’re catering to dietary restrictions, exploring vegan desserts, or simply craving something indulgently creamy, this foolproof recipe is your ticket to dessert heaven. Let’s unlock the secrets to creating this perfect, crowd-pleasing treat.
Why You’ll Fall in Love With This Coconut Milk Pudding
Before we dive into the ingredients, let’s talk about why this recipe deserves a permanent spot in your repertoire. First, it’s inherently dairy-free and vegan, making it an inclusive dessert for guests with various dietary preferences. The natural sweetness of coconut milk provides a beautiful base that pairs wonderfully with both classic and exotic toppings. Second, it’s incredibly versatile. Enjoy it as is, layer it in parfaits, or use it as a luxurious pie filling. Finally, it’s a make-ahead champion, setting beautifully in the fridge and tasting even better the next day as the flavors meld.
Gathering Your Ingredients: A Simple List for a Stunning Result
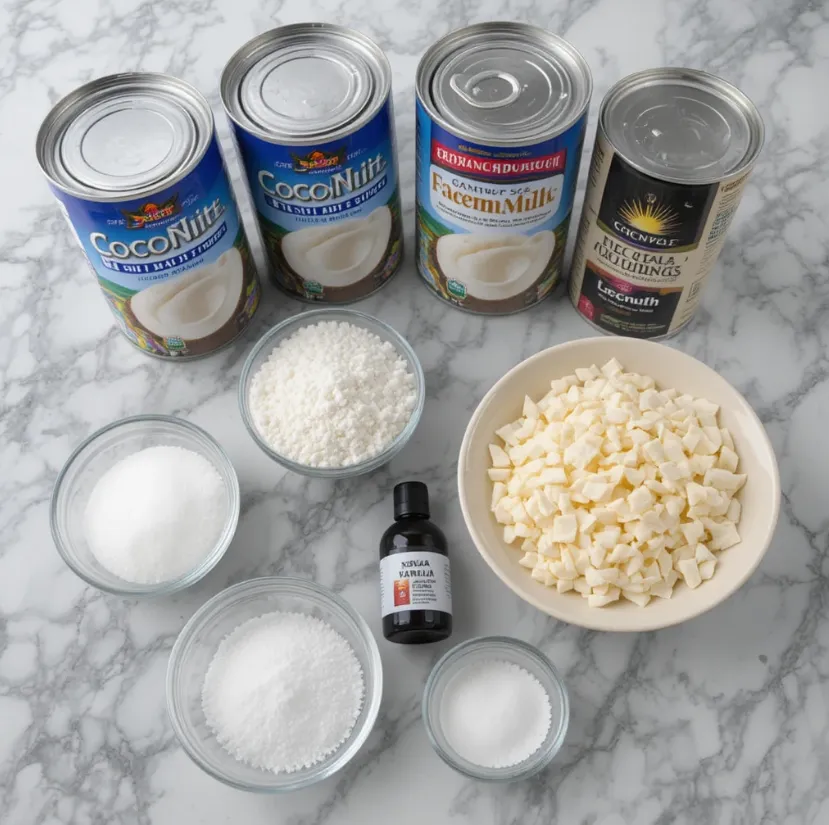
The beauty of this pudding lies in its simplicity. You only need six core ingredients to create this masterpiece. Using high-quality components is key to achieving the best flavor and texture.
Core Ingredients:
- 2 cans (13.5 oz / 400 ml each) Full-Fat Coconut Milk: This is the star. Do not use “lite” coconut milk. The high fat content is crucial for a rich, creamy set. Chill the cans overnight for best results.
- 1/2 cup (100g) Granulated Sugar: Adjust to your taste. You can substitute with coconut sugar for a deeper, caramel-like flavor.
- 1/3 cup (40g) Cornstarch: Our magic thickener. Ensure it’s fresh and lump-free for a smooth pudding.
- 1/4 teaspoon Salt: A pinch enhances all the other flavors and balances the sweetness.
- 1 teaspoon Pure Vanilla Extract: Use the real thing for the best aroma.
- 1/4 teaspoon Coconut Extract (optional): This boosts the coconut flavor intensely. Highly recommended for coconut lovers!
For Garnish (Optional but Recommended):
- Toasted Coconut Flakes
- Fresh Berries (mango, raspberries, or strawberries)
- A drizzle of honey or maple syrup (agave for vegan)
- Fresh Mint Leaves
- Crushed Pistachios or Macadamia Nuts
Step-by-Step: Your Foolproof Path to Perfect Pudding
Follow these detailed, numbered steps for a seamless cooking experience. This process is beginner-friendly and focuses on technique to prevent common pitfalls like lumps.
Step 1: The Initial Prep is Key
- Shake & Separate: If you chilled your coconut milk, the creamy solid part will have separated from the watery liquid at the bottom. Carefully open the cans and scoop the thick, solid coconut cream into a measuring jug. Add enough of the thinner liquid to make exactly 3 cups (720 ml) of total coconut mixture. This ensures perfect consistency.
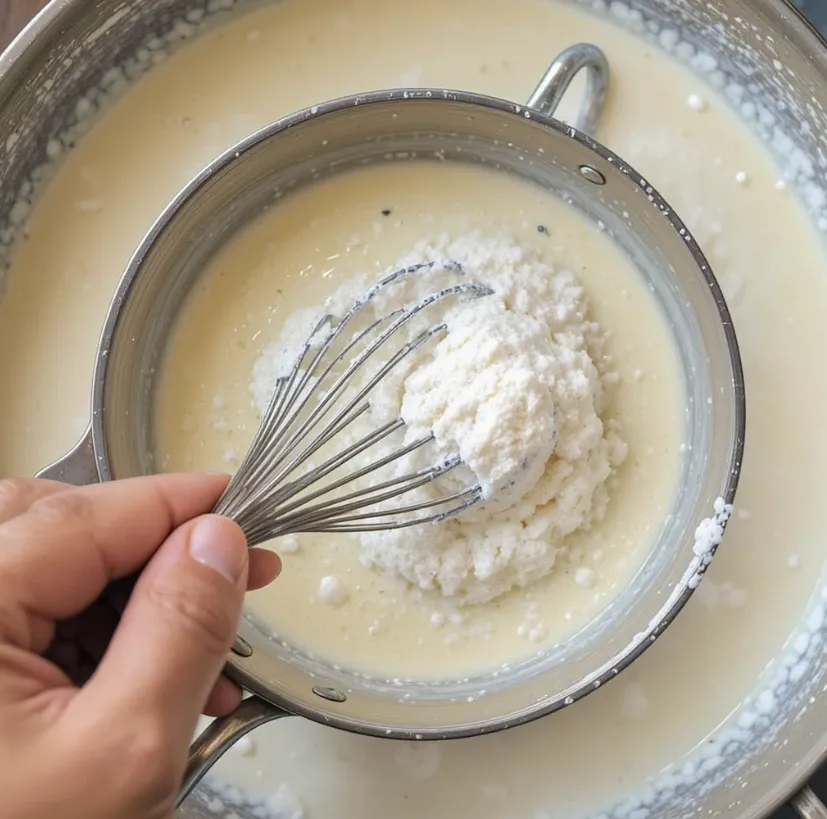
- Create a Slurry: Take 1/2 cup of this measured coconut liquid and pour it into a small bowl. Add the 1/3 cup of cornstarch. Whisk vigorously until you have a completely smooth, lump-free paste. This “slurry” is the secret to a lump-free pudding.
Step 2: Cooking to Creamy Perfection
- Combine and Heat: In a medium, heavy-bottomed saucepan, combine the remaining coconut milk mixture, sugar, and salt. Warm this over medium heat, stirring occasionally with a wooden spoon or silicone spatula, until it just begins to steam and the sugar is fully dissolved. Do not let it boil yet.
- Temper & Thicken: Here’s the crucial step. While whisking the warm coconut milk mixture constantly, slowly drizzle in the cornstarch slurry. Continue to whisk vigorously to incorporate it fully without lumps.
- The Simmer: Keep cooking over medium heat, now switching to constant stirring. The mixture will begin to thicken. Once you see large bubbles breaking the surface—a low, lazy boil—let it cook for exactly 1 more minute while stirring. This cooks out the raw starch taste. The pudding will become very thick and glossy.
Step 3: Finishing and Setting
- Off the Heat Flavor: Remove the saucepan from the heat immediately. Stir in the vanilla and coconut extract (if using). The residual heat will bloom their flavors beautifully.
- Strain (Pro Tip): For an absolutely flawless, restaurant-quality texture, pour the hot pudding through a fine-mesh sieve into a clean bowl or jug. This catches any potential tiny lumps.
- Portion and Cool: Quickly pour or ladle the pudding into your desired serving glasses or a large bowl. To prevent a skin from forming, press a piece of plastic wrap directly onto the surface of each pudding.
- Chill: Refrigerate for at least 4 hours, or ideally overnight, until completely cold and firmly set.
Pro Tips & Creative Variations for Your Pudding
Mastered the basic recipe? Now let’s personalize it! These tips and twists will ensure success every time and keep things exciting.
Essential Tips for Success:
- Whisk, Don’t Stir: When adding the slurry, aggressive whisking is non-negotiable for smoothness.
- Patience is a Virtue: Don’t rush the chilling process. A full overnight set yields the best texture.
- Flavor Infusion: Steep the warming milk with a pandan leaf or a strip of lime zest for an exotic twist. Remove before adding the slurry.
- Sweetener Swaps: Sugar can be replaced with an equal amount of maple syrup or agave. Adjust cornstarch slightly if the liquid volume changes significantly.
Delicious Variations to Try:
- Chocolate Coconut Pudding: Add 1/4 cup of high-quality cocoa powder to the dry cornstarch and sugar mix.
- Mango Coconut Layered Parfait: Layer the set pudding with fresh mango puree in a glass.
- Tropical Fruit Topping: Top with a mix of diced ripe mango, pineapple, and kiwi.
- Coffee Infused: Dissolve 1 tablespoon of instant espresso powder into the warm milk for a coconut mocha pudding.
Serving, Storing, and Savoring Your Creation
Your pudding is set, and it’s time for the grand finale!
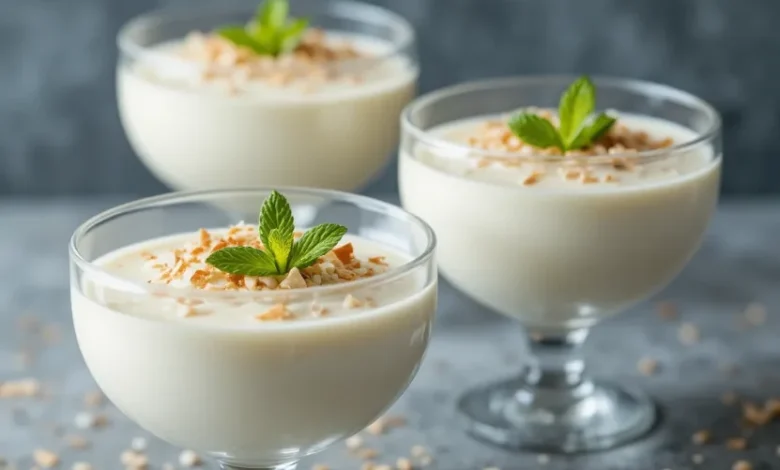
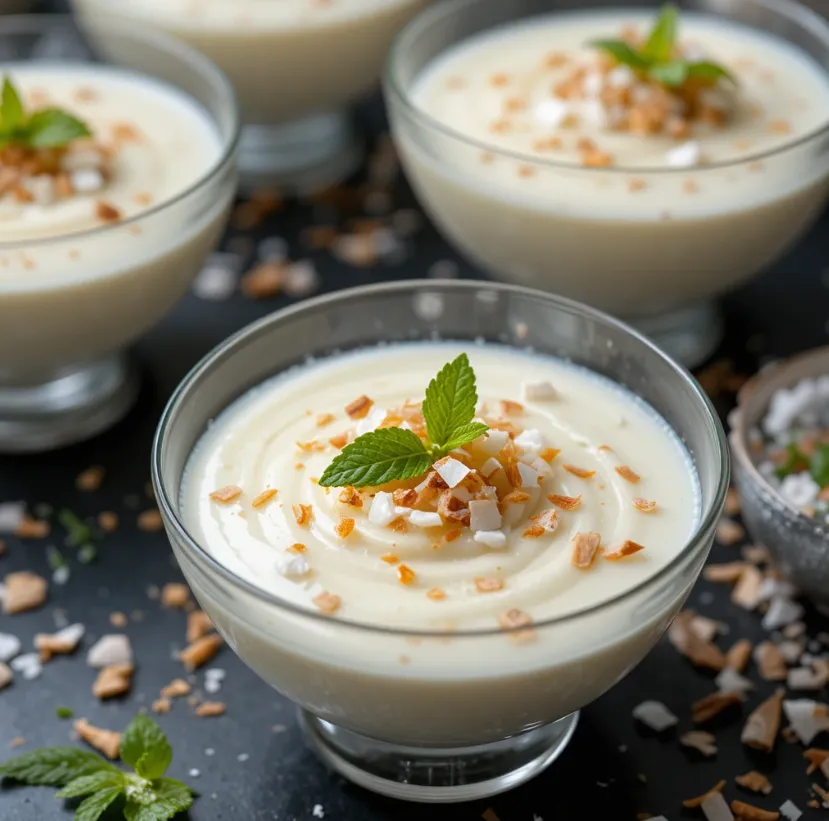
Serving Suggestions: Garnish generously just before serving. A sprinkle of toasted coconut adds crunch, fresh fruit brings acidity, a drizzle of honey adds sweetness, and a mint leaf gives color. Serve in elegant glasses for a dinner party or in a large bowl for a family-style dessert.
Storage Instructions: This pudding keeps wonderfully. Store it covered in the refrigerator for up to 4-5 days. It is not suitable for freezing, as the texture will become grainy upon thawing.
Conclusion: Your Journey to a Perfect Dessert Starts Now
There you have it the complete guide to creating an unforgettable, silky-smooth Creamy Coconut Milk Pudding. This recipe proves that spectacular desserts don’t require complex techniques or dozens of ingredients. With a little care and these detailed steps, you can create a dessert that is both comforting and elegant, satisfying and sophisticated.
So, what are you waiting for? Gather those simple ingredients, embrace the therapeutic process of stirring, and prepare to be amazed by your own culinary skills. This pudding is more than a recipe; it’s a blank canvas for your creativity and a guaranteed way to bring a touch of tropical bliss to any day.
Don’t just dream about creamy perfection make it tonight! And when you do, share your beautiful creations and tell us about your favorite variation. Happy cooking


