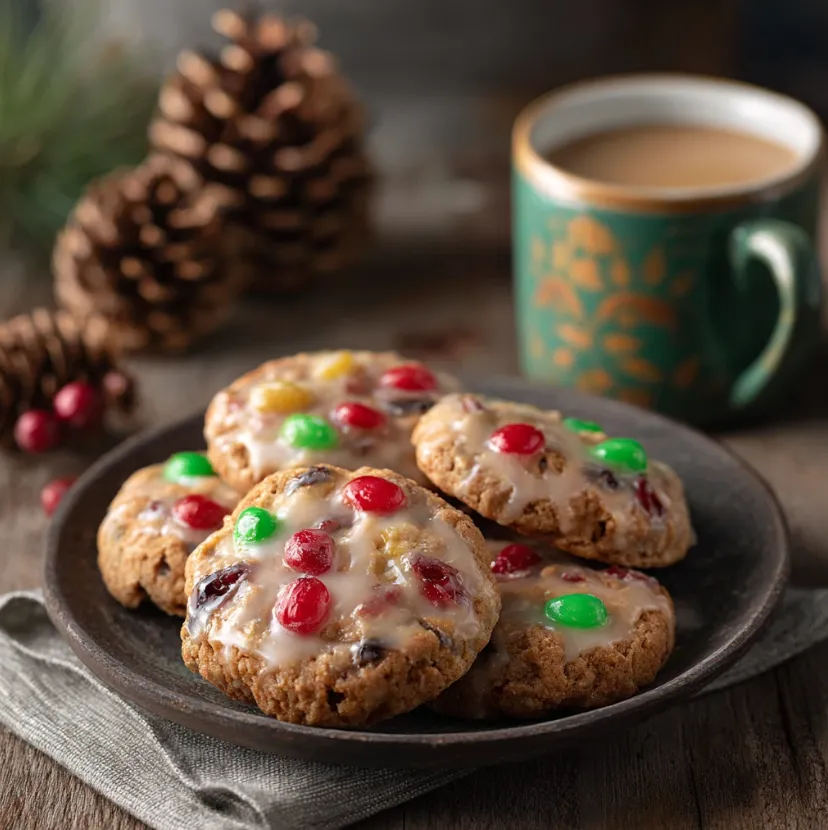
Christmas Fruitcake Cookies: A Festive Bite-Sized Tradition (Recipe & Guide)
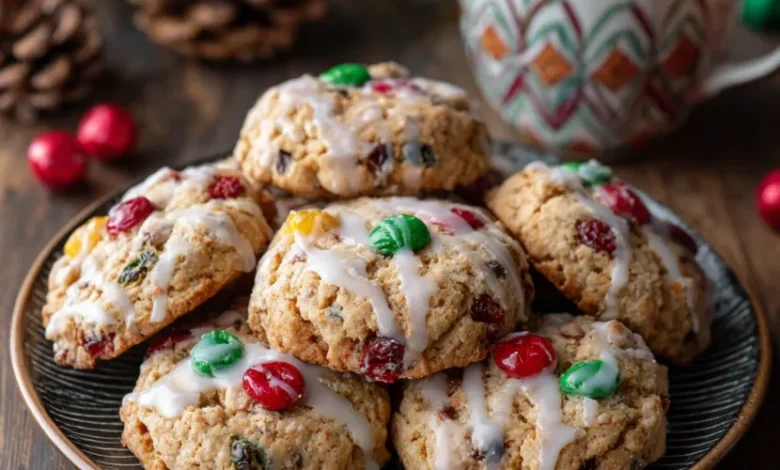
Nothing says “holiday season” quite like the rich, spiced, and fruit-filled aroma of a classic Christmas bake. But let’s be honest: a traditional fruitcake can be daunting time-consuming, large, and sometimes divisive. That’s where these Christmas Fruitcake Cookies come in! They capture all the beloved, nostalgic flavors of the classic holiday fruitcake in a delightful, bite-sized, chewy cookie form. Perfect for cookie exchanges, gifting, or simply enjoying with a cup of eggnog by the fire, this recipe is a foolproof way to bring festive joy to your kitchen. Easier than baking a whole cake and universally loved, these cookies are about to become your new holiday staple.
Why You’ll Love This Christmas Fruitcake Cookie Recipe
Before we dive into the ingredients, let’s talk about why this recipe works so well. We’ve streamlined the process, eliminating the weeks of “feeding” a cake. The cookies are packed with a generous mix of dried fruits and nuts, soaked in orange juice for a burst of flavor and moisture. The spice blend is warm and comforting, and the optional simple glaze adds a beautiful festive finish. They are soft, chewy, full of texture, and perfectly sweet. Best of all, this recipe is designed for bakers of all levels clear, simple, and absolutely delicious.
Christmas Fruitcake Cookies: Your Complete Ingredient List
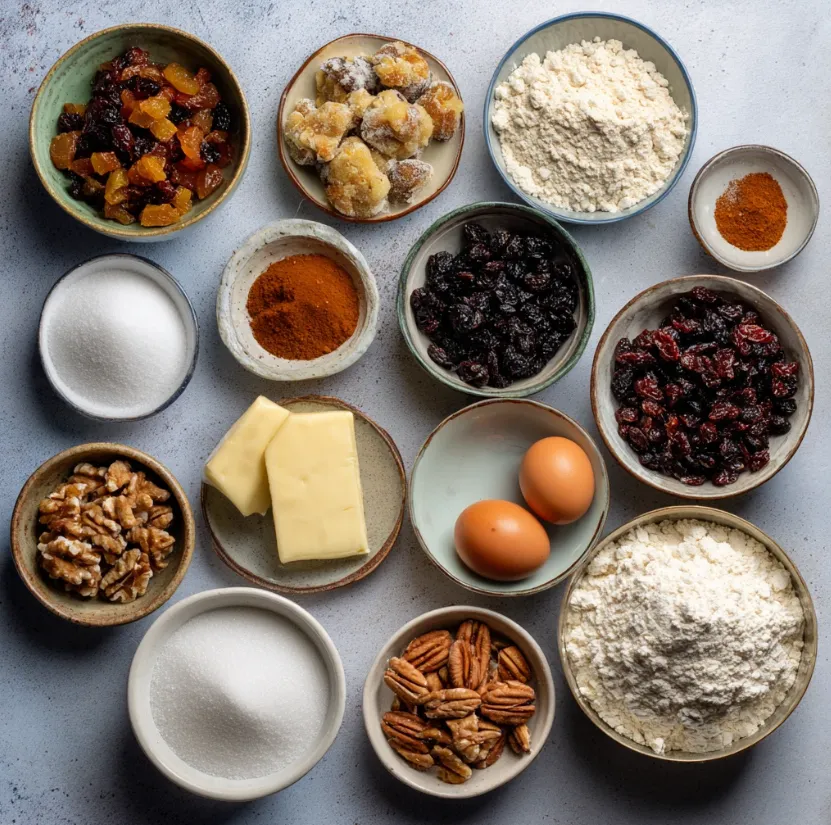
Gathering your ingredients is the first step to success. Here’s what you’ll need for these festive treats. For the best flavor, use high-quality extracts and fresh spices.
For the Fruit and Nut Mix:
- 1 ½ cups mixed dried fruits (a combination of raisins, chopped dates, chopped apricots, and cranberries)
- ½ cup candied red and green cherries, chopped (plus extra for topping, optional)
- ½ cup chopped pecans or walnuts
- ⅓ cup brandy, rum, OR orange juice (for a non-alcoholic version)
- 1 tablespoon orange zest
For the Cookie Dough:
- 2 ¼ cups all-purpose flour
- 1 ½ teaspoons ground cinnamon
- ½ teaspoon ground nutmeg
- ¼ teaspoon ground allspice
- ¼ teaspoon ground cloves
- ½ teaspoon baking soda
- ½ teaspoon salt
- ¾ cup unsalted butter, softened to room temperature
- ¾ cup packed light brown sugar
- ¼ cup granulated sugar
- 1 large egg, room temperature
- 2 teaspoons pure vanilla extract
- 1 teaspoon pure almond extract (optional, but recommended)
For the Optional Glaze:
- 1 cup powdered sugar, sifted
- 2-3 tablespoons milk or orange juice
- ½ teaspoon vanilla extract
Step-by-Step Instructions for Perfect Cookies
Follow these numbered steps carefully for the best results. Remember, patience is key, especially when soaking the fruits and chilling the dough.
Step 1: Prepare the Fruit Mixture (Do This First!)
In a medium bowl, combine the mixed dried fruits, chopped candied cherries, and chopped nuts. Pour your chosen liquid (brandy, rum, or orange juice) over the mixture and stir in the orange zest. Cover the bowl and let it soak for at least 1 hour at room temperature, or ideally overnight in the refrigerator. This step is crucial as it plumps up the fruits, making them incredibly juicy and flavorful in the baked cookies.
Step 2: Make the Cookie Dough
- Whisk Dry Ingredients: In a separate bowl, whisk together the flour, cinnamon, nutmeg, allspice, cloves, baking soda, and salt. Set aside.
- Cream Butter and Sugars: In the bowl of a stand mixer fitted with the paddle attachment (or using a hand mixer), beat the softened butter, brown sugar, and granulated sugar together on medium speed for 2-3 minutes, until light and fluffy.
- Add Wet Ingredients: Beat in the egg, vanilla extract, and almond extract until fully combined, scraping down the sides of the bowl as needed.
- Combine Dry and Wet: With the mixer on low speed, gradually add the flour mixture until just combined. Do not overmix.
- Fold in Fruits: Using a sturdy spatula, fold the soaked fruit and nut mixture (and any remaining liquid) into the cookie dough until evenly distributed.

Step 3: Chill the Dough
Cover the bowl with plastic wrap and refrigerate the dough for at least 2 hours, or up to 3 days. Chilling is non-negotiable it firms up the butter, prevents the cookies from spreading too much, and allows the flavors to deepen.
Step 4: Bake to Perfection
- Preheat your oven to 350°F (175°C). Line baking sheets with parchment paper or silicone mats.
- Scoop the dough using a 1.5-tablespoon cookie scoop or a spoon, and roll into balls. Place them about 2 inches apart on the prepared sheets. You can gently press a halved candied cherry onto the top of each ball for a festive look.
- Bake for 12-15 minutes, or until the edges are just set and lightly golden. The centers will still look soft this is perfect!
- Let the cookies cool on the baking sheet for 5 minutes before transferring them to a wire rack to cool completely.
Step 5: Add the Glaze (Optional)
While the cookies cool, make the glaze: whisk together the powdered sugar, 2 tablespoons of milk/orange juice, and vanilla extract. Add more liquid, one teaspoon at a time, until you reach a drizzle-able consistency. Using a spoon or a piping bag, drizzle the glaze over the completely cooled cookies.
Pro Baker Tips for the Best Christmas Cookies
- Fruit Flexibility: Feel free to customize the fruit mix based on preference. Try adding chopped dried figs, pineapple, or even a bit of ginger.
- Soaking Shortcut: If you’re short on time, microwave the fruit and liquid together for 1 minute, then let it sit for 30 minutes to cool and absorb.
- Consistency is Key: If your dough seems too sticky after chilling, let it sit at room temperature for 10-15 minutes before scooping. You can flour your hands slightly when rolling.
- Storage: Store completely cooled cookies in an airtight container at room temperature for up to 1 week. They also freeze beautifully for up to 3 months. Freeze unglazed cookies on a tray before bagging them; thaw and glaze when ready to serve.
- The Flavor Secret: The cookies taste even better the next day, as the flavors continue to meld.
Conclusion: Share the Joy of Homemade Holiday Baking
There you have it the ultimate guide to creating irresistible Christmas Fruitcake Cookies. This recipe bridges the gap between tradition and convenience, delivering all the festive cheer in every single bite. Whether you’re leaving them out for Santa, packing them in pretty tins as gifts, or simply treating yourself, these cookies are a celebration of the season.
We encourage you to put on some holiday music, pour yourself a warm drink, and embrace the comforting, creative process of baking. Don’t forget to share your beautiful creations! Snap a picture, tag it #MyChristmasFruitcakeCookies, and spread the sweetness. Happy Baking and Merry Christmas


