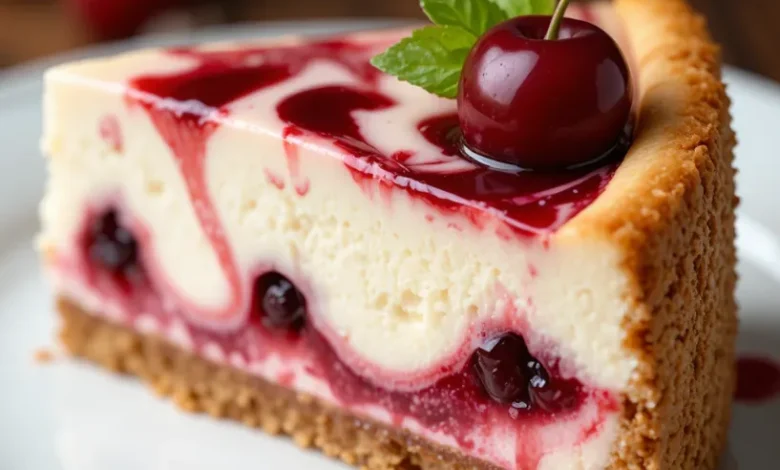
Is there anything more satisfying than the creamy, dreamy texture of a perfect cheesecake, beautifully swirled with a vibrant, tangy fruit sauce? This Cherry Swirl Cheesecake Dessert brings that exquisite café-quality experience right into your kitchen, with a surprising twist: no oven required! Designed for bakers of all levels, especially beginners, this recipe is your foolproof ticket to a stunning, crowd-pleasing dessert. It combines a buttery graham cracker crust with a luxuriously smooth cheesecake filling and a gorgeous, homemade cherry swirl that cuts through the richness with a burst of fruity flavor. Forget about complicated water baths or cracked tops this is cheesecake, simplified, without sacrificing an ounce of decadence. Let’s create a dessert that’s as beautiful to look at as it is divine to eat.

Gathering Your Ingredients
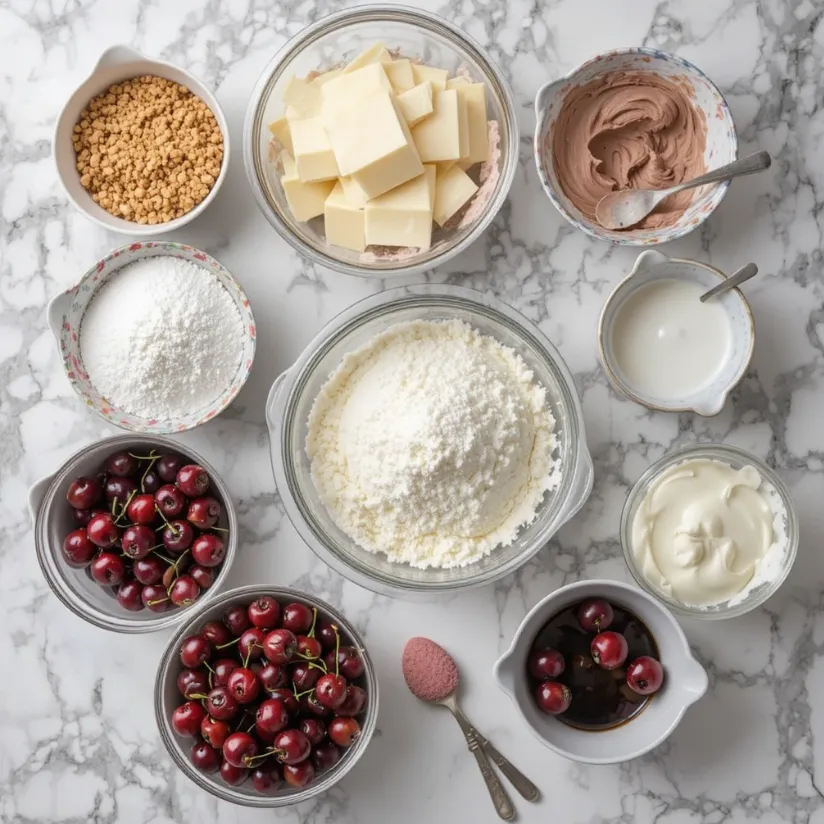
The magic of this dessert lies in its simple, high-quality components. Using full-fat ingredients is key for the best texture and flavor. Here’s everything you’ll need, divided by component.
For the Graham Cracker Crust:
- 2 cups (about 200g) graham cracker crumbs (from roughly 15 full sheets)
- 1/2 cup (115g) unsalted butter, melted
- 2 tablespoons (25g) granulated sugar
- A pinch of salt
For the No-Bake Cheesecake Filling:
- 24 ounces (680g) full-fat cream cheese, completely softened to room temperature
- 1 cup (120g) powdered sugar, sifted
- 1 ½ cups (360ml) cold heavy whipping cream
- 1 teaspoon pure vanilla extract
- 1 tablespoon freshly squeezed lemon juice
- A pinch of salt
For the Homemade Cherry Swirl:
- 2 cups (about 300g) fresh or frozen pitted cherries (thawed if frozen)
- 1/4 cup (50g) granulated sugar
- 2 tablespoons water
- 1 tablespoon cornstarch mixed with 1 tablespoon cold water (slurry)
- 1 teaspoon lemon juice
Equipment:
- 9-inch springform pan or a 9×9 inch square baking dish
- Electric hand mixer or stand mixer
- Medium saucepan
- Spatula
- Measuring cups and spoons
Step-by-Step Preparation Guide
Follow these numbered steps carefully for a seamless, stress-free baking experience.
Step 1: Prepare the Perfect Crust
- If using whole graham crackers, pulse them in a food processor until you achieve fine, sandy crumbs. Alternatively, place them in a sealed zip-top bag and crush with a rolling pin.
- In a medium bowl, combine the graham cracker crumbs, melted butter, sugar, and salt. Mix until the crumbs are uniformly moist and resemble wet sand.
- Press this mixture firmly and evenly into the bottom of your springform pan or baking dish. Use the bottom of a measuring cup to compact it tightly—this prevents a crumbly crust.
- Place the crust in the refrigerator to set while you prepare the filling.
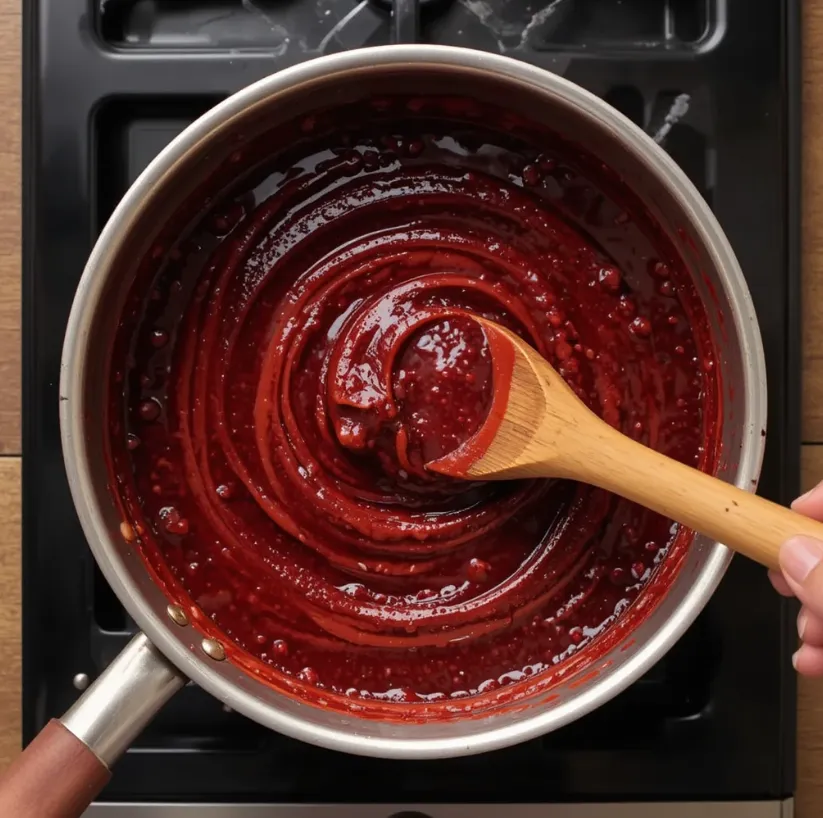
Step 2: Create the Luscious Cherry Swirl
- In a medium saucepan over medium heat, combine the cherries, sugar, and water. Cook, stirring occasionally, until the cherries break down and release their juices, about 8-10 minutes.
- Reduce heat to low. Give the cornstarch slurry a quick stir and then slowly whisk it into the cherry mixture.
- Continue to cook for 2-3 minutes, stirring constantly, until the sauce thickens noticeably and becomes glossy.
- Remove from heat, stir in the lemon juice, and let it cool completely. For a smoother sauce, you can blend it briefly with an immersion blender or leave it chunky for texture. Set aside to cool.
Step 3: Whip Up the Creamy Cheesecake Filling
- In a large bowl, using an electric mixer, beat the softened cream cheese on medium speed until it is completely smooth, creamy, and free of any lumps. This should take about 2 minutes. Scrape down the sides of the bowl.
- Add the sifted powdered sugar, vanilla extract, lemon juice, and salt. Beat on low speed until combined, then on medium until fully incorporated and smooth.
- In a separate, clean, chilled bowl, beat the cold heavy whipping cream on medium-high speed until stiff peaks form. Be careful not to overbeat into butter.
- Gently fold the whipped cream into the cream cheese mixture using a spatula. Use a slow, sweeping motion to maintain the airy volume until no white streaks remain. The mixture will be thick, fluffy, and spreadable.
Step 4: Assemble and Swirl
- Retrieve the chilled crust from the refrigerator. Spoon the cheesecake filling over the crust and spread it into an even layer.
- Dollop spoonfuls of the cooled cherry sauce over the top of the cheesecake filling.
- Using a knife, toothpick, or skewer, gently swirl the cherry dollops into the cheesecake layer. Create figure-eight or marble patterns—avoid over-mixing, or you’ll lose the beautiful swirl effect.
- Cover the dessert carefully with plastic wrap and refrigerate for at least 6 hours, but ideally overnight. This crucial chilling time allows the dessert to set firmly and the flavors to meld perfectly.
Pro Tips for a Flawless Cherry Swirl Cheesecake
- Room Temperature is Key: Ensure your cream cheese is truly soft. Cold cream cheese will result in a lumpy filling. Leave it out on the counter for 2-3 hours before starting.
- Chill Your Bowl: For faster, better whipped cream, place your mixing bowl and beaters in the freezer for 15 minutes before whipping.
- Customize Your Crust: Swap graham crackers for digestive biscuits, vanilla wafers, or even crushed Oreos (without the filling) for a different flavor profile.
- Sauce Consistency: The cherry sauce must be completely cool before swirling. A warm sauce will melt the filling and create a mess. If it’s too thick to dollop, thin it with a teaspoon of water.
- Clean Slices: For picture-perfect slices, dip your knife in hot water, wipe it dry, and then cut. Repeat for each slice.
- Fruit Variations: This recipe is versatile! Use the same method with blueberries, raspberries, or a mix of berries for the swirl.
Serving and Storing Your Masterpiece
Once fully set, run a thin knife around the edge of the springform pan before releasing the clamp. Slice, serve, and prepare for compliments! Garnish with extra cherry sauce, fresh cherries, or a dollop of whipped cream.
Store any leftovers covered tightly in the refrigerator for up to 5 days. This dessert can also be frozen for up to 2 months. Thaw overnight in the refrigerator before serving.
Conclusion: Your No-Bake Showstopper Awaits
This Cherry Swirl Cheesecake Dessert proves that you don’t need advanced baking skills or specialized equipment to create something truly extraordinary. It’s a recipe that builds confidence: a straightforward crust, a forgiving filling, and the artistic freedom of the cherry swirl. The result is a harmoniously balanced dessert where the tangy, fruity cherry perfectly complements the rich, creamy cheesecake, all resting on that signature buttery crust.
So, gather your ingredients, embrace the process, and get ready to impress your family, friends, or simply treat yourself. This no-bake cherry swirl cheesecake isn’t just a recipe; it’s your next great kitchen triumph. Don’t just dream about it make it today and share a slice of happiness!


