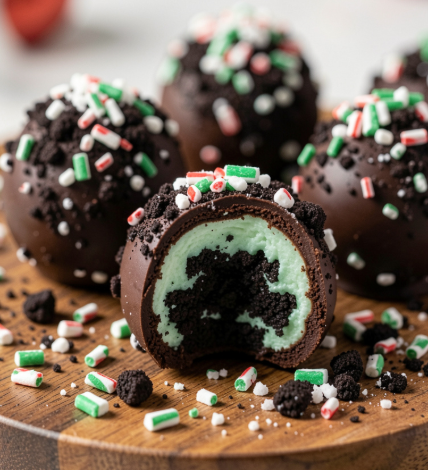
Let’s be honest, who can resist the combination of rich, chocolatey Oreos and cool, refreshing mint? It’s a match made in dessert heaven. These Mint Oreo Truffles capture that perfect pairing in a bite-sized, no-bake treat that’s dangerously easy to make. They’re incredibly rich, creamy, and have a satisfying crunch from the Oreo crust, all wrapped up in a smooth, minty chocolate coating.
What I love most about these truffles is how they look like they came from a fancy chocolate shop, yet they require absolutely no baking and just a handful of ingredients. They’re the perfect make-ahead dessert for holiday parties, cookie exchanges, or when you want to impress guests without spending hours in the kitchen.

Mint Oreo Truffles: The Ultimate No-Bake Delight
Let’s be honest, who can resist the combination of rich, chocolatey Oreos and cool, refreshing mint? It’s a match made in dessert heaven. These Mint Oreo Truffles capture
Table of Contents
Recipe Overview
- Prep Time: 20 minutes
- Chill Time: 2 hours
- Total Time: 2 hours 20 minutes
- Servings: 24-30 truffles
- Cuisine: American
- Course: Dessert
- Calories (Approximate): 120 per truffle
Why You’ll Love This Recipe
- No-Bake Simplicity: Ready with minimal effort and no oven required.
- Irresistible Flavor: The classic combination of mint and chocolate is always a crowd-pleaser.
- Make-Ahead Marvel: Perfect for holiday parties and gift-giving.
- Beautiful Presentation: These truffles look like they came from a gourmet chocolate shop.
- Kid-Friendly: A fun, easy recipe the whole family can help make.
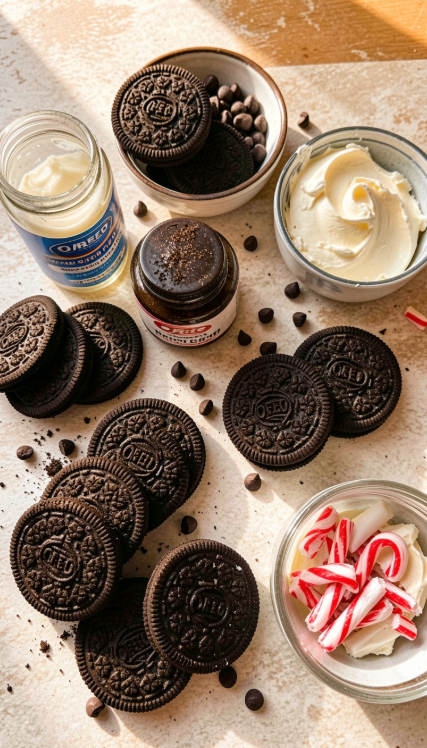
Ingredients
For the Truffles:
- 1 package (14.3 oz) Oreo cookies (about 36 cookies)
- 8 oz cream cheese, softened to room temperature
- ½ teaspoon peppermint extract
For the Coating:
- 12 oz semi-sweet chocolate chips
- 1 tablespoon coconut oil or vegetable shortening (for a glossy finish)
Optional For Decoration:
- Crushed Oreos (for garnish)
- White chocolate drizzle
- Sprinkles
- Crushed candy canes
Ingredient Notes
Oreo Cookies: Use regular Oreos for the classic flavor, or try the Mint Oreo variety for an extra minty punch. You can also use chocolate cream-filled cookies like Trader Joe’s Joe-Joe’s.
Cream Cheese: Full-fat cream cheese gives the truffles the best texture and richness. Make sure it’s softened to room temperature for easy mixing.
Peppermint Extract: A little goes a long way. Adjust to your taste preference.
Chocolate Coating: Semi-sweet chocolate chips work beautifully, but you can also use milk or dark chocolate.

Step-by-Step Instructions
1. Prepare the Oreo Crumbs
In a food processor, pulse the Oreo cookies until they form fine crumbs. If you don’t have a food processor, place the cookies in a sealed bag and crush them with a rolling pin.
2. Make the Truffle Mixture
In a large bowl, combine the Oreo crumbs, softened cream cheese, and peppermint extract. Mix until everything is well combined and a sticky dough forms.
3. Roll into Balls
Using a small cookie scoop or your hands, roll the mixture into 1-inch balls. Place them on a baking sheet lined with parchment paper.
4. Chill the Truffles
Refrigerate the truffles for at least 30 minutes to firm up. This makes them easier to dip in the chocolate coating.
5. Melt the Chocolate Coating
In a microwave-safe bowl, combine the chocolate chips and coconut oil. Microwave in 30-second intervals, stirring between each, until the chocolate is smooth and fully melted.
6. Dip the Truffles
Using a fork or dipping tool, dip each chilled truffle into the melted chocolate, allowing any excess to drip off. Place the coated truffle back on the parchment-lined baking sheet.
7. Decorate and Set
Before the chocolate sets, sprinkle with crushed Oreos, candy cane pieces, or a drizzle of white chocolate. Refrigerate until the chocolate is fully set, about 30 minutes.
Expert Tips
- Don’t Overmix: Mix the truffle ingredients just until combined. Overmixing can make the truffles dense.
- Chill Before Dipping: Chilling the truffles is essential for a smooth dipping process.
- Use a Dipping Tool: A fork or a chocolate dipping tool makes it easier to coat the truffles evenly.
- Add Coconut Oil: The coconut oil helps the chocolate set with a beautiful shine.
Variations
- White Chocolate Mint Truffles: Use white chocolate coating and add green food coloring for a festive look.
- Dark Chocolate Mint Truffles: Coat the truffles in dark chocolate for an extra intense chocolate flavor.
- Add Sprinkles: Top with festive sprinkles for holidays or special occasions.
- Make Them Gluten-Free: Use gluten-free Oreos.
Storage Instructions
Store the truffles in an airtight container in the refrigerator for up to 2 weeks. They can also be frozen for up to 3 months just thaw in the refrigerator before serving.
Reheating Tips
These truffles are best served chilled or at room temperature. No reheating is necessary.
Common Mistakes to Avoid
- Not Softening the Cream Cheese: Cold cream cheese won’t mix properly and can result in lumps.
- Skipping the Chill Time: Chilling is essential for firm truffles that are easy to dip.
- Overheating the Chocolate: Chocolate can burn easily. Microwave in short intervals.
- Using Too Much Peppermint: Peppermint extract is potent a little goes a long way.
What to Serve With
- Coffee or Espresso: The rich chocolate and mint pair beautifully with a strong coffee.
- A Glass of Milk: The classic accompaniment for any chocolate treat.
- Hot Cocoa: For a double chocolate indulgence.
Frequently Asked Questions
Q: Can I use a different cookie?
A: Yes! You can use chocolate sandwich cookies, or try a chocolate wafer cookie with a creamy filling.
Q: Can I use low-fat cream cheese?
A: Full-fat cream cheese gives the best texture, but low-fat can work in a pinch.
Q: How do I store these truffles?
A: Store them in an airtight container in the refrigerator for up to 2 weeks.
Q: Can I freeze these truffles?
A: Yes! Freeze them in an airtight container for up to 3 months.
Q: How do I get the chocolate coating smooth?
A: Add a tablespoon of coconut oil to the chocolate before melting for a glossy finish.
Q: Can I use milk chocolate instead of semi-sweet?
A: Absolutely! Use whichever chocolate you prefer.
Conclusion
These Mint Oreo Truffles are the ultimate no-bake treat. They’re rich, creamy, minty, and chocolatey all at once. They’re perfect for holidays, parties, or just because. With their simple ingredients and foolproof steps, they’re a dessert everyone can enjoy making and eating.
Have you tried making these Mint Oreo Truffles? I’d love to hear how they turned out! Share your photos, tips, and any creative variations in the comments below. Happy no-bake baking!