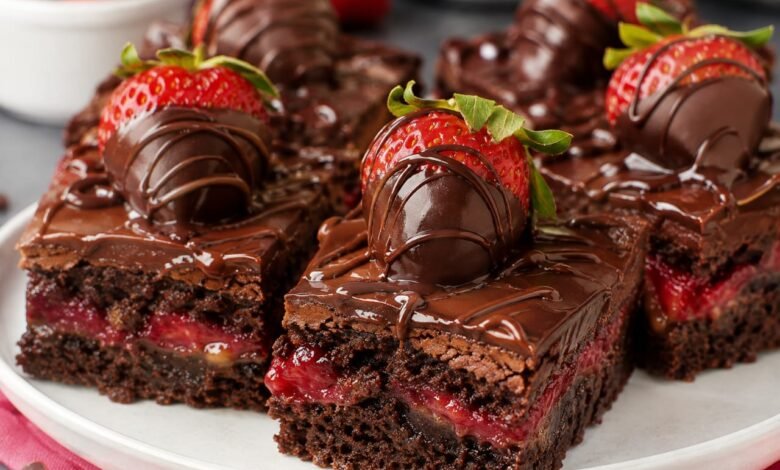
These Chocolate Covered Strawberry Brownies bring together two irresistible desserts in one beautiful treat. Each square has a rich, fudgy chocolate brownie base, a sweet homemade strawberry swirl, and a smooth chocolate ganache topping. Finish them with fresh strawberries dipped in chocolate for a dessert that looks as wonderful as it tastes.
They’re perfect for Valentine’s Day, birthdays, holidays, dinner parties, or whenever you’re craving the combination of chocolate and strawberries. Although they look impressive, each layer is made with simple ingredients and easy-to-follow steps.
Why You’ll Love These Chocolate Covered Strawberry Brownies
- Rich and fudgy: Butter, cocoa powder, and chocolate chips create a deep chocolate flavor and dense brownie texture.
- Real strawberry flavor: Homemade strawberry filling adds a fruity contrast to the chocolate.
- Beautiful finish: Silky ganache and chocolate-dipped strawberries make every square look special.
- Made from scratch: The brownie base and strawberry swirl are homemade, with no boxed brownie mix required.
- Great for sharing: Cut them into squares for parties, celebrations, or homemade gifts.
Ingredients You’ll Need
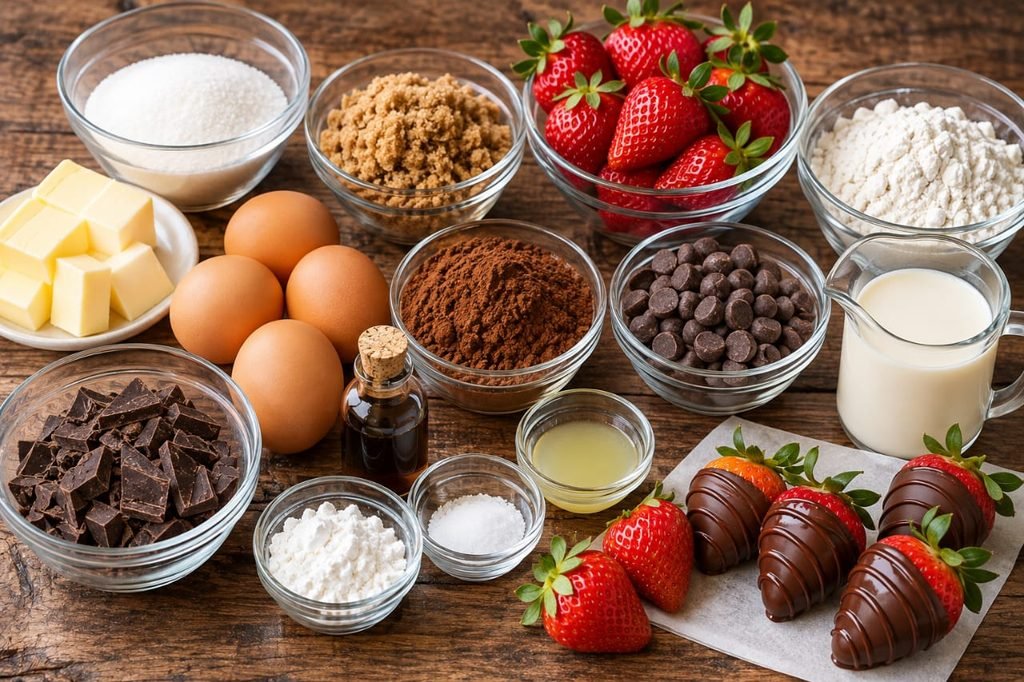
For the Fudgy Brownie Base
- 1 cup (225g) unsalted butter
- 1 1/4 cups (250g) granulated sugar
- 3/4 cup (150g) packed brown sugar
- 4 large eggs, preferably at room temperature
- 1 tablespoon pure vanilla extract
- 1 cup (125g) all-purpose flour
- 3/4 cup (90g) unsweetened cocoa powder
- 1/2 teaspoon salt
- 1 cup (175g) semi-sweet chocolate chips
For the Strawberry Swirl Filling
- 1 1/2 cups fresh strawberries, hulled and chopped
- 1/4 cup (50g) granulated sugar
- 1 tablespoon cornstarch
- 1 teaspoon lemon juice
- 1 tablespoon water, for mixing with the cornstarch
For the Chocolate Ganache
- 1/2 cup (120ml) heavy cream
- 1 cup (175g) semi-sweet or dark chocolate, finely chopped
For the Chocolate-Dipped Strawberry Topping
- 12–15 whole fresh strawberries, with stems if possible
- 1/2 cup (90g) melting chocolate or chocolate chips
Equipment
- 8-inch or 9-inch square baking pan
- Parchment paper
- Medium saucepan
- Mixing bowls
- Whisk and rubber spatula
- Heatproof bowl for the ganache
- Sharp knife for slicing
How to Make Chocolate Covered Strawberry Brownies
Step 1: Make the Strawberry Filling
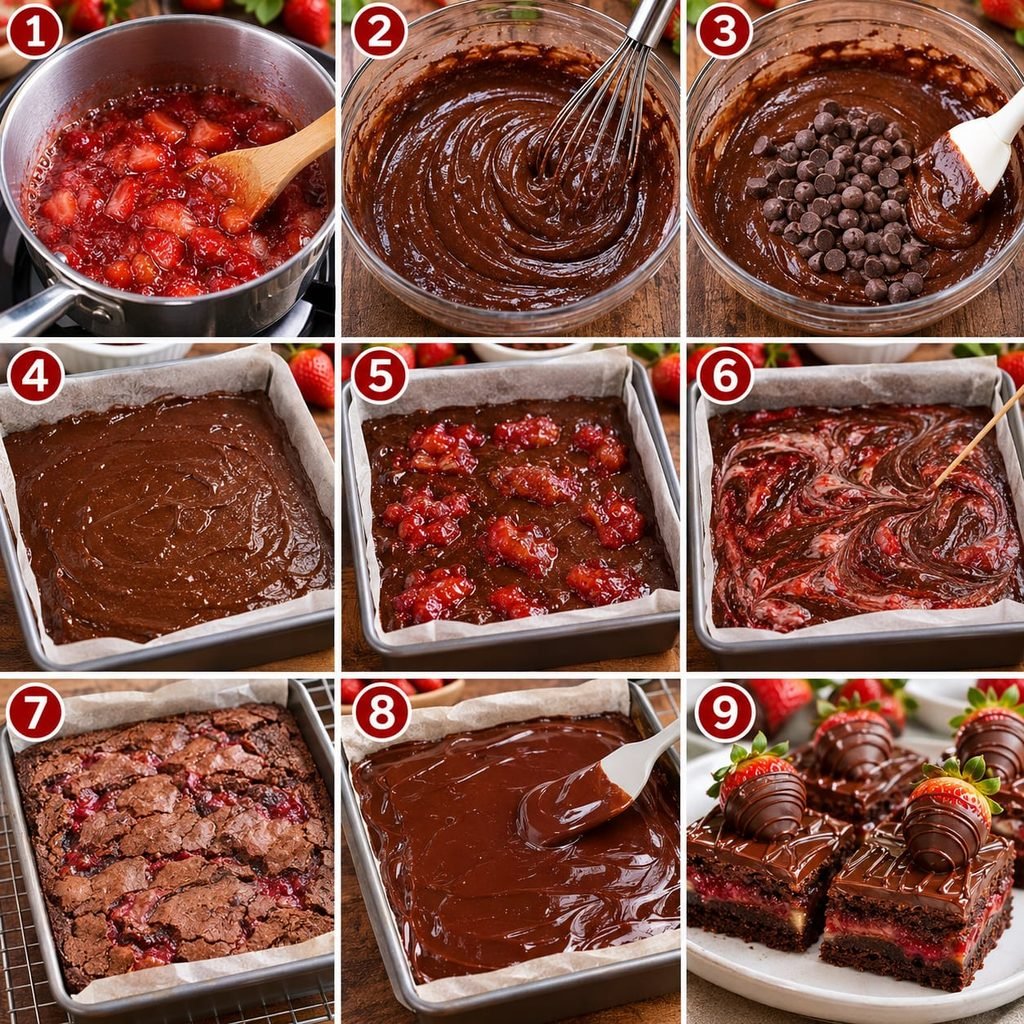
Add the chopped strawberries, granulated sugar, and lemon juice to a small saucepan. Cook over medium heat for about 8–10 minutes, stirring frequently, until the strawberries soften and release their juices.
In a small bowl, whisk the cornstarch with 1 tablespoon of water until smooth. Stir this slurry into the strawberry mixture. Continue cooking for 2–3 minutes, stirring, until the filling thickens.
Remove the pan from the heat and let the strawberry filling cool completely before using it. You can leave it slightly chunky or blend it briefly for a smoother swirl.
Step 2: Prepare the Brownie Pan and Oven
Preheat the oven to 350°F (175°C). Line an 8-inch or 9-inch square baking pan with parchment paper, leaving some overhang on two opposite sides. This makes it easier to lift out the brownies after cooling.
Step 3: Mix the Brownie Batter
Melt the butter in a microwave-safe bowl using short 30-second intervals, stirring between each interval. Transfer the melted butter to a large mixing bowl.
Add the granulated sugar and brown sugar. Whisk for 1–2 minutes until the mixture looks smooth and glossy.
Add the eggs one at a time, whisking well after each addition. Stir in the vanilla extract.
Sift the flour, cocoa powder, and salt into the wet ingredients. Gently fold with a spatula until no dry streaks remain. Avoid overmixing, which can make brownies tougher.
Fold in the semi-sweet chocolate chips until evenly distributed.
Step 4: Add the Strawberry Swirl
Spread the brownie batter evenly into the prepared pan. Spoon small portions of the completely cooled strawberry filling over the surface.
Use a butter knife or toothpick to gently swirl the filling through the batter. Make a few light passes to create a marbled pattern. Avoid mixing too much, or the strawberry filling will disappear into the chocolate batter.
Step 5: Bake the Brownies
Bake at 350°F (175°C). Begin checking around 35 minutes, allowing additional time if needed. A deeper 8-inch pan may take longer than a 9-inch pan.
To check for doneness, insert a toothpick into a chocolate-only section of the brownie, avoiding the strawberry swirl. It should come out with a few moist crumbs, but not wet brownie batter.
Let the brownies cool completely in the pan on a wire rack. Do not add the ganache while they are still warm.
Step 6: Make the Chocolate Ganache
Place the finely chopped chocolate in a heatproof bowl. Heat the heavy cream in a small saucepan until it just begins to simmer around the edges. Do not let it boil vigorously.
Pour the hot cream over the chocolate. Let it stand for 2 minutes, then stir slowly from the center outward until the ganache becomes smooth and glossy.
Allow it to cool for about 5–10 minutes, stirring occasionally, until it thickens slightly but is still easy to spread.
Step 7: Prepare the Chocolate-Dipped Strawberries
Wash the strawberries and dry them very thoroughly. Any water left on the fruit can affect how the melted chocolate coats and sets.
Melt the dipping chocolate according to the package instructions. Hold each strawberry by its stem and dip it halfway into the melted chocolate. Let excess chocolate drip off, then place the strawberry on parchment paper until the coating sets.
Step 8: Assemble and Decorate
Pour the ganache over the completely cooled brownies and spread it evenly to the edges.
Let the ganache begin to set for about 15–20 minutes. Arrange the chocolate-dipped strawberries on top. If desired, drizzle with any remaining melted chocolate.
Allow the topping to set completely. For easier slicing, refrigerate the pan for about 30 minutes or until the ganache is firm enough to cut neatly.
Step 9: Slice and Serve
Use the parchment overhang to lift the brownie slab onto a cutting board. Cut into squares with a sharp knife, wiping the blade clean between cuts.
For the prettiest presentation, add the chocolate-dipped strawberries shortly before serving.
Expert Tips for the Best Strawberry Brownies
- Cool the strawberry filling: Warm filling can soften the brownie batter and make the swirl harder to control.
- Don’t overmix: Fold the flour into the wet ingredients only until combined for a tender, fudgy texture.
- Watch the baking time: Pan size and oven differences affect how quickly the brownies bake. Look for moist crumbs rather than relying only on the clock.
- Cool before decorating: The brownie base must be completely cool before adding ganache.
- Dry the strawberries: Make sure the whole strawberries are completely dry before dipping them in chocolate.
- Use a clean knife: Wipe the blade between cuts for neat squares and visible strawberry swirls.
Common Mistakes to Avoid
- Adding runny strawberry filling: Cook it until thickened with the cornstarch slurry and let it cool completely.
- Over-swirling: Too much swirling blends the strawberry filling into the brownie batter instead of creating a visible pattern.
- Overbaking: Brownies continue to set as they cool. Remove them when a toothpick shows moist crumbs rather than wet batter.
- Pouring ganache onto warm brownies: This can make the topping runny and difficult to layer.
- Using wet strawberries: Water can interfere with the chocolate coating and make the topping less attractive.
Variations and Substitutions
- Use frozen strawberries: Thaw them first and drain excess liquid before cooking the filling. The cooking time may vary.
- Try dark chocolate: Use dark chocolate in the ganache for a less sweet, deeper chocolate flavor.
- Add a little white chocolate: Drizzle melted white chocolate over the ganache for a decorative finish.
- Make a raspberry version: Replace the strawberries in the swirl with raspberries for a tangier variation.
- Add a pinch of sea salt: A light sprinkle over the ganache can balance the sweetness.
How to Store Chocolate Covered Strawberry Brownies
Because these brownies are topped with fresh strawberries and ganache, store them in an airtight container in the refrigerator. For the best quality, enjoy them within 3–5 days.
For freezing, freeze the brownie base with the strawberry swirl before adding the fresh strawberry topping. Wrap the cooled slab or individual squares tightly and freeze for up to 3 months. Thaw in the refrigerator, then add freshly dipped strawberries before serving.
Frequently Asked Questions
Can I make Chocolate Covered Strawberry Brownies ahead of time?
Yes. You can bake the brownies and prepare the strawberry filling a day ahead. Keep the cooled brownies covered in the refrigerator, then add the ganache and chocolate-dipped strawberries closer to serving time for the freshest presentation.
How do I know when the brownies are done?
Insert a toothpick into a chocolate-only section, avoiding the strawberry swirl. It should come out with a few moist crumbs, not wet batter. The brownies will continue to set as they cool.
Can I use frozen strawberries?
Yes. Thaw the strawberries and drain excess liquid before cooking them with the sugar and lemon juice. Cook the filling until thickened before adding it to the brownie batter.
Why did my strawberry swirl disappear?
The filling may have been too thin or mixed too deeply into the brownie batter. Make sure it is fully cooled and thickened, then use only a few gentle swirling motions.
Do these brownies need to be refrigerated?
Yes. The fresh strawberry topping makes refrigeration the best storage option. Keep the brownies in an airtight container and avoid leaving them at room temperature for extended periods.
Can I make these brownies without the chocolate-dipped strawberries?
Absolutely. The brownie base, strawberry swirl, and ganache are delicious on their own. You can finish the brownies with fresh strawberry slices or a simple chocolate drizzle instead.
Final Thoughts
These Chocolate Covered Strawberry Brownies are a beautiful way to enjoy the classic pairing of chocolate and strawberries. With their fudgy brownie base, homemade strawberry swirl, glossy ganache, and chocolate-dipped fruit, they make an impressive dessert for special occasions or an indulgent weekend baking project.
Take your time with the cooling and decorating steps, cut them into neat squares, and enjoy every rich, fruity bite!