Australian Chocolate Coconut Crunch: The No-Bake Treat You’ll Crave
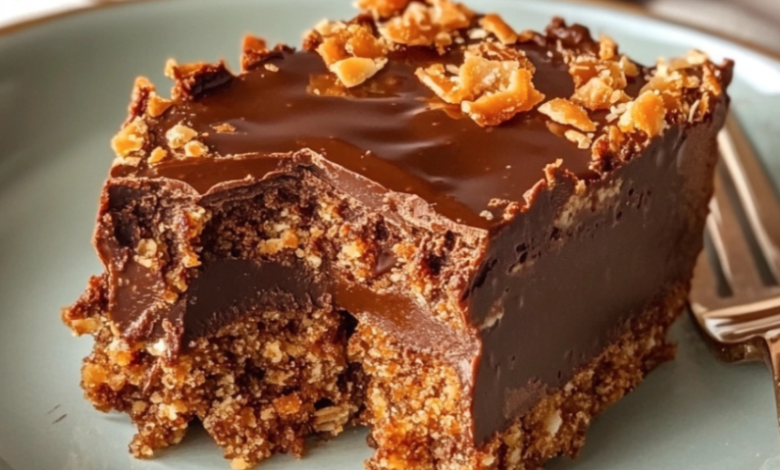
There’s a special place in the heart of Australian dessert culture for simple, no-fuss, and utterly delicious treats. Among the classics like Lamingtons and Anzac biscuits, there lies a humble yet irresistible contender: the Australian Chocolate Coconut Crunch. This no-bake slice is a symphony of textures and flavours a crisp biscuit base, a chewy coconut middle, and a rich, glossy chocolate topping. It’s the kind of treat you’ll find at school fetes, community gatherings, and in countless family recipe books across the country.
More than just a dessert, it’s a testament to the Australian love for straightforward, crowd-pleasing food. If you’re looking for a recipe that requires minimal effort but delivers maximum satisfaction, you’ve come to the right place. Let’s dive into the world of this iconic slice and create your own batch of chocolatey, crunchy heaven.
The Story Behind the Slice: A Touch of Australian Ingenuity
The exact origins of the Chocolate Coconut Crunch are delightfully, much like many heritage recipes. It belongs to a category of “slice” recipes that became incredibly popular in Australia post-World War II. With the rise of home refrigeration and the availability of convenient ingredients like sweetened condensed milk and desiccated coconut, home cooks began experimenting with no-bake desserts.
This slice is a direct descendant of that culinary innovation. It shares DNA with the beloved Cherry Ripe chocolate bar, capturing that perfect combination of coconut and dark chocolate. However, by making it at home, you control the quality of ingredients and can achieve a far superior, fresher flavour. It’s a recipe passed down through generations, a little piece of Australian culinary history you can recreate in your own kitchen.
Why This Recipe is a Guaranteed Winner
Before we get to the ingredients, it’s worth noting why this recipe has stood the test of time:
- No Baking Required: Perfect for hot summer days or for those without an oven.
- Minimal Equipment: All you need is a saucepan, a baking tin, and a bit of muscle for stirring.
- Customizable: Easily adaptable with nuts, dried fruits, or different types of chocolate.
- Crowd-Pleaser: Its universal appeal makes it a hit with both children and adults.
Australian Chocolate Coconut Crunch Recipe
This recipe yields approximately 16 squares and takes about 30 minutes of active preparation, plus several hours of chilling.
Ingredients
For the Coconut Crunch Base:
- 200g (7 oz) plain sweet biscuits (like Marie biscuits or Graham crackers)
- 1 cup (90g) desiccated coconut
- 125g (1/2 cup) unsalted butter
- 1/2 cup (110g) caster sugar (or granulated sugar)
- 2 tablespoons cocoa powder, unsweetened
- 1 egg, lightly beaten
For the Chocolate Topping:
- 200g (7 oz) dark chocolate, finely chopped (or high-quality chocolate chips)
- 1 tablespoon vegetable or coconut oil
Optional Add-ins:
- 1/4 cup chopped nuts (walnuts or pecans work well)
- 2 tablespoons sultanas or raisins
Essential Equipment
- 20cm x 20cm (8-inch x 8-inch) square baking tin
- Baking paper (for lining the tin)
- Large saucepan
- Mixing bowls
- Spatula
- Food processor or a zip-lock bag and rolling pin for crushing biscuits
Method: How to Make Your Chocolate Coconut Crunch
Step 1: Prepare the Tin and Biscuits
Start by lining your square baking tin with baking paper, leaving some overhang on two opposite sides. This “sling” will make it incredibly easy to lift the entire slice out of the tin once it’s set.
Place the plain biscuits into a food processor and pulse until you have fine crumbs. If you don’t have a processor, place the biscuits in a sturdy zip-lock bag, seal it, and crush them with a rolling pin until you achieve a consistent crumb texture.
Step 2: Toast the Coconut (The Secret Step for Maximum Flavour)
While this step is optional, it is highly recommended. Toasting the coconut unlocks a deep, nutty aroma that elevates the entire slice. Spread the desiccated coconut evenly in a dry frying pan over medium heat. Stir constantly for 2-4 minutes until it turns a beautiful golden brown. Be vigilant, as it can burn quickly. Once toasted, transfer it to a bowl immediately to stop the cooking process.
Step 3: Create the Crunch Base
In your large saucepan, melt the butter over low heat. Add the sugar and cocoa powder, and stir continuously until the mixture is smooth and begins to bubble gently. This helps dissolve the sugar.
Important: Remove the saucepan from the heat. Quickly add the lightly beaten egg to the hot butter mixture, whisking vigorously and constantly. This tempers the egg and prevents it from scrambling. Return the pan to low heat and cook for one more minute, stirring, until the mixture thickens slightly.
Take the pan off the heat again. Now, add the crushed biscuits, toasted coconut, and any optional add-ins (like nuts or sultanas). Mix thoroughly until every crumb is coated in the chocolatey butter mixture.
Step 4: Press and Set the Base
Transfer the mixture into your prepared baking tin. Use the back of a spoon or a small glass with a flat base to press the mixture down very firmly and evenly. This compacting is crucial for getting a slice that holds together well. Once pressed, place the tin in the refrigerator to chill while you prepare the topping.
Step 5: Create the Glossy Chocolate Topping
For a perfectly smooth and shiny topping, use the double boiler method. Place a heatproof bowl over a saucepan of gently simmering water, ensuring the bottom of the bowl does not touch the water. Add the chopped dark chocolate and the tablespoon of oil. The oil is the key to a glossy, easy-to-slice finish.
Stir gently until the chocolate is completely melted and smooth. Alternatively, you can melt it in the microwave in 20-second bursts, stirring between each burst.
Step 6: The Final Assembly
Remove the chilled base from the refrigerator. Pour the melted chocolate over the base and use a spatula to spread it into an even layer.
Step 7: The Final Chill
Return the tin to the refrigerator for at least 3-4 hours, or preferably overnight. This allows all the layers to set completely and the flavours to meld together.
Step 8: Slice and Serve
Once fully set, use the baking paper sling to lift the entire block of Chocolate Coconut Crunch out of the tin. Place it on a cutting board and use a large, sharp knife to slice it into squares or bars. For clean cuts, you can dip the knife in hot water and wipe it dry between each slice.
Storing Your Masterpiece
Store your Australian Chocolate Coconut Crunch in an airtight container in the refrigerator for up to one week. The cool temperature keeps the base firm and the chocolate topping perfect. It can also be frozen for up to three months—just layer the squares between baking paper in a freezer-safe container.
A Taste of Australian Sunshine
This Australian Chocolate Coconut Crunch is more than just a recipe; it’s a bite of pure, uncomplicated joy. It embodies the easy-going, flavour-forward spirit of Australian home baking. With its satisfying crunch, rich chocolate, and tropical coconut notes, it’s guaranteed to become a new favourite in your household. So, gather your simple ingredients and treat yourself to a slice of Down Under delight.
