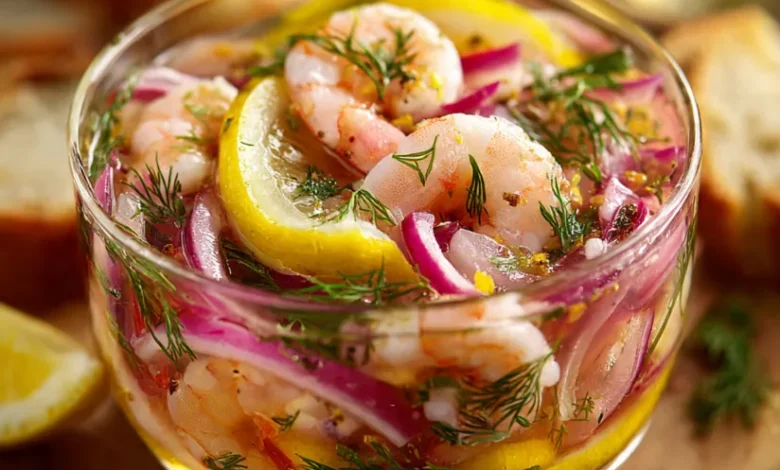
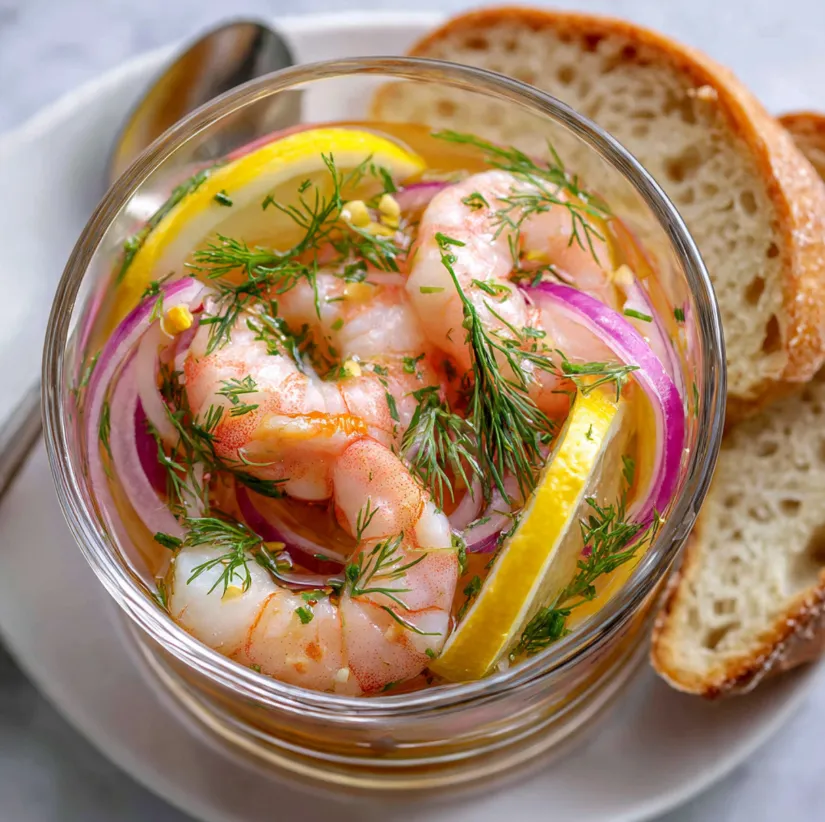
There’s a secret weapon for hosts who want to impress without stress, a dish that whispers of coastal breezes and lively conversation. It’s not a labor-intensive main course, but a vibrant, make-ahead marvel that gets better with time: Pickled Shrimp. This isn’t your average shrimp cocktail. Imagine plump, tender shrimp bathed in a zesty, aromatic brine infused with citrus, spices, and a gentle kick of heat. It’s a symphony of flavors tangy, sweet, spicy, and herbaceous all coming together in a beautiful, jewel-toned appetizer.
Perfect for potlucks, elegant starters, or a quick gourmet snack, this pickled shrimp recipe is a guaranteed crowd-pleaser. It requires minimal hands-on cooking and rewards you with a stunning, flavorful dish that showcases your culinary foresight. Let’s dive into this easy, foolproof recipe that will become a staple in your entertaining repertoire.
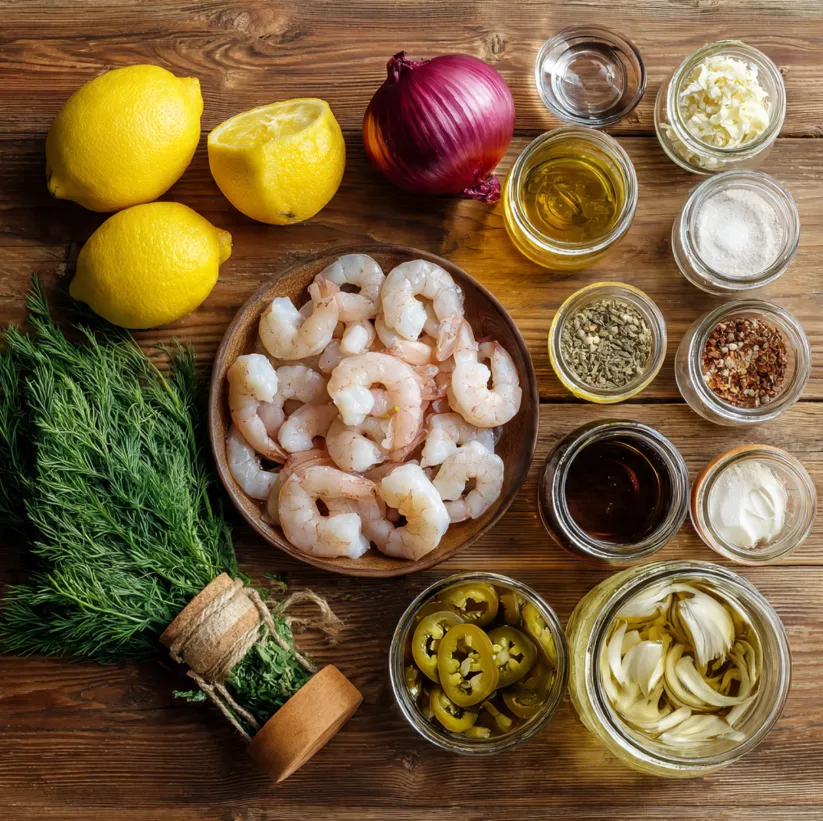
Gathering Your Ingredients for the Perfect Pickle
The magic of this recipe lies in the harmony of fresh and pantry ingredients. Using high-quality shrimp is key, but the pickle brine is where you can truly make it your own.
The Main Components
For the Shrimp:
- 1 ½ pounds large shrimp (31/40 count), peeled and deveined (tails on or off based on preference)
- 1 tablespoon Old Bay seasoning (or similar seafood seasoning)
- 1 lemon, cut into wedges
- 4 quarts water
- 2 tablespoons salt (for the boiling water)
For the Pickling Brine & Aromatics:
- 1 cup extra virgin olive oil
- ¾ cup fresh lemon juice (about 4-5 lemons)
- ½ cup apple cider vinegar (or white wine vinegar)
- 4-5 cloves garlic, thinly sliced
- 1 large red onion, thinly sliced into half-moons
- 2-3 jalapeños or serrano peppers, thinly sliced (deseed for less heat)
- 1 tablespoon whole black peppercorns
- 1 tablespoon coriander seeds
- 2-3 bay leaves
- 1 tablespoon sugar
- 1 teaspoon kosher salt (adjust to taste)
- 1 cup fresh dill, roughly chopped (plus extra for garnish)
- 1 teaspoon red pepper flakes (optional, for extra heat)
Step-by-Step Instructions for Flawless Pickled Shrimp
Follow these simple steps for perfect results every time. The process is quick, with most of the time dedicated to letting the flavors meld in the refrigerator.
Step 1: Perfectly Cook the Shrimp
- In a large pot, bring 4 quarts of water to a rolling boil. Add the 2 tablespoons of salt.
- While waiting, prepare an ice bath: fill a large bowl with cold water and ice cubes.
- Once boiling, add the shrimp and Old Bay seasoning. Cook for just 2-3 minutes, or until the shrimp are pink, opaque, and curled. They cook incredibly fast—do not overcook!
- Immediately drain the shrimp and plunge them into the ice bath to stop the cooking process. This ensures they remain tender and not rubbery. Let them cool completely for about 5 minutes, then drain well.
Step 2: Build the Flavor-Packed Brine
- In a medium saucepan, combine the olive oil, lemon juice, apple cider vinegar, garlic, peppercorns, coriander seeds, bay leaves, sugar, and 1 teaspoon salt.
- Warm the mixture over medium heat, stirring, until it just begins to simmer and the sugar dissolves. This should take about 3-4 minutes. Do not boil vigorously. The goal is to infuse the oil and blend the flavors, not cook the aromatics completely.
- Remove from heat and let it cool for 10-15 minutes.
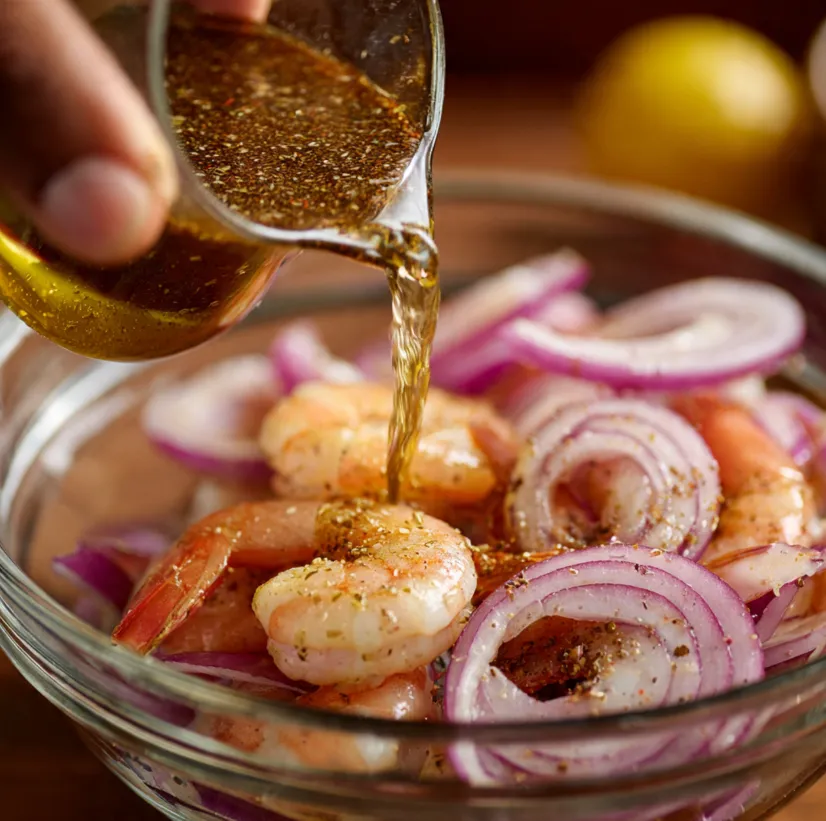
Step 3: Layer and Marinate
- In a large, non-reactive dish (glass, ceramic, or stainless steel), start layering. Place a portion of the cooled shrimp, followed by slices of red onion, jalapeño, and sprigs of dill. Repeat until all ingredients are used.
- Carefully pour the warm (not hot) brine over the layered shrimp and vegetables. Ensure everything is submerged as much as possible.
- Gently stir to combine, then cover tightly with plastic wrap or a lid.
Step 4: The Crucial Chill Time
- Refrigerate for at least 8 hours, ideally 24-48 hours. This is non-negotiable for the best flavor. The shrimp will absorb the marinade, becoming more tangy and delicious with each passing hour.
- Gently stir or shake the container once or twice during the marinating time to redistribute the brine.
Pro Tips for Pickled Shrimp Perfection
- Shrimp Selection: For the best texture, use wild-caught shrimp if available. You can use frozen raw shrimp; just thaw completely in the refrigerator before cooking.
- Safety First: Always keep the pickled shrimp refrigerated. It is not a shelf-stable, canned product. It will keep safely for 3-4 days in the fridge.
- Customize Your Brine: Love garlic? Add more! Prefer it sweeter? Add a touch more sugar. Like it fiery? Leave the jalapeño seeds in or add more red pepper flakes. This recipe is a canvas.
- Serving Suggestions: Serve chilled, straight from the fridge. Use a slotted spoon to plate it. It’s fantastic:
- As an appetizer with toothpicks or crusty bread for soaking up the brine.
- Tossed into a green salad for a protein punch.
- On top of avocado toast or crackers.
- Alongside grilled fish or chicken as a vibrant condiment.
- Presentation: For parties, consider layering the shrimp and aromatics in a large, clear glass jar or bowl for a stunning visual effect.
Conclusion: Your New Go-To Party Star
This tangy, spicy pickled shrimp recipe is more than just food; it’s an experience. It’s the promise of a hassle-free, impressive dish that allows you to enjoy your own gathering. The balance of bright citrus, pungent garlic, spicy pepper, and fresh dill creates a flavor profile that is complex yet utterly approachable.
Don’t wait for a special occasion. Make a batch this weekend. Your future self will thank you when you open the fridge to find this ready-to-eat delicacy waiting. Share it with friends, savor it as a treat, and revel in the compliments. Once you try it, this pickled shrimp will undoubtedly earn a permanent spot in your culinary playbook. Happy pickling