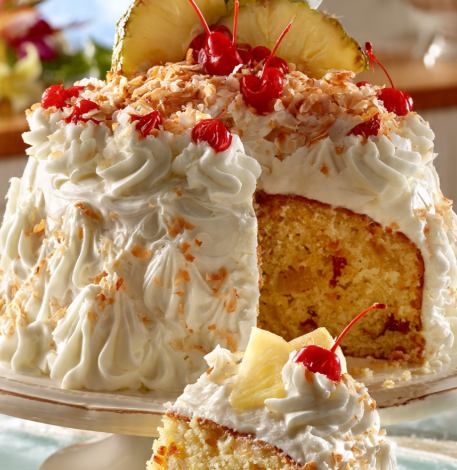
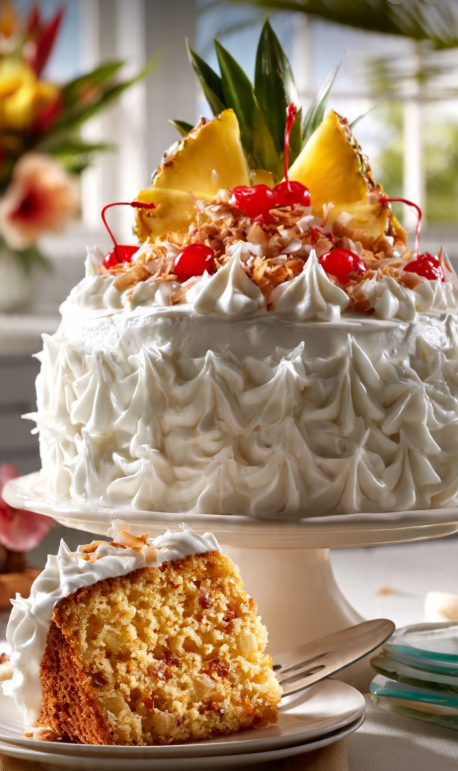
Imagine a cake so moist, so fragrant, and so bursting with tropical flavor that it transports you to a sunny beach in Hawaii with every single forkful. That is exactly what this Hawaiian Pineapple Cake delivers a taste of paradise in every bite. This beloved dessert combines the sweet, tangy brightness of crushed pineapple with the rich, buttery comfort of a perfectly baked cake, all crowned with a luscious cream cheese frosting that will have you coming back for seconds.
This cake is more than just a dessert; it is a celebration of tropical flavors that brightens any occasion. Whether you are hosting a summer barbecue, celebrating a birthday, or simply craving something sweet and sunny, this Hawaiian Pineapple Cake is the perfect choice. The pineapple not only infuses the cake with incredible flavor but also ensures an exceptionally moist, tender crumb that stays fresh for days.
Best of all, this recipe is surprisingly easy to make, even for beginner bakers. With simple ingredients, straightforward steps, and foolproof techniques, you will create a stunning, crowd-pleasing cake that looks as impressive as it tastes. The cream cheese frosting adds a tangy, creamy finish that perfectly balances the sweetness of the pineapple, creating a harmonious flavor profile that is simply irresistible.
Get ready to bring a little island sunshine into your kitchen. This Hawaiian Pineapple Cake is guaranteed to become your new favorite dessert!
Table of Contents
Recipe Overview: Quick Facts
Before we dive into the ingredients and instructions, here is a quick overview of what to expect:
| Category | Details |
|---|---|
| Prep Time | 20 minutes |
| Cook Time | 35-40 minutes |
| Total Time | 1 hour (plus cooling time) |
| Servings | 12-16 slices |
| Difficulty | Easy (Beginner-Friendly) |
| Equipment | Mixing bowls, electric mixer, 9×13-inch baking pan or two 9-inch round cake pans |
Ingredients You Will Need
This recipe uses simple, pantry-friendly ingredients that come together to create something truly spectacular. The star, of course, is the crushed pineapple, which provides both incredible flavor and moisture.
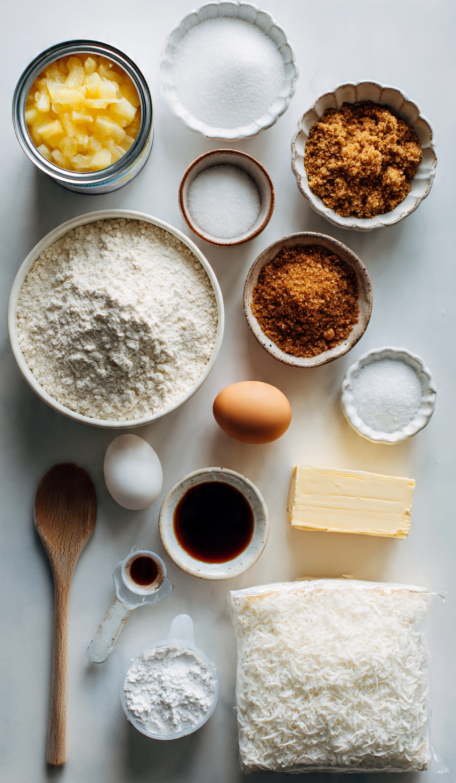
For the Hawaiian Pineapple Cake:
- 2 cups (250g) all-purpose flour
- 1½ cups (300g) granulated sugar
- ½ cup (100g) light brown sugar, packed
- 1 teaspoon baking soda
- ½ teaspoon baking powder
- ½ teaspoon salt
- 1 cup (226g) unsalted butter, softened to room temperature
- 4 large eggs, at room temperature
- 1 teaspoon vanilla extract
- 1 can (20 ounces) crushed pineapple in juice (do not drain—you will use the entire can)
- ½ cup (120ml) buttermilk (or ½ cup milk with ½ tablespoon lemon juice, rested for 5 minutes)
For the Cream Cheese Frosting:
- 8 oz (226g) cream cheese, softened to room temperature
- ½ cup (113g) unsalted butter, softened to room temperature
- 4 cups (480g) powdered sugar, sifted
- 1 teaspoon vanilla extract
- Pinch of salt
For the Garnish (Optional but Highly Recommended):
- 1 cup sweetened shredded coconut, toasted
- Fresh pineapple slices or chunks
- Maraschino cherries
- Toasted macadamia nuts, chopped
Step-by-Step Instructions: How to Make Hawaiian Pineapple Cake
Follow these detailed, beginner-friendly steps to create the perfect tropical cake. This recipe is designed to be simple and foolproof.

Step 1: Prepare Your Pans and Preheat the Oven
Preheat your oven to 350°F (175°C). Grease and flour a 9×13-inch baking pan, or grease two 9-inch round cake pans and line the bottoms with parchment paper. Proper pan preparation ensures your cake releases easily after baking.
Step 2: Mix the Dry Ingredients
In a medium bowl, whisk together the all-purpose flour, baking soda, baking powder, and salt. Set this dry mixture aside. Whisking ensures the leavening agents are evenly distributed throughout the flour.
Step 3: Cream the Butter and Sugars
In a large mixing bowl, using an electric hand mixer or a stand mixer fitted with the paddle attachment, beat the softened butter, granulated sugar, and brown sugar together on medium speed until light, fluffy, and pale in color. This should take about 3-4 minutes. The creaming process is important—it incorporates air into the batter, which helps the cake rise and gives it a tender texture.
Step 4: Add the Eggs and Vanilla
Add the eggs one at a time, beating well after each addition and scraping down the sides of the bowl with a spatula as needed. Add the vanilla extract and beat until combined. The batter should look smooth and creamy.
Step 5: Alternate Adding Dry Ingredients and Buttermilk
With the mixer on low speed, add the dry ingredients in three additions, alternating with the buttermilk in two additions. Begin and end with the dry ingredients. Mix just until combined after each addition. Do not overmix the batter—overmixing can develop gluten and result in a dense, tough cake. The batter will be thick and smooth.
Step 6: Fold in the Crushed Pineapple
This is the star of the show! Add the entire can of crushed pineapple (including the juice) to the batter. Using a rubber spatula, gently fold the pineapple into the batter until just incorporated. Be careful not to overmix—some streaks are okay. The juice from the pineapple adds incredible moisture and flavor.
Step 7: Bake the Cake
Pour the batter evenly into your prepared pan(s). Smooth the top with a spatula. Bake in the preheated oven for:
- 9×13-inch pan: 35-40 minutes
- Two 9-inch round pans: 30-35 minutes
The cake is done when a toothpick inserted into the center comes out clean or with just a few moist crumbs. The top should be golden brown and spring back when lightly touched.
Step 8: Cool Completely
Remove the cake from the oven and let it cool in the pan on a wire rack for 15 minutes. If using round pans, carefully run a knife around the edges and turn the cakes out onto the rack to cool completely. If using a 9×13-inch pan, let the cake cool completely in the pan. It is essential that the cake is completely cool before frosting to prevent the cream cheese frosting from melting.
Step 9: Make the Cream Cheese Frosting
While the cake is cooling, prepare the frosting. In a large bowl, beat the softened cream cheese and butter together on medium speed until smooth, creamy, and free of lumps (about 2-3 minutes). Gradually add the sifted powdered sugar, 1 cup at a time, beating on low speed initially and then increasing to medium speed. Add the vanilla extract and a pinch of salt. Beat until the frosting is light, fluffy, and spreadable. If the frosting is too thick, add 1 tablespoon of milk; if too thin, add more powdered sugar.
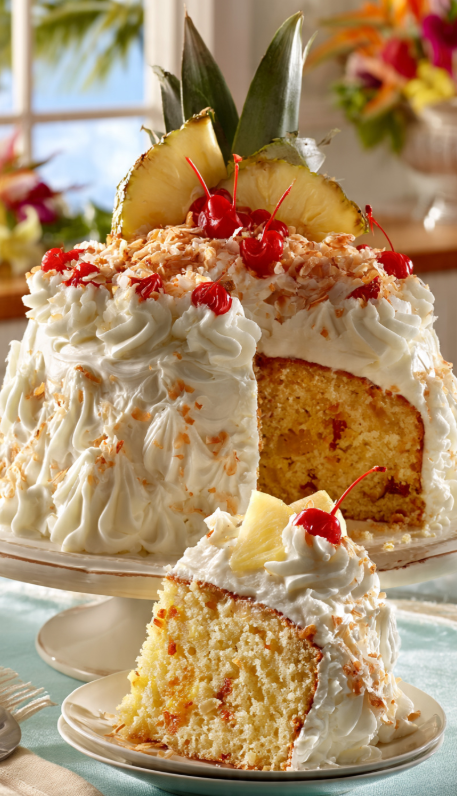
Step 10: Frost and Garnish
Spread the cream cheese frosting generously over the cooled cake. For a 9×13-inch cake, simply spread the frosting evenly over the top. For a layer cake, place one round cake on a serving plate, spread a layer of frosting, top with the second cake, and frost the top and sides.
Toast the shredded coconut in a dry skillet over medium heat for 2-3 minutes, stirring frequently, until golden and fragrant. Sprinkle the toasted coconut over the top of the frosted cake. Garnish with fresh pineapple slices, maraschino cherries, and chopped macadamia nuts for that beautiful tropical presentation.
6 Essential Tips for the Perfect Hawaiian Pineapple Cake
Follow these expert tips to ensure your cake turns out absolutely perfect every time:
- Use Room Temperature Ingredients: This is crucial for a smooth, well-emulsified batter. Take your butter, eggs, and buttermilk out of the refrigerator about 1 hour before baking. Cold ingredients can cause the batter to curdle and result in a dense cake.
- Do Not Drain the Pineapple: The juice in the crushed pineapple is packed with flavor and moisture. Using the entire can ensures a supremely moist cake. Trust the process—the batter will be wet, but that is exactly what you want for a tender crumb.
- Don’t Overmix the Batter: Once you add the flour and pineapple, mix only until combined. Overmixing develops gluten, which can make the cake tough and chewy instead of light and tender. Fold the pineapple in gently.
- Toast Your Coconut: Toasting the shredded coconut is a game-changer. It brings out the natural oils and nutty flavor, adding texture and depth to the cake. Watch it closely, as it can burn quickly.
- Cool Completely Before Frosting: Cream cheese frosting is soft and delicate. If the cake is even slightly warm, the frosting will melt, slide off, and become a runny mess. Patience is key—allow ample cooling time.
- Store Properly: Because of the cream cheese frosting, this cake must be stored in the refrigerator. However, bring it to room temperature for about 30 minutes before serving to enjoy the full flavor and soft texture.
Delicious Variations to Try
This versatile recipe welcomes creative twists. Here are some delicious variations to explore:
- Pineapple Coconut Cake: Add ½ cup of shredded coconut to the cake batter for extra coconut flavor and texture.
- Pineapple Upside-Down Cake Style: Arrange pineapple rings and maraschino cherries in the bottom of a buttered and sugared pan before pouring the batter over the top. Bake and invert for a classic twist.
- Citrus Kick: Add the zest of one lime or orange to the batter and frosting for a bright, citrusy flavor that complements the pineapple beautifully.
- Nutty Crunch: Fold ½ cup of chopped macadamia nuts or pecans into the batter for added texture and nutty flavor.
- Gluten-Free Option: Substitute the all-purpose flour with a high-quality 1:1 gluten-free baking flour blend.
Storage and Make-Ahead Guide
This Hawaiian Pineapple Cake is perfect for making ahead of time. Here is how to store it properly:
- Refrigeration: Store the frosted cake in an airtight container in the refrigerator for up to 5 days. The cake actually becomes more moist and flavorful over time as the pineapple flavors meld.
- Freezing (Unfrosted): Wrap the cooled cake layers (unfrosted) tightly in plastic wrap, then in aluminum foil, and freeze for up to 3 months. Thaw overnight in the refrigerator before frosting.
- Freezing (Frosted): Place the frosted cake in the freezer until the frosting is firm (about 2 hours), then wrap tightly in plastic wrap and foil. Freeze for up to 2 months. Thaw in the refrigerator overnight.
- Serving Tip: Bring refrigerated cake to room temperature for 20-30 minutes before serving to allow the flavors to fully develop and the frosting to soften.
Why This Hawaiian Pineapple Cake is a Must-Try
This recipe has earned its place as a beloved classic for many reasons:
- Incredible Moisture: The crushed pineapple ensures an exceptionally moist, tender crumb that stays fresh for days.
- Perfect Balance of Flavors: The sweet, tangy pineapple paired with the rich, tangy cream cheese frosting creates a perfectly balanced dessert.
- Beginner-Friendly: With simple, clear instructions and common ingredients, this cake is accessible to bakers of all skill levels.
- Beautiful Presentation: The vibrant garnishes make this cake a stunning centerpiece for any table.
- Crowd-Pleaser: The tropical flavors appeal to all ages and are perfect for any celebration or casual gathering.
Conclusion: Bring a Taste of Paradise to Your Table
This Hawaiian Pineapple Cake is more than just a dessert—it is an experience. Every bite is a delightful escape to a tropical paradise, with the sweet, juicy pineapple, the soft, buttery cake, and the luscious cream cheese frosting coming together in perfect harmony. Whether you are celebrating a special occasion, hosting a summer gathering, or simply treating yourself to something wonderful, this cake delivers happiness with every slice.
The best part? It is incredibly easy to make, even for beginner bakers. With simple ingredients, straightforward steps, and tips to ensure success, you can confidently create a cake that looks and tastes like it came from a professional bakery. The vibrant, tropical garnishes of toasted coconut, fresh pineapple, and cherries add a beautiful finishing touch that will impress your family and friends.
So, why wait? Bring a little island sunshine into your kitchen today. This recipe is guaranteed to become a favorite in your dessert repertoire, a go-to for any occasion that calls for something special, sweet, and truly unforgettable.
I would love to see your Hawaiian Pineapple Cake creations! Share your photos, your successes, and any creative twists you added in the comments below. Your stories and feedback inspire our community. Now, go ahead and bake your way to paradise!
Hawaiian Pineapple Cake: A Taste of Step-by-Step
Imagine a cake so moist, so fragrant, and so bursting with tropical flavor that it transports you to a sunny beach in Hawaii with every single forkful. That
For the best results, prep the ingredients ahead of time and control the heat gradually while cooking. This helps improve texture, flavor balance, and overall consistency.
You can also customize the recipe based on what you have on hand while keeping the seasoning balanced. Serve it with a light side dish and store leftovers in an airtight container for easy reheating.
FAQ
Can I make Hawaiian Pineapple Cake: A Taste of ahead of time?
Yes. Prep components in advance and store them separately if possible. Reheat gently and add a splash of liquid (broth, water, or milk) to restore the texture before serving.
How do I store leftover Hawaiian Pineapple Cake: A Taste of?
Let it cool, then store in an airtight container in the fridge. It typically keeps well for 3–4 days. Reheat slowly to avoid drying out or splitting sauces.
Can I freeze Hawaiian Pineapple Cake: A Taste of?
Often yes. Cool completely, freeze in freezer-safe containers, then thaw overnight in the fridge. Some creamy sauces may change texture slightly—stir well while reheating.
What are the best substitutions for Hawaiian Pineapple Cake: A Taste of?
Swap proteins, use a dairy-free alternative, or change the pasta/rice depending on your needs. Taste and adjust seasoning after substitutions to keep flavors balanced.
What should I serve with Hawaiian Pineapple Cake: A Taste of?
Pair it with a fresh salad, garlic bread, roasted vegetables, or a light soup. A crunchy or acidic side helps balance rich flavors.
{“@context”:”https:\/\/schema.org”,”@type”:”FAQPage”,”mainEntity”:[{“@type”:”Question”,”name”:”Can I make Hawaiian Pineapple Cake: A Taste of ahead of time?”,”acceptedAnswer”:{“@type”:”Answer”,”text”:”Yes. Prep components in advance and store them separately if possible. Reheat gently and add a splash of liquid (broth, water, or milk) to restore the texture before serving.”}},{“@type”:”Question”,”name”:”How do I store leftover Hawaiian Pineapple Cake: A Taste of?”,”acceptedAnswer”:{“@type”:”Answer”,”text”:”Let it cool, then store in an airtight container in the fridge. It typically keeps well for 3\u20134 days. Reheat slowly to avoid drying out or splitting sauces.”}},{“@type”:”Question”,”name”:”Can I freeze Hawaiian Pineapple Cake: A Taste of?”,”acceptedAnswer”:{“@type”:”Answer”,”text”:”Often yes. Cool completely, freeze in freezer-safe containers, then thaw overnight in the fridge. Some creamy sauces may change texture slightly\u2014stir well while reheating.”}},{“@type”:”Question”,”name”:”What are the best substitutions for Hawaiian Pineapple Cake: A Taste of?”,”acceptedAnswer”:{“@type”:”Answer”,”text”:”Swap proteins, use a dairy-free alternative, or change the pasta\/rice depending on your needs. Taste and adjust seasoning after substitutions to keep flavors balanced.”}},{“@type”:”Question”,”name”:”What should I serve with Hawaiian Pineapple Cake: A Taste of?”,”acceptedAnswer”:{“@type”:”Answer”,”text”:”Pair it with a fresh salad, garlic bread, roasted vegetables, or a light soup. A crunchy or acidic side helps balance rich flavors.”}}]}